|
|
Post by indy on Jun 30, 2015 22:57:18 GMT -5
I've never seen this level of detail in this kit. Off the chart great. Thanks for posting these pics. Yeah, what he said. Now I must go pick my jaw off of the floor! Jordan |
|
|
|
Post by florida70bee on Jun 30, 2015 23:21:15 GMT -5
i'm still trying to figure out how you did the air scoop. duane Duane, Ill try to explain as best I can.. To make the air intake/scoop I did the following: Intake 1st made the air intake out of 1 large aluminum tube and 4 smaller ones centered over each of the 4 injector openings 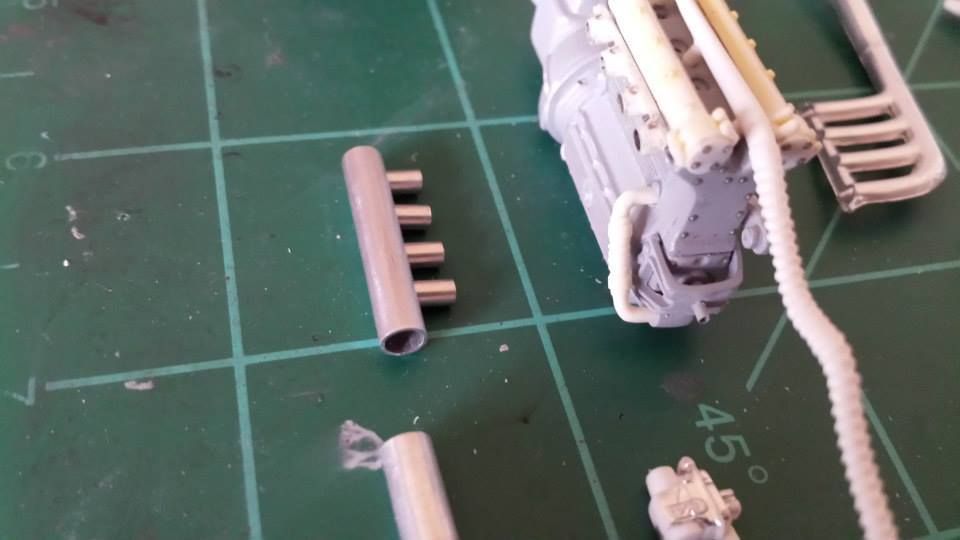 Used the large aluminum tubing I made the intake with and cut 2 small tube rings.. and then set them aside 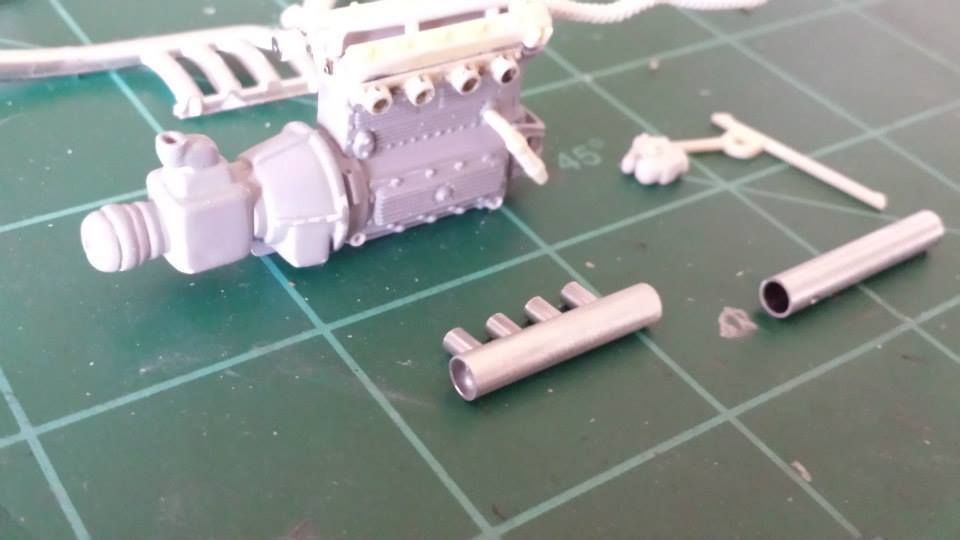 Mocked intake on partially assembled engine 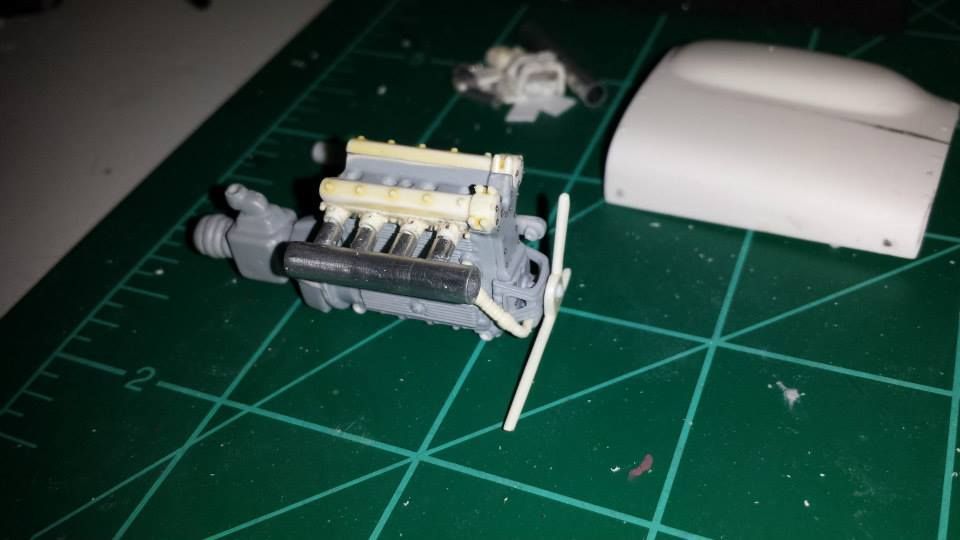 Mocked engine in chassis with aluminum intake. Sandwiched 3 pieces of sheet plastic together with super glue and drew a pattern out on the sheet plastic to the approximate shape for the air scoop. in relation to the scoop opening in the nose-cone Sanded the pattern to the shape I wanted 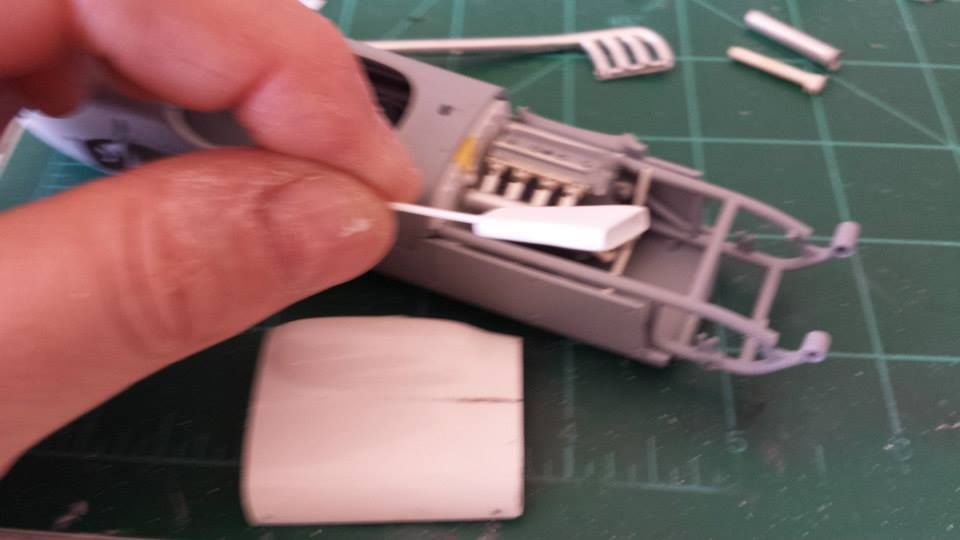 Took one of he large rings I cut previously and glued to to the back of the scoop (this end will fit on the large intake aluminum tube) Then filled in the gaps on the intake side of the scoop with super glue.. Sanded the scoop smooth and drill out the openings with a dremel on both the intake and nose-cone side of the scoop. Took some plastic tube stuck it inside the large aluminum intake tube for a place to mount the scoop on to the intake Took the second aluminum ring and fit it on the aluminum intake tube. mounted the scoop on the intake tube. 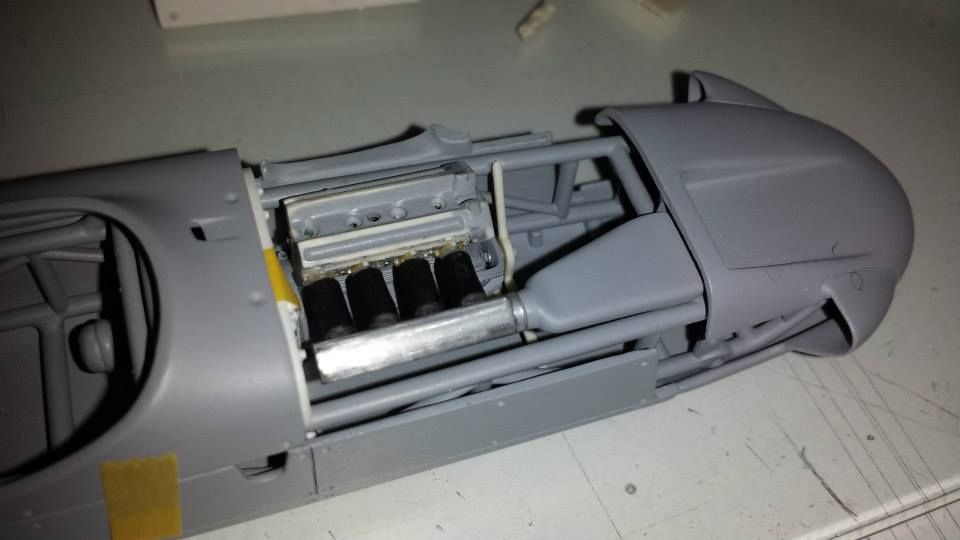 Hopefully that give you an idea of what I did .. |
|
|
|
Post by florida70bee on Jun 30, 2015 23:33:26 GMT -5
I think I've seen this on Facebook. Fantastic work! Thank you Michael! Yes it has been on Facebook. Your replacement parts and decals were the main inspiration for me trying this build in the first place! Thanks again for all you do! |
|
|
|
Post by florida70bee on Jun 30, 2015 23:51:00 GMT -5
I've never seen this level of detail in this kit. Off the chart great. Thanks for posting these pics. Yeah, what he said. Now I must go pick my jaw off of the floor! Jordan Thanks everyone! I'm glad you all enjoyed the photos! I was hoping I would get this one done for the IPMS Nationals next month in Columbus Ohio as I am making the trip up from FL. But it will have to wait until next years nationals in Columbia SC as I still have lots to do.. |
|
|
|
Post by Calvin on Jul 1, 2015 0:43:15 GMT -5
I'm glad you joined! This has turned into once heck of an entertaining thread!
|
|
|
|
Post by alterrenner on Jul 1, 2015 5:08:36 GMT -5
About the air scoop: at what point did you sprinkle the magic real dust on it?
--Frank
|
|
Deleted
Deleted Member
Posts: 0
|
Post by Deleted on Jul 1, 2015 16:15:22 GMT -5
Very special little piece of jewelry! The entire thing is very, very impressive.
|
|
|
|
Post by 2lapsdown on Jul 1, 2015 16:34:49 GMT -5
Very special little piece of jewelry! The entire thing is very, very impressive. That about sums it up for me too John |
|
|
|
Post by jamesharvey on Jul 10, 2015 8:02:48 GMT -5
This is the first model of this car that got the scoop right. Good for you. I built mine years ago according to the kit instructions. I later saw photos that showed how much was missing. I am glad for you and for giving us a chance to see what you did.
Jim
|
|
|
|
Post by florida70bee on Jul 10, 2015 21:29:46 GMT -5
This is the first model of this car that got the scoop right. Good for you. I built mine years ago according to the kit instructions. I later saw photos that showed how much was missing. I am glad for you and for giving us a chance to see what you did. Jim Thank you Jim! I'm glad you liked it. I did not realize that there was a ram air scoop until another indy enthusiast pointed it out to me. I then tried to find pictures of the scoop which I could not find any. But I did find some diecast model pictures of ole' calhoun and saw how the scoop was set up. I assume the scoop was only used at indy or other high speed tracks and typical injector stacks were used on short tracks... |
|
|
|
Post by flashman on Jul 13, 2015 11:42:02 GMT -5
Andy, Just have to add my appreciation of your fabulous work on this model, and how much I'm enjoying following along. I am also currently building (very slowly!  ) this kit using Calvin's nosecone/windscreen upgrade and the Indycals tires and decals. I am not doing any extra internal detailing, mainly because I will be closing up the body panels to even out all the seams before doing the body paint. I am using Calvin's 2014 WIP and Russ Bundy's 2009 WIP ( mb2501.proboards.com/thread/1692) as guides for my build. I had read about the inner scoop to the injectors and remember seeing at least one photo somewhere of how it looked, but can't remember where or whether the photo was of the real car or a model someone had made. The odd thing I wanted to point out is the photo at the top of Russ's above WIP shows the scoop in the nosecone of the restored car, but it looks like the inner scoop to the injectors is not there (at least when that photo was taken). That was how I was planning to do my model, but yours may have inspired me to try at least simulating the inner scoop, since the opening in the resin nose is so prominent. Keep up the great work, and looking forward to your completed jewel! Cameron |
|
|
|
Post by jamesharvey on Jul 13, 2015 18:39:56 GMT -5
Look at Karl Ludvigsen's "Indy Cars of the 1960." Page 26 has a picture showing a frontal view. It shows that what Andy did is just spot on.
Good luck, Jim.
|
|
|
|
Post by florida70bee on Jul 15, 2015 14:26:03 GMT -5
Andy, Just have to add my appreciation of your fabulous work on this model, and how much I'm enjoying following along. I am also currently building (very slowly!  ) this kit using Calvin's nosecone/windscreen upgrade and the Indycals tires and decals. I am not doing any extra internal detailing, mainly because I will be closing up the body panels to even out all the seams before doing the body paint. I am using Calvin's 2014 WIP and Russ Bundy's 2009 WIP ( mb2501.proboards.com/thread/1692) as guides for my build. I had read about the inner scoop to the injectors and remember seeing at least one photo somewhere of how it looked, but can't remember where or whether the photo was of the real car or a model someone had made. The odd thing I wanted to point out is the photo at the top of Russ's above WIP shows the scoop in the nosecone of the restored car, but it looks like the inner scoop to the injectors is not there (at least when that photo was taken). That was how I was planning to do my model, but yours may have inspired me to try at least simulating the inner scoop, since the opening in the resin nose is so prominent. Keep up the great work, and looking forward to your completed jewel! Cameron Thank you Cameron and everyone else who is enjoying the build. I had no idea it would be this well received! Anyway I had to set the model aside for the next 2 weeks until I get back from the IPMS Nationals in Columbus. |
|
|
|
Post by clm1545 on Jul 15, 2015 15:54:58 GMT -5
This thing is just over the top good, Andy. You are getting hard to like  |
|
|
|
Post by 2lapsdown on Jul 15, 2015 16:00:40 GMT -5
This WIP definitely moved the needle as far as builds go.
John
|
|
|
|
Post by lance on Jul 15, 2015 20:03:44 GMT -5
This has been a lot of fun to watch, great build.
|
|
|
|
Post by florida70bee on Jan 25, 2016 0:40:55 GMT -5
(Update 1/23/16: Fixed the picture links)I haven't worked on the Indy Roadster in several months. But in the last couple of weeks I decided to hinge the hood (or bonnet for those in the UK) like the original car. So with a large Model Car Garage photo-etched piano hinge, some cutting and LOTS of sanding here is what I came up with.... Model Car Garage large piano hinge that will be the basis for the hinged hood. 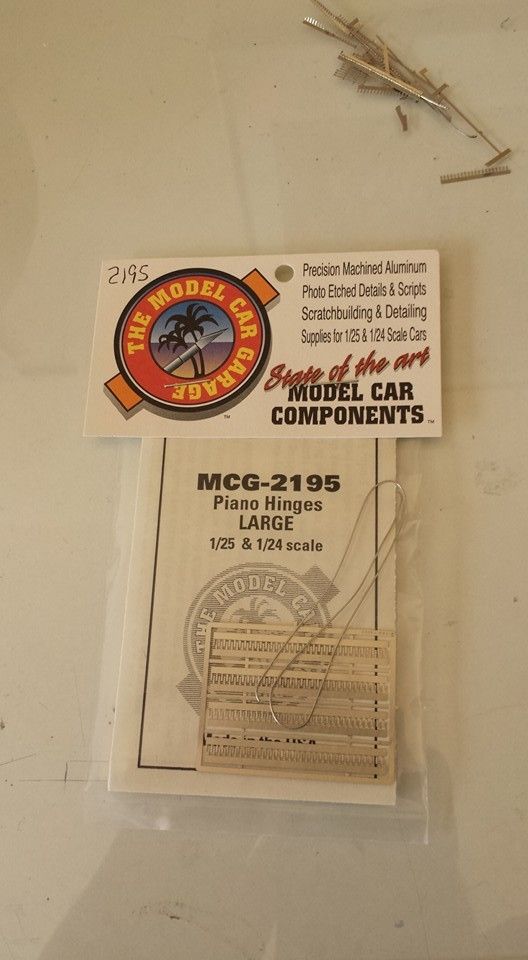 By taking my time and the 2 photoetched hinged parts are wrapped around the included wire 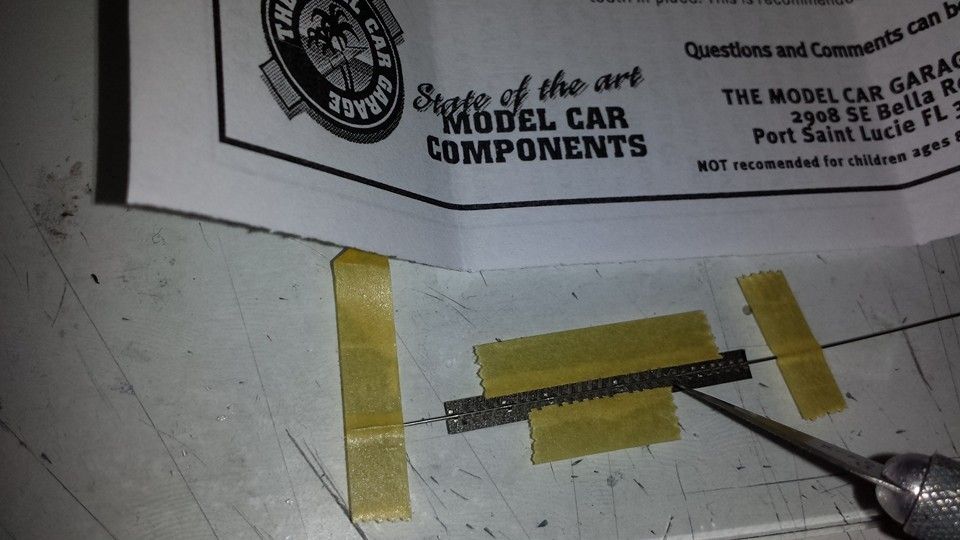 Completed photo-etched hinge is laid on top of the hood. 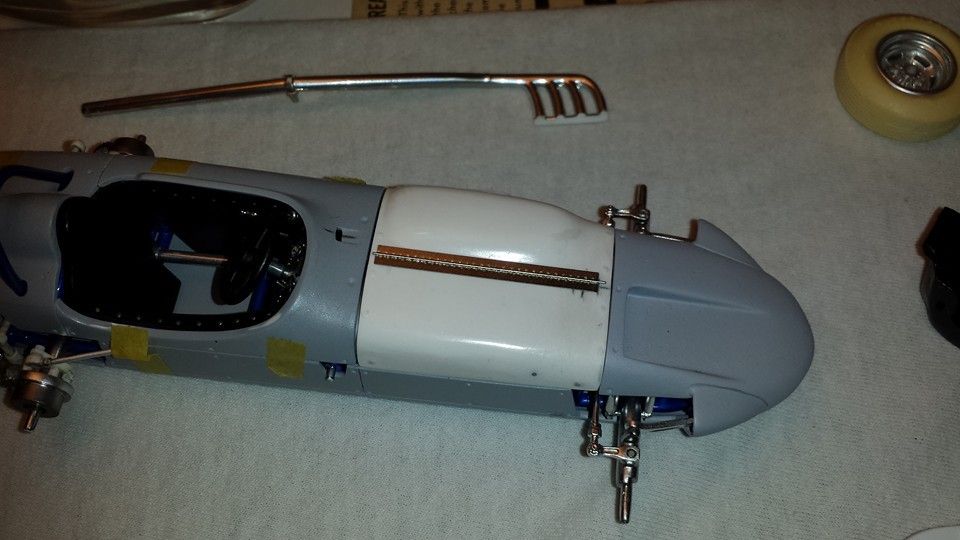
|
|
|
|
Post by florida70bee on Jan 25, 2016 0:43:57 GMT -5
I had measured several times to find the center line of the hood. This where I will cut the hood in half using a razor blade. Once cut in half the hinge will be fitted to the hood pieces from the underside. 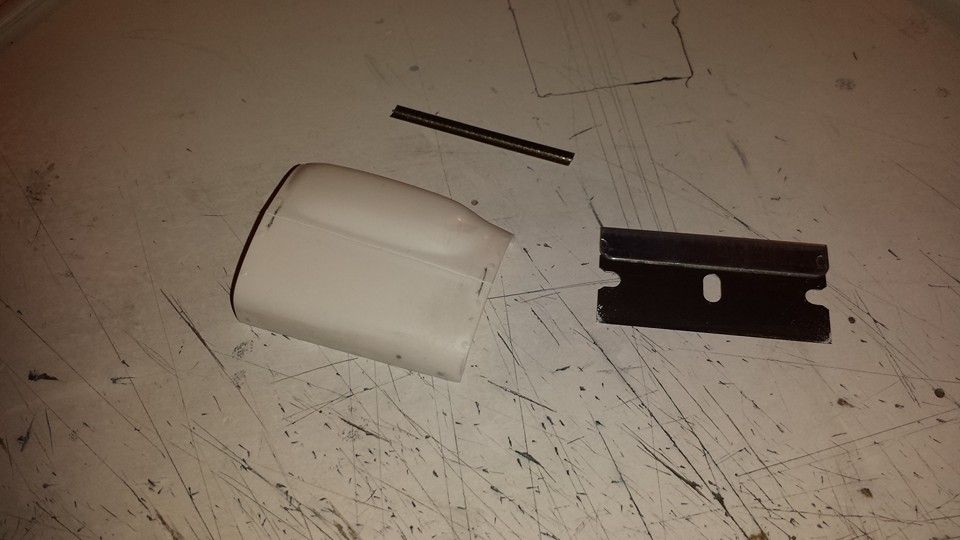 Hood is cut on half and one side is sanded from the underside and taped in place. This looks like it will work! 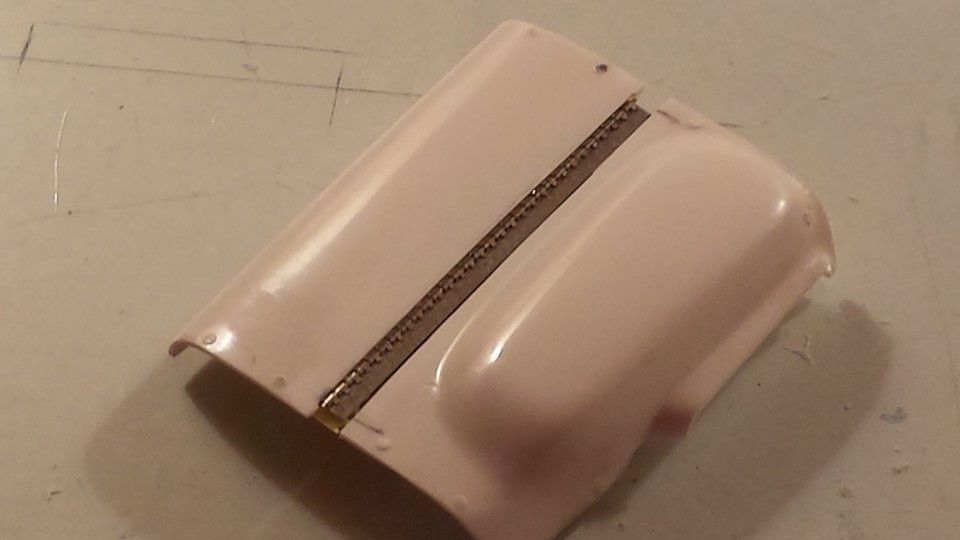 After a day of sanding, fitting and drilling indentations where the dzus fasteners will god the hood half ' s are ready to be attached to the photo-etched hinge. 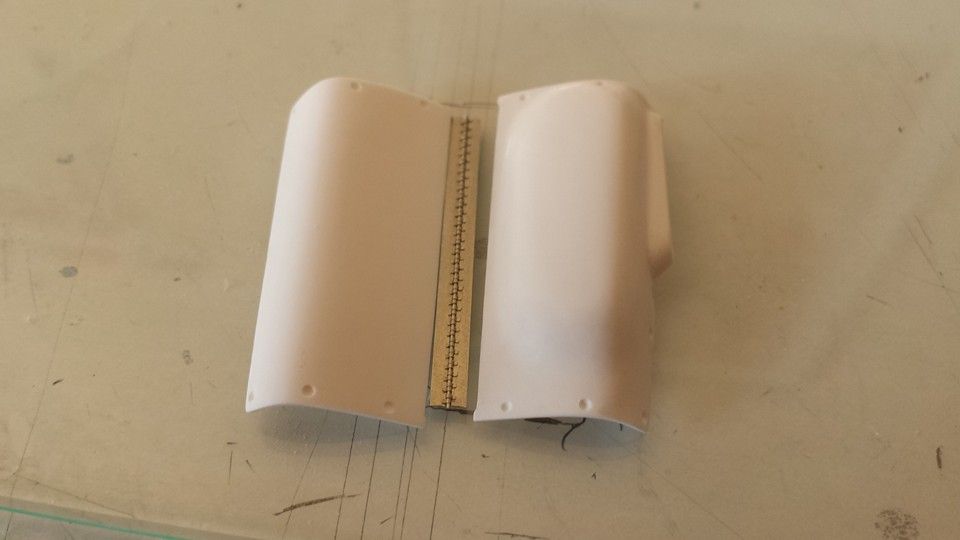 |
|
|
|
Post by florida70bee on Jan 25, 2016 0:46:12 GMT -5
Hinge is attached very carefully to the underside of the hood using slow curing CA glue. 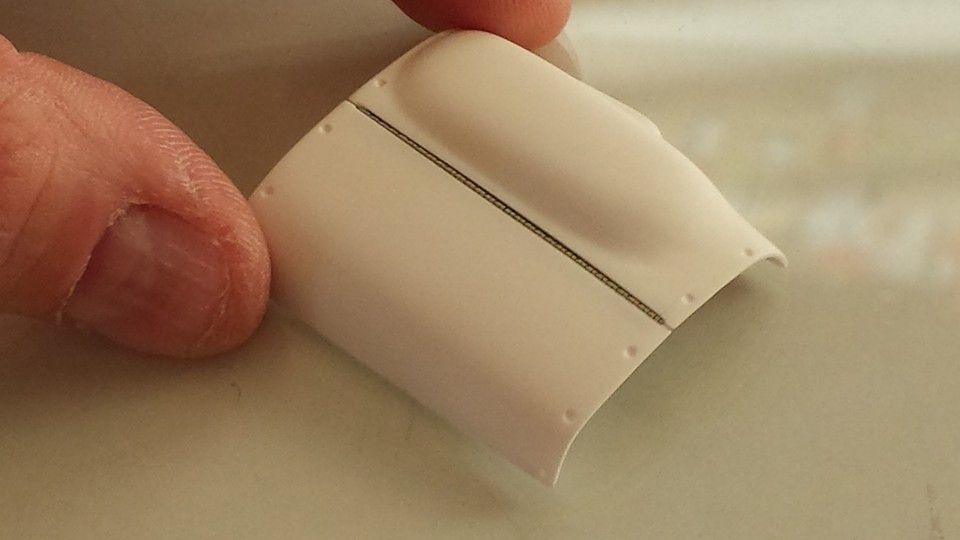 I did a bunch of sanding to the underside of the the hood as well. Looks clean with the hinge attached. 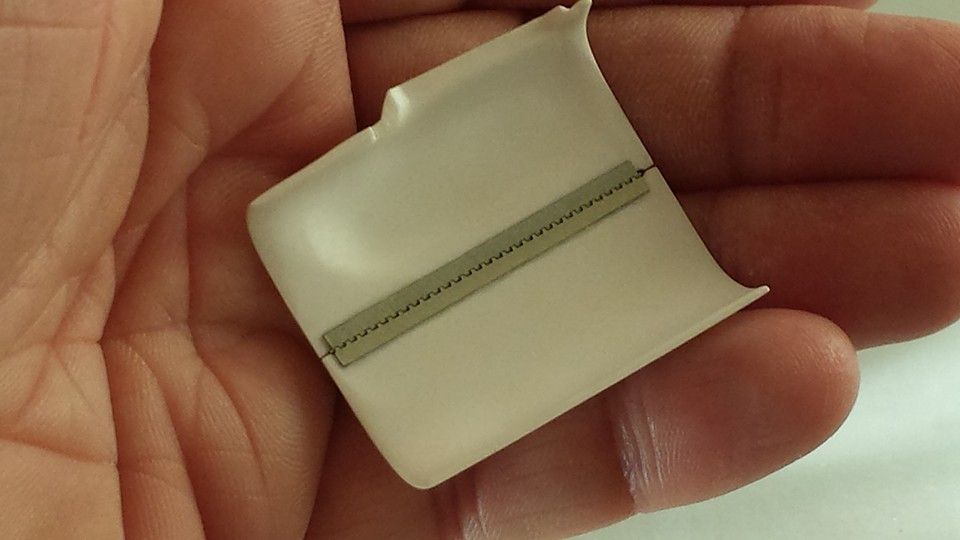 It fits!!! 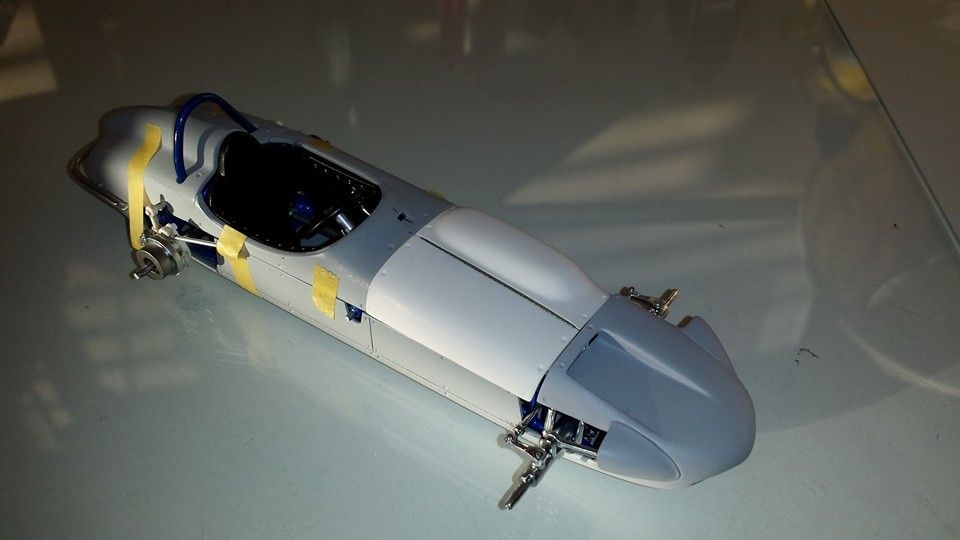 |
|
|
|
Post by florida70bee on Jan 25, 2016 0:48:27 GMT -5
Better yet... It works!!! 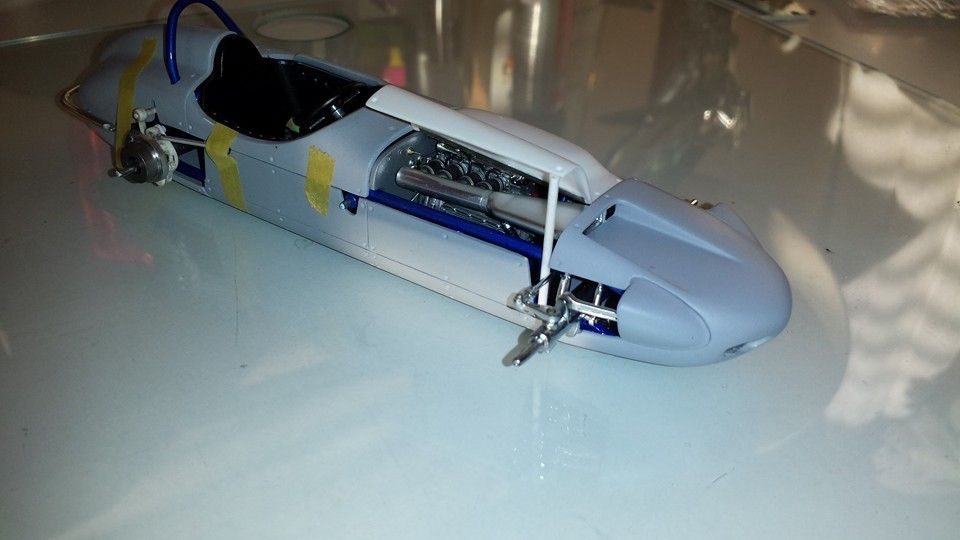 Another view! 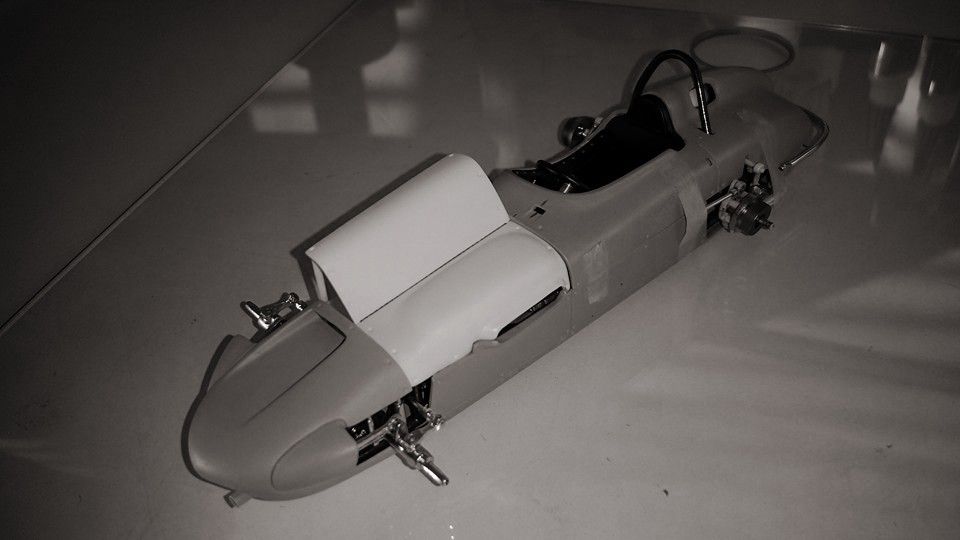 From the front opening on the left side. 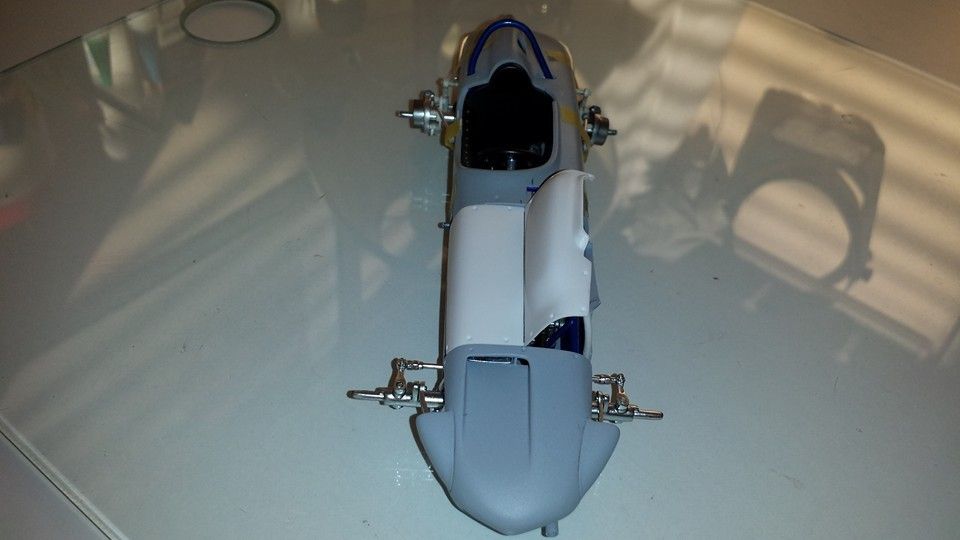 Works great! 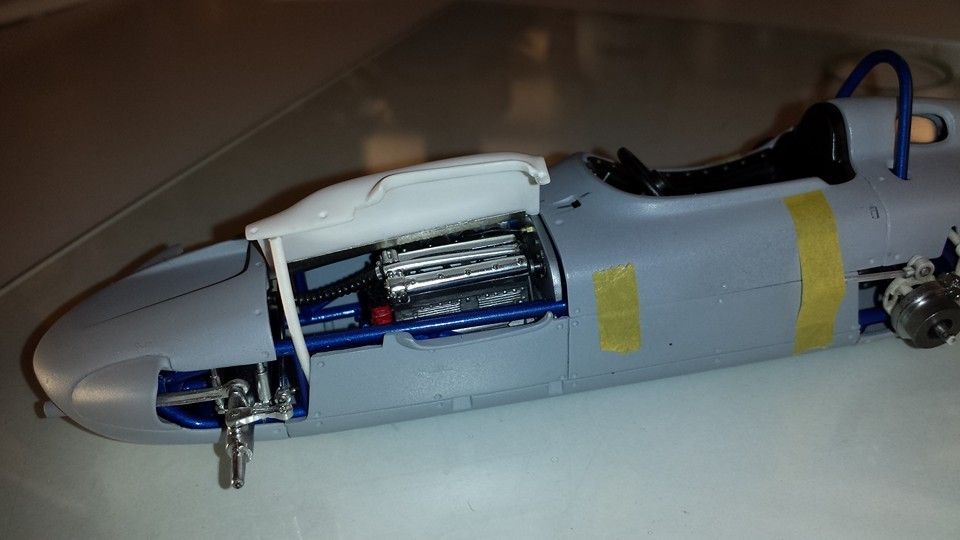 |
|
|
|
Post by 2lapsdown on Jan 25, 2016 1:25:42 GMT -5
Those hinges are a first, it looks great!
John
|
|
|
|
Post by Art Laski on Jan 25, 2016 2:26:34 GMT -5
Nice work!
|
|
|
|
Post by bobbyc on Jan 25, 2016 7:25:15 GMT -5
Wow, that's great!
|
|
|
|
Post by racerbrown on Jan 25, 2016 8:22:48 GMT -5
impressive enough just to put that hinge together but to get it to work properly on the hood is over the top!
really glad to see you back at it andy.
duane
|
|
|
|
Post by kip on Jan 25, 2016 8:31:47 GMT -5
Boy, I'll say. I bought a pack of those to use on my Mid-Continent Epperly. Spent two days just trying to put the hinge together and gave up.
WELL DONE.
kip
|
|
|
|
Post by clm1545 on Jan 25, 2016 9:38:25 GMT -5
Fanflippintastic!
|
|
|
|
Post by florida70bee on Jan 25, 2016 11:26:41 GMT -5
Boy, I'll say. I bought a pack of those to use on my Mid-Continent Epperly. Spent two days just trying to put the hinge together and gave up. WELL DONE. kip
Thank you Kip!
I screwed up multiple times before I got the hang of it.. I tried the instructions with the photo-etched pieces but found it too difficult..
I originally had a pack of the Model Car Garage small piano hinges and I used the whole pack to figure out how to put them together. Once I got one assembled that I liked I figured out that they were too small for the hood and looked out of scale. So I bought the large piano hinge and made the one hinge in the photos that attached to the hood.
Here is the method that I used to assembling the hinge.
- I took each of the photo-etched 1/2 hinge combs and bent the teeth at a 45 degree angle using a photo-etch bender (like a micro metal brake) - Then I matched the 2 bent combs and lay them opposite of each other in interlocking pattern order to create a "V" shape in between the 2 combs. Then I taped the pieces to a flat surface so they do not move.
- Next I took the straightened wire from the photo-etched package and laid it down at the bottom of the "V" in between the 2 combs. I also taped the ends of the wire down as well so it would not move
- Slowly and carefully using the tip of an x-acto knife I wrapped the individual teeth of the combs around the wire in an opposite pattern (wrap one up around the wire then wrap one down around the wire) This takes time but its worth it in the end...

Hopefully this gives you an idea how I did it..
|
|
|
|
Post by sandysixtysfan on Jan 25, 2016 15:27:23 GMT -5
Andy, thats just plain amazing work.
Sandy
|
|
Deleted
Deleted Member
Posts: 0
|
Post by Deleted on Jan 25, 2016 17:20:14 GMT -5
Change your name to Mr. Patience!!!!!
WOW, nice hinge dude!
|
|
|
|
Post by lance on Jan 26, 2016 0:19:59 GMT -5
This is impressive!
|
|