Post by Deleted on Oct 29, 2014 14:25:10 GMT -5
Other than Terry and I, I don't know how many 1/64 scale builders are out there, but I thought I'd post a tip that work for me, in hopes that it might be of use to others. In this tiny scale, detail painting is a nightmare, so I avoid it whenever possible. I use tubing of various sizes to make punches I can use to make circles or ovals out of decal paper, rather than trying to paint them. Once you have the punch the correct size, you can make the perfect circle over and over again, always the correct size, always the correct shape. Finally, a technique I can't screw up!
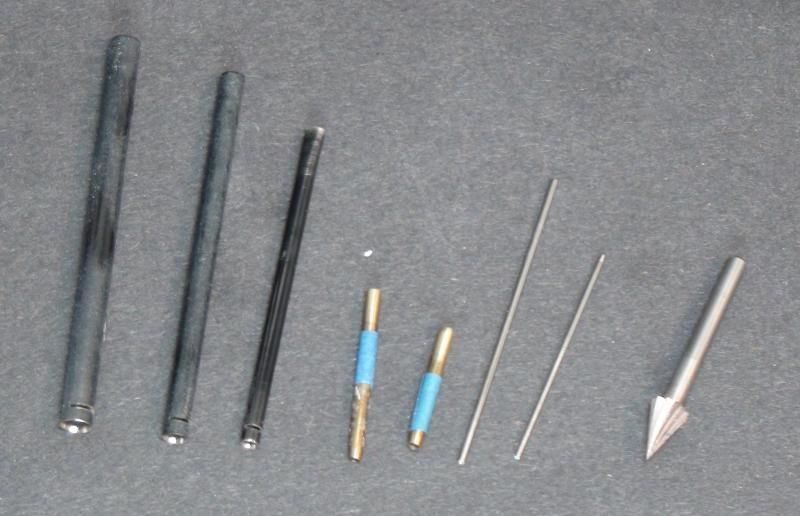
Much of the tubing is available at your local Hobby Store. The brass tubing works well, but stay away from the aluminum - it's too soft, and won't hold its edge for long. Tiny little steel tubing is available in stores specializing in military modeling. I'm always on the lookout for new sizes, and the bigger ones I use are actually scrounged from old telescoping antennas - from cars, portable radios, you name it. These often have the advantage of being made of steel, meaning they'll hold their edge after many uses. Speaking of holding their edge, none of this tubing is ready to use when you get it. It's all got to be sharpened first. Each piece of tubing can be made into two sizes, depending on whether you sharpen it on the inside, or outside. I've included a pic of the Dremel bit I use to sharpen the inside, and it works on even the smallest tubing. You can sharpen the outside by chucking the tubing into your dremel, then holding it against a piece of fine sandpaper. For best results, keep the angle between the tubing and sandpaper constant.
For the exaust surrounds and air inlet, I've bent a piece of tubing with needlenose pliers until it's in the correct shape. Don't forget to sharpen it first - you can't sharpen an oval!
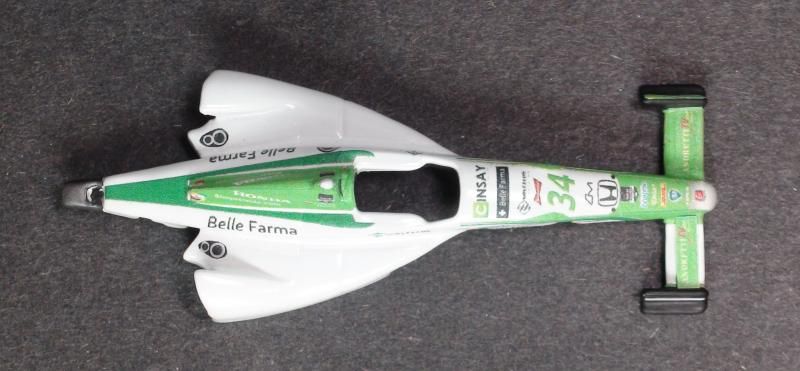
I use these punches to make decals for the exaust surrounds, the exaust themselves, the fuel filler inlets, the air intakes, and even the headrests. I'm sure others can come up with even more uses. On the Munoz car below, each exaust is five decals - three black ones and two silver ones. They may not be perfect, but they're waaay better than I could ever do with paint. You can't screw them up, and they take all of five minutes to make.


On a completely different note, notice the decal for the front wing on the right side of the car. A little too small, isn't it? That's all Patto's gives me. The left side is actually FIVE decals I've had to scrounge up from a spare decal sheet. Same thing with the headrest. The models look fairly straightforward when completed, but often there's a lot of work in getting them correct.
Much of the tubing is available at your local Hobby Store. The brass tubing works well, but stay away from the aluminum - it's too soft, and won't hold its edge for long. Tiny little steel tubing is available in stores specializing in military modeling. I'm always on the lookout for new sizes, and the bigger ones I use are actually scrounged from old telescoping antennas - from cars, portable radios, you name it. These often have the advantage of being made of steel, meaning they'll hold their edge after many uses. Speaking of holding their edge, none of this tubing is ready to use when you get it. It's all got to be sharpened first. Each piece of tubing can be made into two sizes, depending on whether you sharpen it on the inside, or outside. I've included a pic of the Dremel bit I use to sharpen the inside, and it works on even the smallest tubing. You can sharpen the outside by chucking the tubing into your dremel, then holding it against a piece of fine sandpaper. For best results, keep the angle between the tubing and sandpaper constant.
For the exaust surrounds and air inlet, I've bent a piece of tubing with needlenose pliers until it's in the correct shape. Don't forget to sharpen it first - you can't sharpen an oval!
I use these punches to make decals for the exaust surrounds, the exaust themselves, the fuel filler inlets, the air intakes, and even the headrests. I'm sure others can come up with even more uses. On the Munoz car below, each exaust is five decals - three black ones and two silver ones. They may not be perfect, but they're waaay better than I could ever do with paint. You can't screw them up, and they take all of five minutes to make.


On a completely different note, notice the decal for the front wing on the right side of the car. A little too small, isn't it? That's all Patto's gives me. The left side is actually FIVE decals I've had to scrounge up from a spare decal sheet. Same thing with the headrest. The models look fairly straightforward when completed, but often there's a lot of work in getting them correct.

