|
|
Post by lance on Oct 16, 2014 22:33:19 GMT -5
I received a call from Walt today and he said he wanted to do a work in progress of the Metal-Cal car (his first W.I.P. on any site). The only problem he told me was that he does not know how to post photos, he asked me if I would post his photos and then he would provide the play by play. So, here is Walts first W.I.P. After the photos are posted, please give him a chance to post a discription of what he is doing and then feel free to post away. Photo #1 After studying the model and the real car the first thing that jumps out is the wheelbase the car had a 96" wb of 3.84 in 1/25 scale the wb on the model is almost 4.2 inches, so after checking every thing where I could shorten the car I cut .2" where you see marked. and then move the rear axle forward and the front axle aft.  Photo # 2 The headrest and Fin are not centered on the cockpit so I removed the headrest  Photos #3 & #4 The tail cone on the left side curves way to far toward the center of the car, The right side looks a lot better, I haven't decided how I going to address this problem yet   Photos #5 I lowered the windshield cowling about .1" on the left and canter but left the left side as is for now also move the exhaust outlet forward and added a small filler to the aft of the opening  Photo #6 This shows the car as it was cut apart  Photos #7 & #8 I found this problem after I cut the model apart the sides are suppose to be flat the left side is just off a little bit but the right side is way off, another problem I well have to come up with a way to fix   Photo #9 & #10 this shows the difference in the right and left side of the tail cone. Another problem I'll have to work out   Photo # 11 The open for the Fuel injectors has been move slightly forward and up to match the car, the top of the nose has been slightly reshaped. Once I get most of this straighten out I have to add some to the right side of the car as it's to narrow but Like Lance said IT'S A WORK IN PROGRESS, the hardest part is when you figure out how to solve 1 problem 2 more pop up.  |
|
|
|
Post by oldphotos on Oct 16, 2014 23:06:06 GMT -5
Photo #1
After studying the model and the real car the first thing that jumps out is the wheelbase the car had a 96" wb of 3.84 in 1/25 scale the wb on the model is almost 4.2 inches, so after checking every thing where I could shorten the car I cut .2" where you see marked. and then move the rear axle forward and the front axle aft.
Photo # 2
The headrest and Fin are not centered on the cockpit so I removed the headrest
Photos #3 & #4
The tail cone on the left side curves way to far toward the center of the car, The right side looks a lot better,
I haven't decided how I going to address this problem yet
Photos #5
I lowered the windshield cowling about .1" on the left and canter but left the left side as is for now also move the exhaust outlet forward and added a small filler to the aft of the opening
Photo #6
This shows the car as it was cut apart
Photos #7 & #8
I found this problem after I cut the model apart the sides are suppose to be flat the left side is just off a little bit but the right side is way off, another problem I well have to come up with a way to fix
Photo #9 & #10
this shows the difference in the right and left side of the tail cone. Another problem I'll have to work out
Photo # 11
The open for the Fuel injectors has been move slightly forward and up to match the car, the top of the nose has been slightly reshaped.
Once I get most of this straighten out I have to add some to the right side of the car as it's to narrow
but Like Lance said IT'S A WORK IN PROGRESS, the hardest part is when you figure out how to solve 1 problem 2 more pop up.
Thanks To Lance for helping post this.
Oldphotos
|
|
|
|
Post by Art Laski on Oct 17, 2014 1:46:48 GMT -5
Nice work, Walt! Judging by the examples is the background, I'm sure this is going to turn out great.
-Art
|
|
|
|
Post by clm1545 on Oct 17, 2014 10:43:52 GMT -5
Good to see a WIP from yoy, Walt. Give me a call sometime ( I'll PM my #), and I'm sure we can get you posting photos. If I can do it, anybody can.
Craig
|
|
|
|
Post by indy on Oct 17, 2014 10:51:24 GMT -5
Good to see a WIP from yoy, Walt. Give me a call sometime ( I'll PM my #), and I'm sure we can get you posting photos. If I can do it, anybody can. Craig If not, I can show you in person when I get up your way. Jordan |
|
|
|
Post by kip on Oct 17, 2014 14:07:30 GMT -5
Oh boy. This looks like fun. I feel like I ought to pay tuition to watch this because it looks like it will be a doctorate level learning experience. I think I probably have learned more already than I did in my senior year in high school.
kip
|
|
|
|
Post by clm1545 on Oct 17, 2014 15:31:13 GMT -5
A little background on the MetalCal kit.
Calvin made that kit as a suprise, and favor to me. He made 8 kits hoping that there were a half dozen guys out there who were as crazy as I am(good luck with that). Then Sandy got involved with the Apache car, and the whole thing just went nuts. It was never intended to be the best, or most accurate model ever produced. as there was very little reference material available. I was, and am thrilled to have the kit. Mine is being built as produced, however I'm sure that Walt's model will be more accurate. This will be a very entertaining WIP, and I am looking forward to Walt's work.
Take Care
Craig
|
|
|
|
Post by lance on Oct 22, 2014 18:41:15 GMT -5
Another photo installment from Walt Photo # 12 This shows how I pined the forward and aft section together the holes are drilled with one going up and to the right and the other going to the left and down, I used SLOW setting super glue and then inserted the pins. this way It can't come back apart.  Photo #13 This shows the reshaping of the tail with the headrest tacked on, it well be pined on before filling the gap.  Photo #14, #15, #16 These show an early mock up of where were headed with this build    Thanks again to Lance for posting these photos Oldphotos Walt |
|
|
|
Post by oldphotos on Oct 22, 2014 19:46:09 GMT -5
Photo # 12
This shows how I pined the forward and aft section together the holes are drilled with one going up and to the right and the other going to the left and down, I used SLOW setting super glue and then inserted the pins. this way It can't come back apart.
Photo #13
This shows the reshaping of the tail with the headrest tacked on, it well be pined on before filling the gap.
Photo #14, #15, #16
These show an early mock up of where were headed with this build
Thanks again to Lance for posting these photos
Oldphotos
Walt
|
|
Deleted
Deleted Member
Posts: 0
|
Post by Deleted on Oct 23, 2014 8:59:12 GMT -5
Had any respiratory problmes?
|
|
|
|
Post by lance on Nov 25, 2014 21:21:05 GMT -5
|
|
|
|
Post by oldphotos on Nov 25, 2014 22:35:00 GMT -5
After cutting the openings for the axle and suspension arms I located the panel line in the correct location.
The head rest has pins installed so it well go in the correct location and stay in place when I fill the gap between the body and the headrest when I glue it on it won't move. during the rest of the body work on the tail.
Most of the panel lines have now been scribed and it's on to more of the body work and suspension.
Oldphotos
|
|
Deleted
Deleted Member
Posts: 0
|
Post by Deleted on Nov 25, 2014 23:00:57 GMT -5
Cool!
You staying safe? Doubt if Ferguson has an IPMS club, eh? :-)
|
|
|
|
Post by oldphotos on Nov 26, 2014 1:00:38 GMT -5
So far were SAFE, But it's real SAD to see what's happening to my home town, I lived there for over 40 years.
Everyone is on edge here in the St. Louis area. They closed the St. Louis airport last night from about 9 PM till 5AM due to all the gunfire, The aircraft fly right over Ferguson on there landing path.
So I'll just stay home and work on some models.
Oldphotos
Walt
|
|
|
|
Post by harveythedog2 on Jun 9, 2015 9:29:26 GMT -5
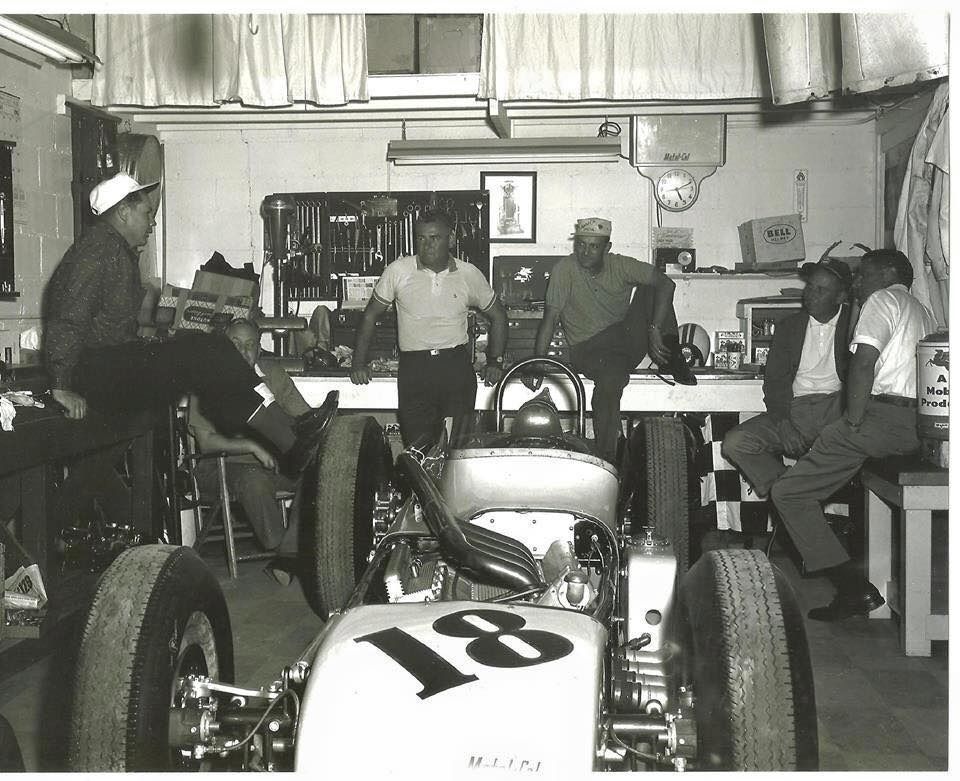
Steve asked me to post this photo for you guys.  |
|
|
|
Post by raceparke on Jun 9, 2015 9:57:38 GMT -5
How cool is that? Great evocation of a long lost era. What they must call bench racing. The engine just about fits, doesn't it? And those tire widths. .
Where's the girlie calendar on the wall? Every garage in those days had one.
|
|
|
|
Post by racerbrown on Jun 9, 2015 10:45:28 GMT -5
great picture!
i wish i had that metal-cal clock…
duane
|
|
|
|
Post by oldphotos on Jun 9, 2015 11:36:05 GMT -5
Great photo thanks for posting it.
Can you name the 3 driver in this photo?
Oldphotos
|
|
|
|
Post by alwaysindy on Jun 9, 2015 12:36:25 GMT -5
Walt: Lloyd Ruby on far left? Jimmy Bryan in middle with white shirt? Third?  ?? Also, it was great to finally meet you in person. I would really enjoy sitting down and letting you tell me Indy stories...your photo collection must compare with Robin Miller's... Tim |
|
spyder
Front Runner
 
Posts: 242 
|
Post by spyder on Jun 9, 2015 14:35:41 GMT -5
The garage shots are always interestiing. There are quite a few similar shots in the yearly collections in the Photo Shop at IMS and are an invaluable source for Indy car modelers. Great for front suspension and engine details. It is amazing how few tools, spares, uniforms, etc. that those old teams got away with compared to teams today. Team laundry budgets alone today would have kept a team on the Championship Trail all year in the fifties.
That appears to be Rube on the left. The guy in the chair behind him may be Russ Snowberger. I think the guy in the polo shirt left of center is not Bryan, but Chuck Stevenson. George Salih on the bench? Who are the others?
Walt, really looking forward to seeing the Metal-Cal Spl. done.
|
|
|
|
Post by clm1545 on Jun 9, 2015 16:56:15 GMT -5
I think you are correct, Ed. I think the photo is from 1961, and Stevenson was the driver. We lost Jimmy Bryan shortly after the 1960 race.
|
|
|
|
Post by oldphotos on Jun 9, 2015 17:28:51 GMT -5
Lloyd Ruby is on the left, Chuck Stevenson leaning against the workbench, driver of the car in 1961 when this photo was taken.
On the right is Johnny Boyd, who was the driver of this car in 1962 and 1963 Indy 500.
Oldphotos
|
|
|
|
Post by Calvin on Jun 9, 2015 19:26:34 GMT -5
i wish i had that metal-cal clock… duane Looks like something you could make out of wood and start selling since everyone wants a Metal-Cal stuff! The Metal-Cal Spl. is prolly more popular now than back then!  Maybe you could quit the cabinetry business and do vintage Indycar Memorabilia out of wood?  |
|
|
|
Post by clm1545 on Jun 9, 2015 20:10:37 GMT -5
I'm pretty sure Duane is smarter than that. It's OK to play around with race cars, no matter what size, but DON'T QUIT YOUR DAY JOB.
I'm not sure about the Metal Cal, but the Apache Airline car sure seems to be more popular now, then it was back then.
|
|
 Photo #1
 Photo # 2
 Photos #3 & #4

 Photos #5

 Photos #7 & #8

 Photo #9 & #10

 Photo # 11


 Pro Tech | MAD | Scale Motorsport


 ??
??

