|
|
Post by Calvin on May 15, 2013 13:55:12 GMT -5
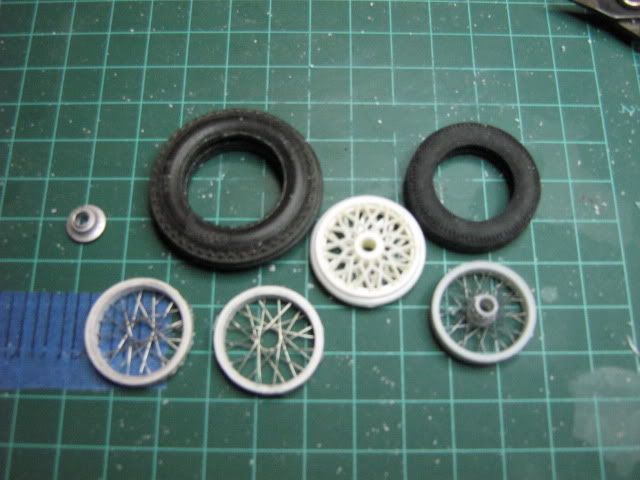
Is there any good "how to's" on building wire wheels? This is ONE of a few things that puzzles and intimidates me about this hobby!  From looking through the forum the best quotes of clues on how to do this are the following: Supposedly there is good how to in Chris Etzel's instruction sheet for the Duesenberg kit? if thats true, can anyone scan and post that here? and cobra276 did a nice WIP here, but my question is which way do the wires go? The layout.  Then I just had to replace those thick plastic spokes from the kit in the center. The kit tire is on the left and the right side is a Duesy tire from Bill Jorgensen's kit for scale. Tires are shorter in stature yet the rims are only about 1/8 smaller. The rim on the right is the Strada Sports Duesy wheels..nice but too small. What I decided to do was use the Souther Finecast Etzel method of making rims. I bought some 11/16 tubing, measured and cut notches in the tubing then cut to thickness. The two halves I made are on the far left as I just finished the first set.   As soon as the super glue sets up I should be able to glue the two halfs together sandwiching the hubs from the Duesy kit and have wheels. I'll post that later as I get further along. |
|
|
|
Post by macsparty on May 22, 2013 8:39:43 GMT -5
This would be a great addition. I tried doing one once, only to set it aside. Another in the long line of projects to get back to!
I do remember reading somewhere, at least as far as the Finecast wheels are concerned, that you can use fishing line instead of the wire provided. It's a little easier to get taut, I guess. I intend to try that. (One of these days...)
|
|
|
|
Post by herk56 on May 22, 2013 9:34:09 GMT -5
The fishing line tip was mine:
"I couldn't get them to look right to save my life until I scrapped the hinky, kinky wire supplied and used......fishing line! Drag it thru some sandpaper to give it some "tooth" for paint to stick to and just keep it pulled tight as you go, small drops of superglue in the rim notches allow you to stop at any time and take a break. I drill a small hole to start from, knot the fishing line, and when done, I paint the knot & line tip silver or brass to simulate a valve stem.
Brian"
Try it, it's pretty easy!
|
|
|
|
Post by macsparty on May 22, 2013 9:40:34 GMT -5
Thanks for putting a name to that, Brian. That's a great tip, and credit where credit is due!
|
|
|
|
Post by herk56 on May 22, 2013 9:44:57 GMT -5
Calvin, as far as the layout goes, look at the third pic in your post. Think of the spokes that cross as a pair. Follow the ending wire back, it bends around the hub slightly and goes thru the slot on the opposite side of the rim from the "starting" slot, then it goes over one slot (Clockwise) and back around the hub to the slot next to the starting slot (Counter-clockwise) 1 pair done on each side of the hub. Then over to the next slot (CCW) on the outside of the rim, thru the slot and around the hub as the first 2 pair of spokes were done, just repeat until the wheel is done. Tedious, but they look real nice when done. I'll check the Etzel Deusie instructions later today. HTH!
Brian
|
|
|
|
Post by Calvin on May 22, 2013 15:43:07 GMT -5
Thanks for the info!
|
|
|
|
Post by pntmachine on May 22, 2013 17:17:35 GMT -5
As far as getting the wire to be straight I use a metal fishing leader straightening tool which is just a bent piece of metal with a raised center and pull it through that. The key is to not pull it to tight while winding around the white metal hubs or they oval out on you. It happens more with the 2 piece rims. The problem I have is that out of the 10 sets of Finecast wheels I have 6 sets look like the hubs have melted in a fire uuur!! Brian has a good idea with the fishing line and might have to give that a try as well.
|
|
|
|
Post by Calvin on Jun 8, 2013 22:31:53 GMT -5
|
|
|
|
Post by indydog on Jun 9, 2013 1:03:51 GMT -5
The Herb Deek wheels are easy to work with and look great. He also makes 2 different types. |
|
|
|
Post by Calvin on Aug 9, 2013 6:33:30 GMT -5
Does anyone know were to find 0.783" photo etched wire wheels? The same type used in Gary D.'s 1938 winner kit. I'm really getting tired of this search for wire wheels, I'm about ready to do some on my own!  |
|
|
|
Post by Calvin on Aug 16, 2013 19:36:49 GMT -5
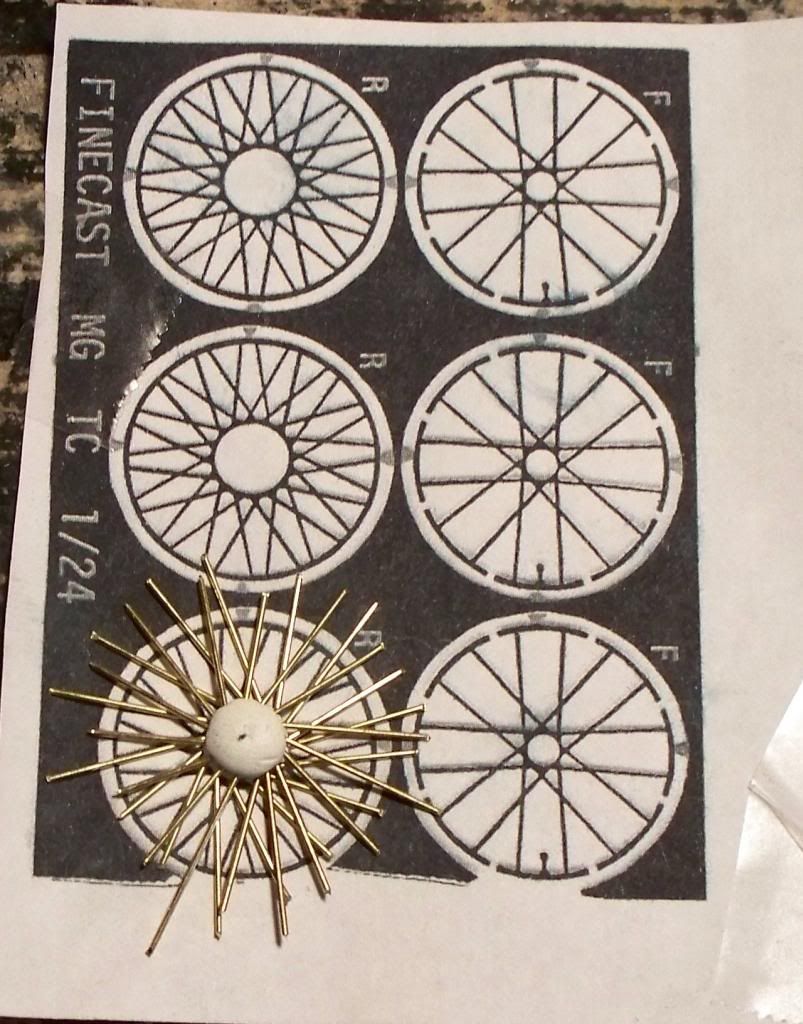
I wonder if I'm on to something? A paper template + Small Brass wire + Un-cured Milliput in the center = wire wheels?  I hope this works! Theoretically after the Milliput dries I can lift it off the paper and drop on some CA glue and lock them on to the center and trim the outside and glue on the outside wheel ring...... I guess we will find out if this is successful or not....it really wasn't that hard to do. |
|
Deleted
Deleted Member
Posts: 0
|
Post by Deleted on Oct 24, 2014 13:25:24 GMT -5
I can attest to the fishing line method for the Finecast wheels at least. I couldn't believe the spool of tightly wound up wire that came with them was even close to viable. Use Stren 2 pound test monofilament line, then cyo it at every encounter with the rim. Slow for sure, but the results, in my opinion, are great. As someone else here said, sand the line lightly by pulling it through fine sand paper first (I guessed right here!). I'll post some pics of the Etzel 91 RD when finished with the "rebuild" of this kit to show the results and added/corrected detail. I must have had this model since the eighties; then my "Crew Chief" dropped it about a foot with awful front suspension damage. I'm building a new axle from silver soldered stainless tubing right now. Wow, does it polish up nicely, and the silver solder makes fine fillets where the casting formed the end pieces. The best part is that the silver solder polishes just like the stainless once it's sanded. Pretty, but so time consuming, especially since at every step I have to do a "proof of concept' exercise so I don't destroy the finished product. I'm including the necked down center section with the sleeves as per the original. I'm one lucky son of a gun.
I have access to the actual Meyer AAA Championship car. It's owned by a guy about a half a mile from me (But worlds apart financially!) He lets me climb all over it, photograph it, and measure it. He has a load of parts for the 91 Rear drives as well. I have stood there and handled engine parts the master himself had in his hands. Who the He-- wouldn't model this machine in my position?
Sorry to go on for so long about this. I'm afraid you'll have to get used to it. Ask my wife. I love this forum!
Motorbill
|
|
Deleted
Deleted Member
Posts: 0
|
Post by Deleted on Nov 4, 2014 5:10:05 GMT -5
it's the passion that keeps us doing
|
|
|
|
Post by racerbrown on Nov 4, 2014 7:07:11 GMT -5
it's the passion that keeps us doing how true! duane |
|
|
|
Post by alterrenner on Nov 5, 2014 5:53:29 GMT -5
Google The Motor Museum In Miniature and go to "articles and projects".
|
|
Deleted
Deleted Member
Posts: 0
|
Post by Deleted on Nov 5, 2014 8:45:28 GMT -5
wow; thanks for the lead!
|
|
|
|
Post by alterrenner on Nov 6, 2014 6:01:38 GMT -5
That's an incredible site, isn't it? These two guys travel around Europe showing their stuff--by invitation!
|
|