|
|
Post by Calvin on Dec 11, 2010 21:58:24 GMT -5
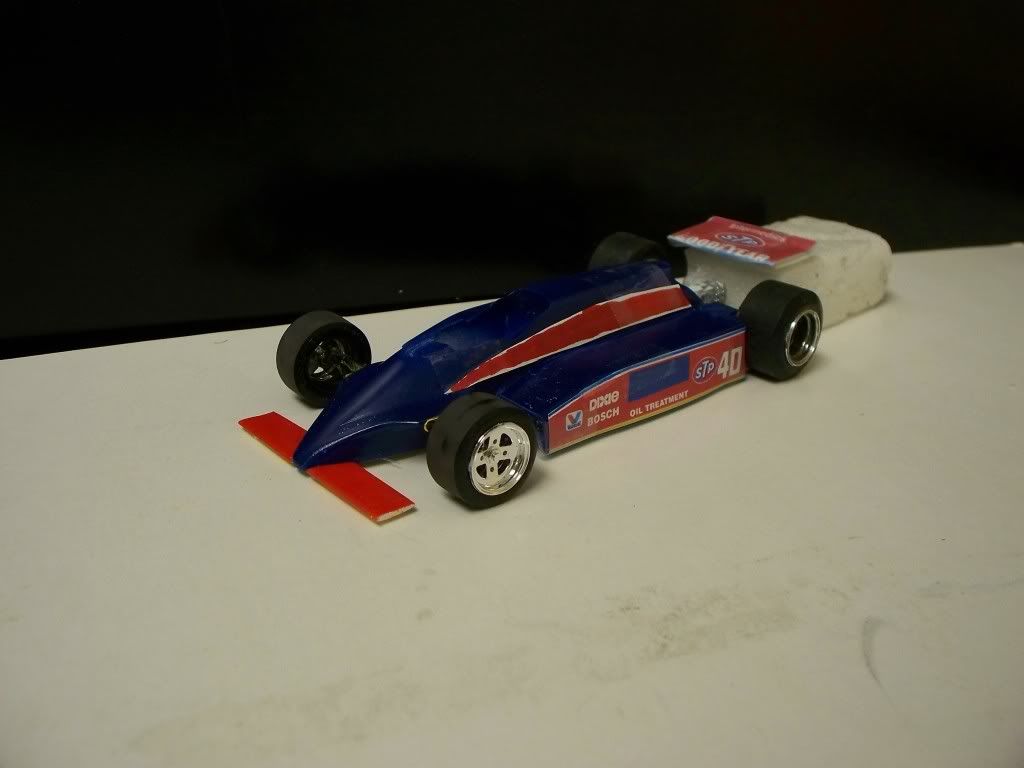
More pics......Im just working away with it...... and I need to fix the radiator inlets then after that Im going to primer it and add some blue and call it a day....then do it all over again tomorrow! I think that PC6 windscreen is just to bulky for this car. 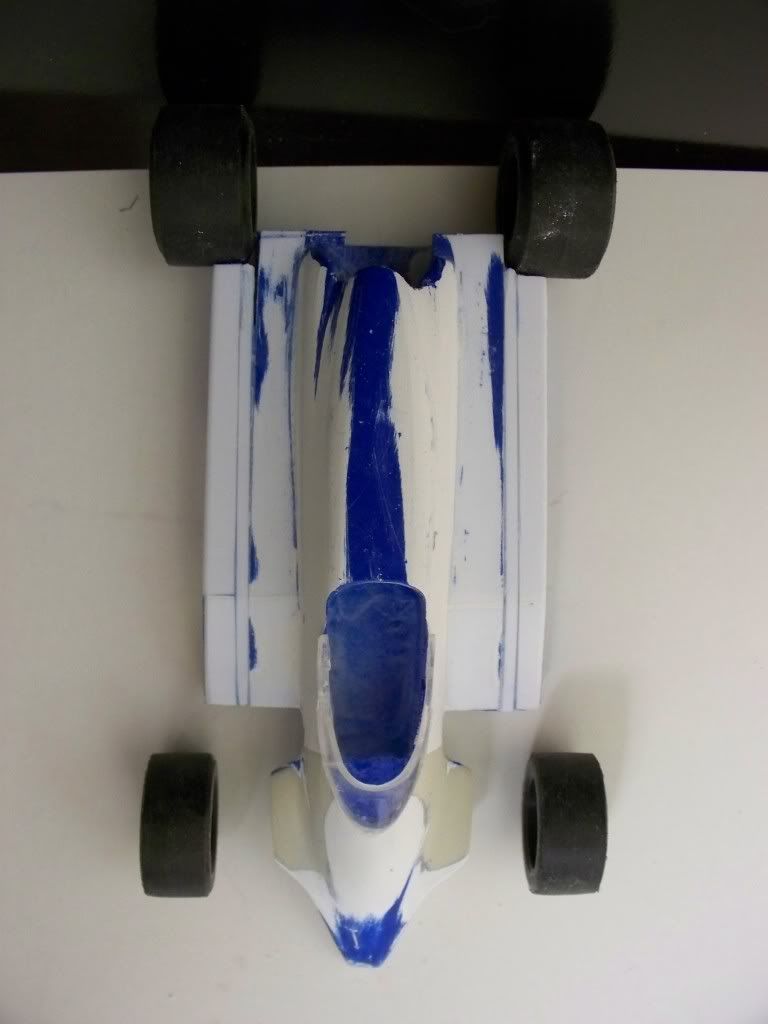 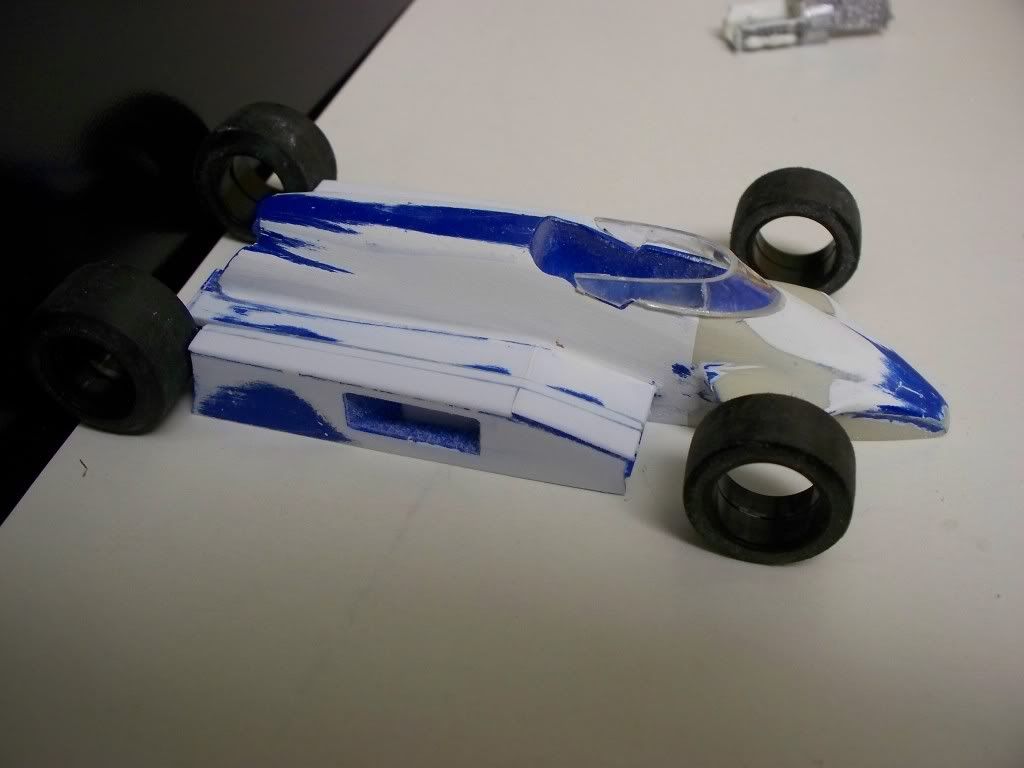 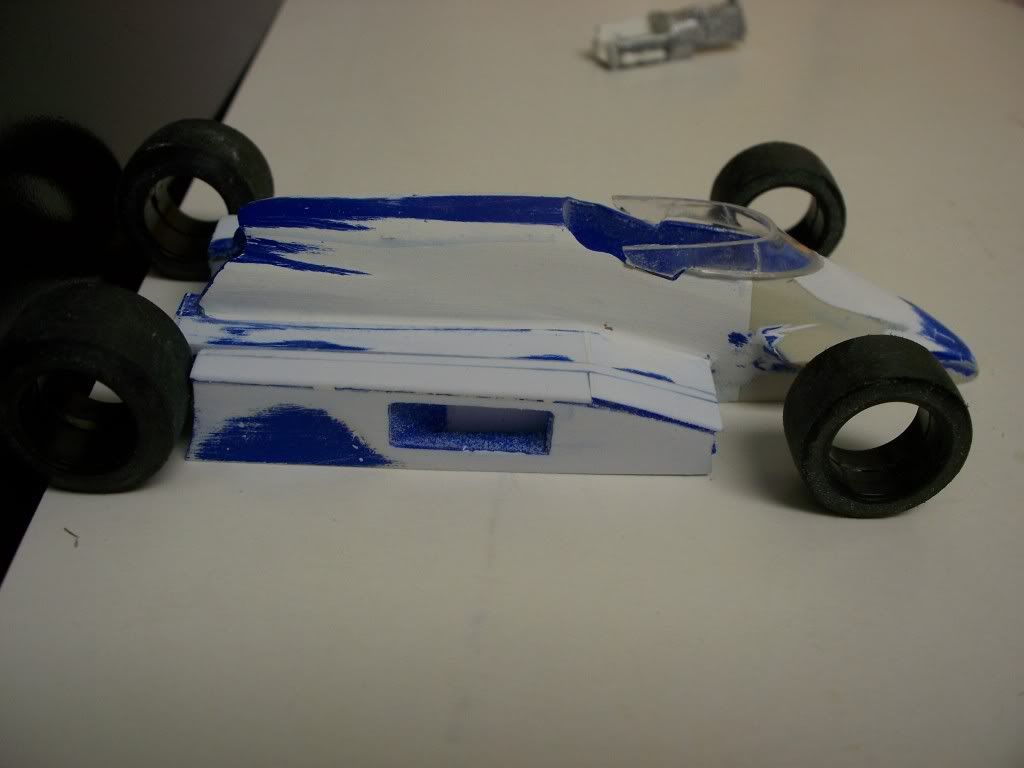 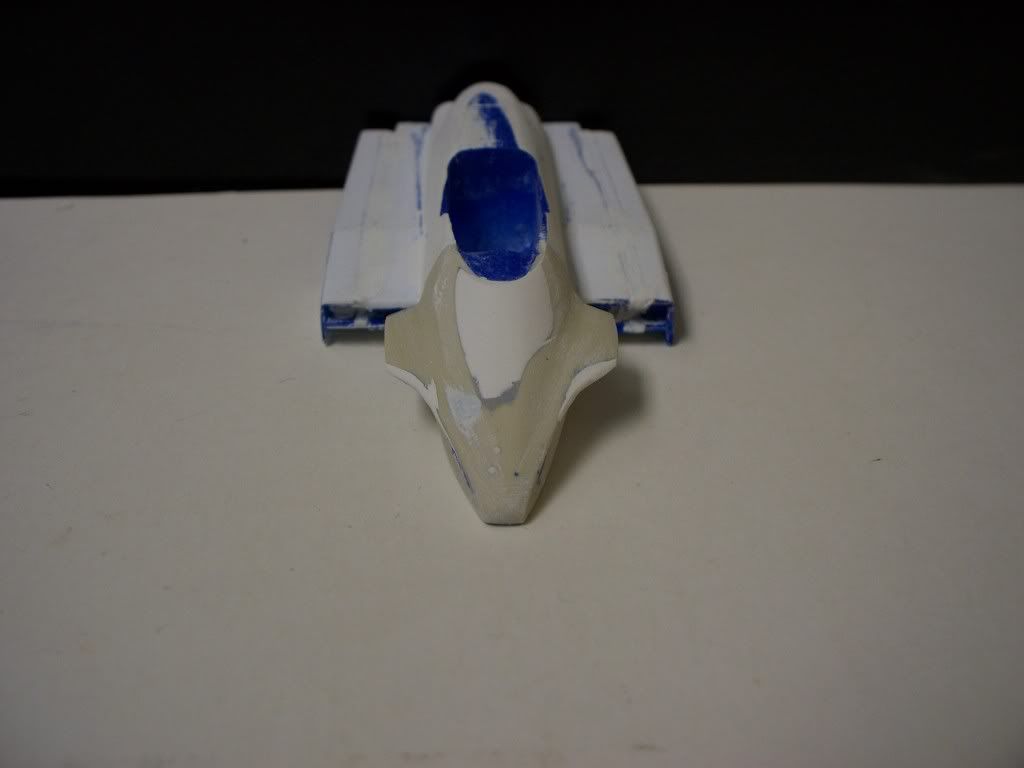 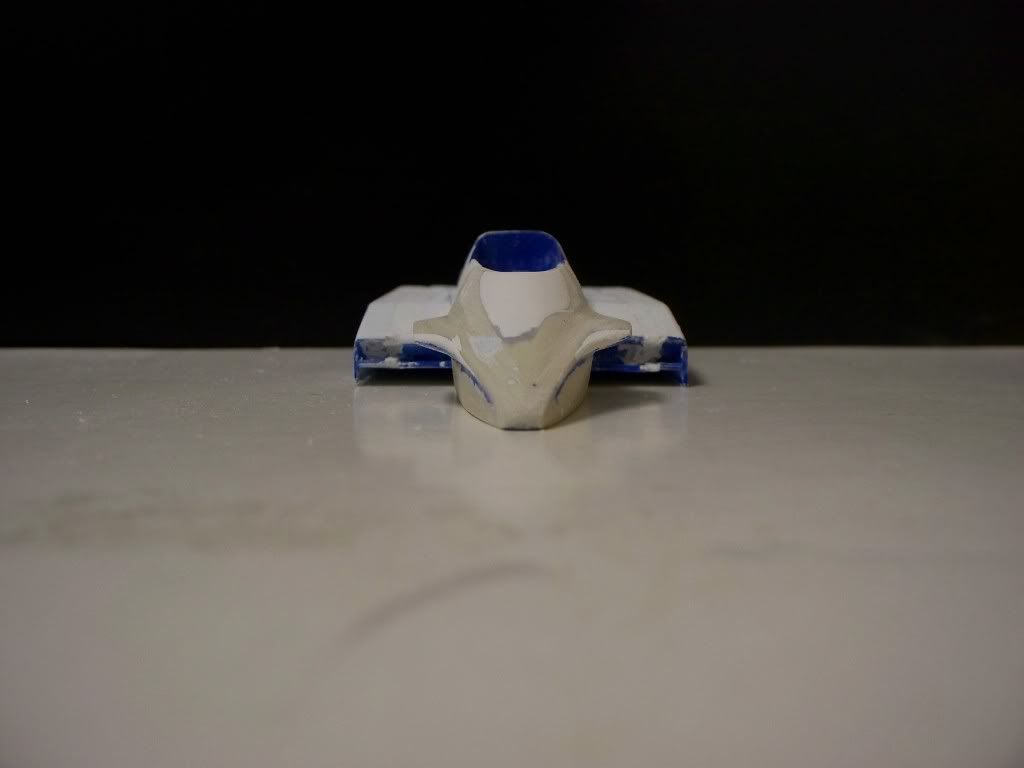 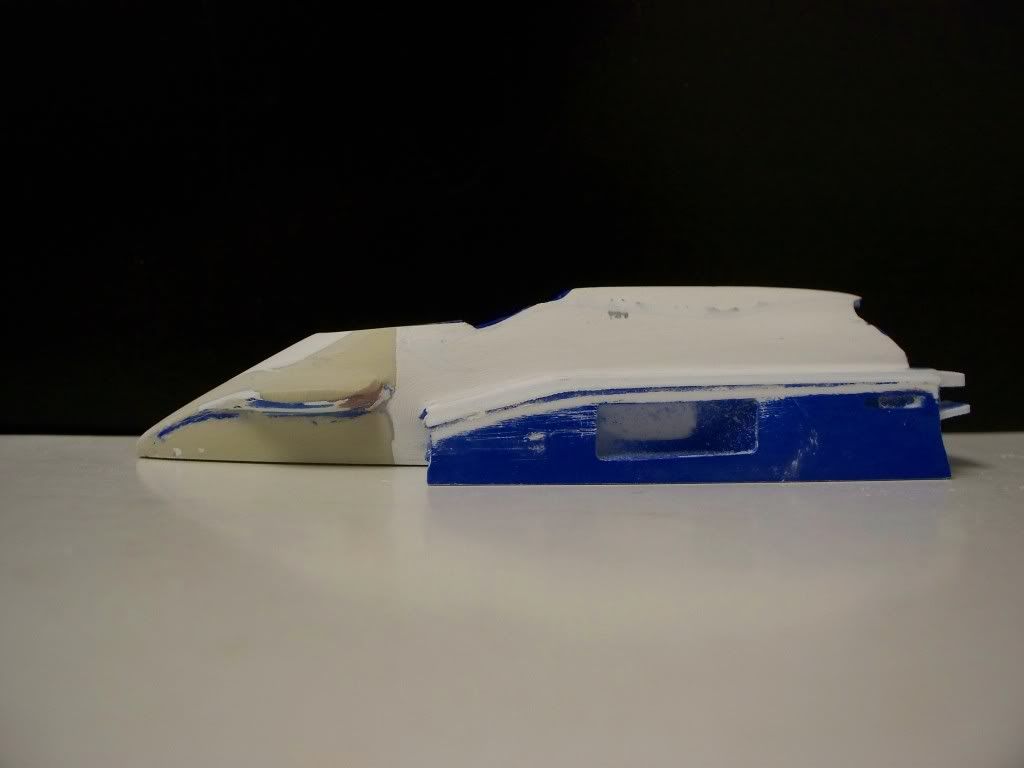 ![]() [/IMG] BTW does anyone have any good pics of the Race day Rear Wing end plate? and or the USAC stickers for 1982. |
|
Deleted
Deleted Member
Posts: 0
|
Post by Deleted on Dec 11, 2010 22:32:33 GMT -5
Calvin....Here are some ideas I have that may help you out on this project...
Im plaining on a complete kit:
Wheels -(I have an idea what to use for the wheels)
Tires - (Take from late 80;s AMT kits
Somewhat of a curbside engine - (From AMY PC6 Kit)
Trans axle
Suspension - (Use from AMT PC6 Kit for both)
Wings - (You can scratch build and cast one of those)
windscreen - (I can make a buck so your can vac-form those)
seat
steering wheel - (Steal from late 80's AMT kit for both parts)
Im not to sure about the rear wing supports I might just add in a template so that it can be used to cut out your own brass or plastic. - (GREAT IDEA!!!!!)
also the roll bars Im not to sure what I'll do. I image its easy enough to do on your own? - (A small piece of Aluminum tubing)
KEEP UP THE GREAT WORK MY FRIEND!!!!!
|
|
|
|
Post by Calvin on Dec 12, 2010 2:44:45 GMT -5
|
|
|
|
Post by Calvin on Dec 12, 2010 18:39:18 GMT -5
I added some more height to the side pod because I think it was not tall enough? 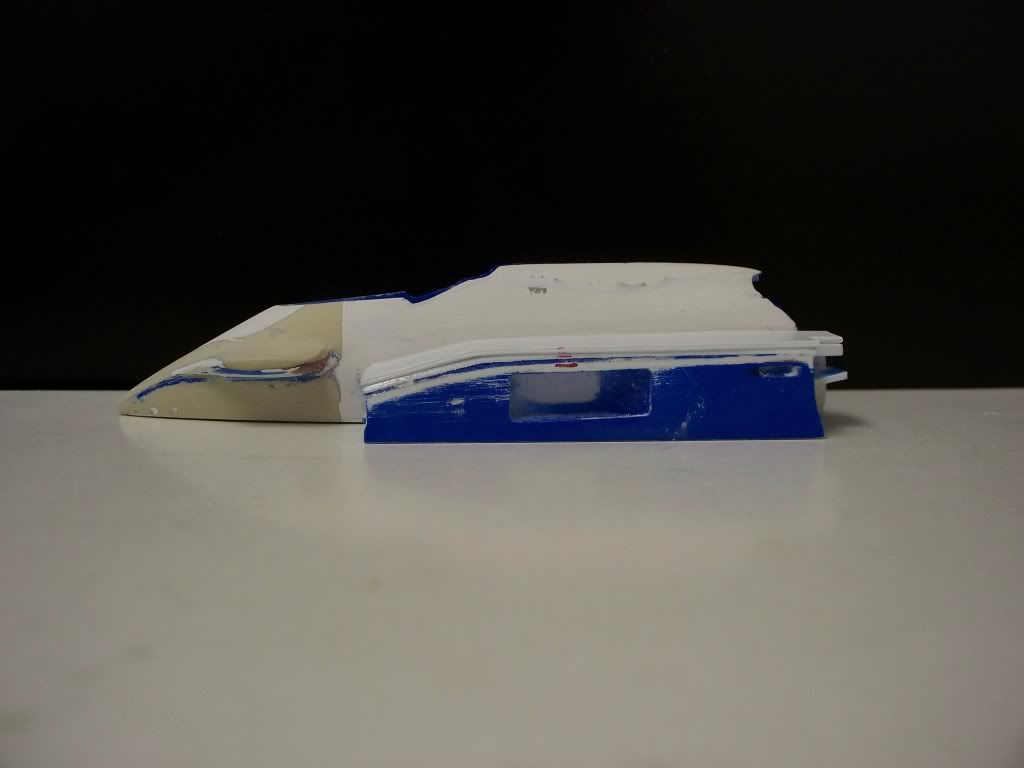 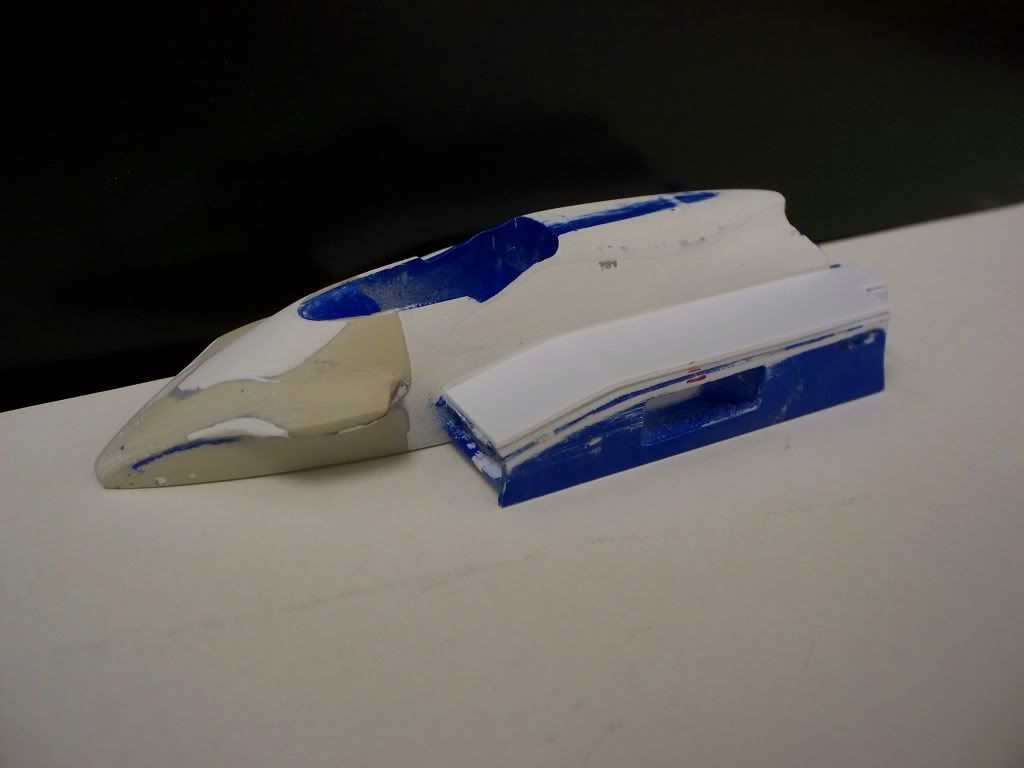 Also the radiator side exit still kinda puzzles me. (the layout of it) I will need to relocate my body line gap on the side pod also, later on after I get the height figured out (any help is more than welcome) I know how to scale out pics but I dont know if do it correctly all the time? But overall I think this Wildcat Scratch built body is at the point if I stopped now and started producing it, I think they would be widely accepted. But Im not stopping now because I know of way to many things to still fix  I still have hrs/days/weeks to go. I cant stop intel I stop 2nd guessing myself. |
|
|
|
Post by indycals on Dec 12, 2010 19:13:49 GMT -5
This will help. I measured several pictures and they all gave me the same result - the sidepod height, including the skirts, is exactly the same height as the rear wheel rims, or about 11/16" high in 1/25 scale. One downside, by raising the sidepod height, even if it's now correct, you need to raise that radiator exit.
|
|
|
|
Post by Calvin on Dec 12, 2010 19:41:12 GMT -5
This will help. I measured several pictures and they all gave me the same result - the sidepod height, including the skirts, is exactly the same height as the rear wheel rims, or about 11/16" high in 1/25 scale. I believe your numbers but? 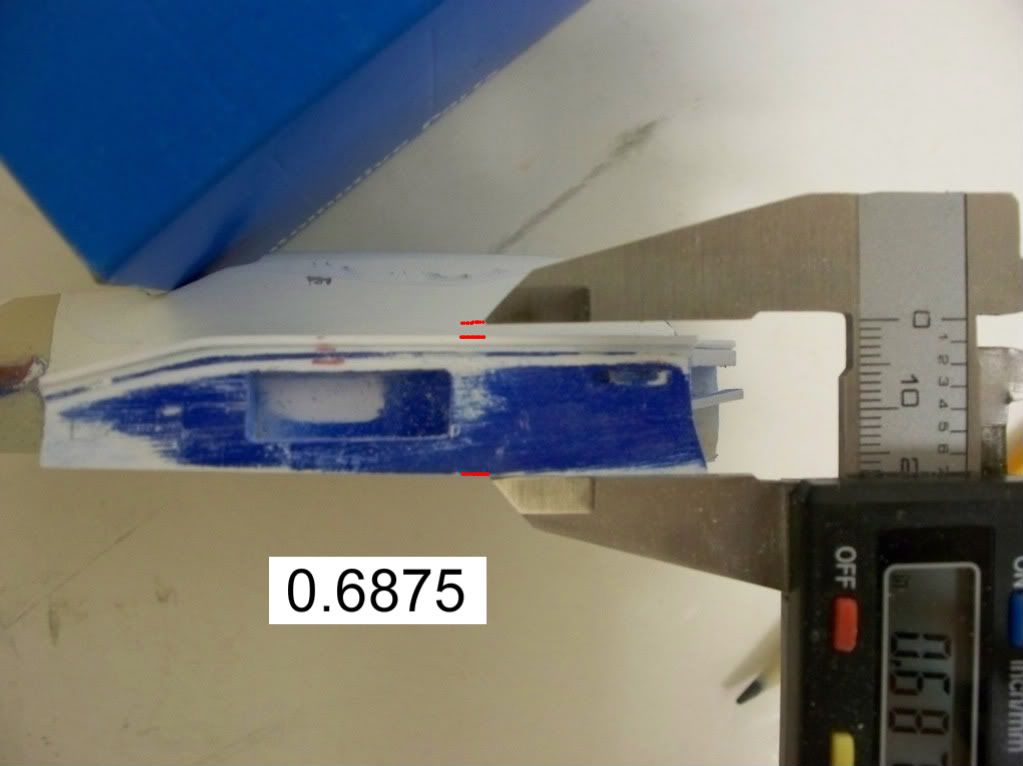 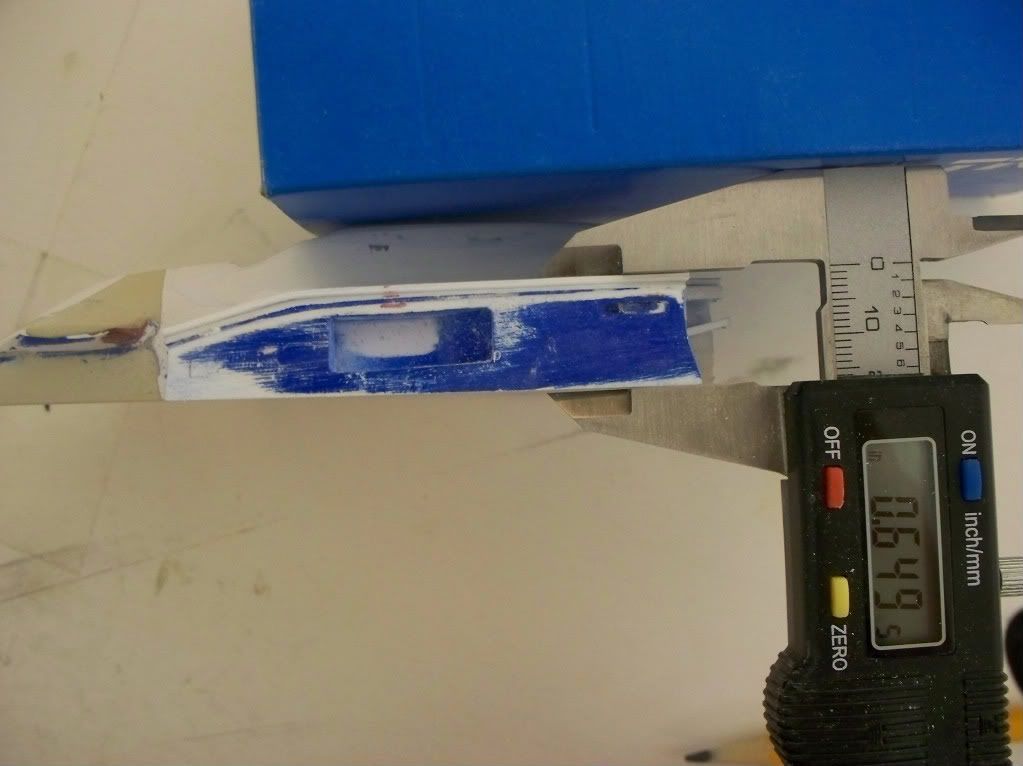 How it is now is 0.6495 Yep but its No biggy, I can do that. Thanks for help! |
|
|
|
Post by Calvin on Dec 12, 2010 19:48:02 GMT -5
I think also a comparison of A-arm fin height to Side pod height might help? Because as of now my side pod height is 0.6495 to my A-arm height of 0.539
|
|
|
|
Post by indycals on Dec 12, 2010 21:51:25 GMT -5
Yeah, I actually have a hard time believing the numbers myself. But I did say that measurement includes the side skirts, so I actually think you're pretty darn close. This is one of those things where you have to decide to trust the numbers or trust your eye.
|
|
|
|
Post by Calvin on Dec 12, 2010 22:31:33 GMT -5
Yeah I figured out whats going on - like you said include the skirts. Im going to add them. Also I think I know whats going on with my radiator exits, they are to large height wise - so Im going to fill in the bottom which in turn will solve the bottom area of where the " Oil Treatment" logo is.
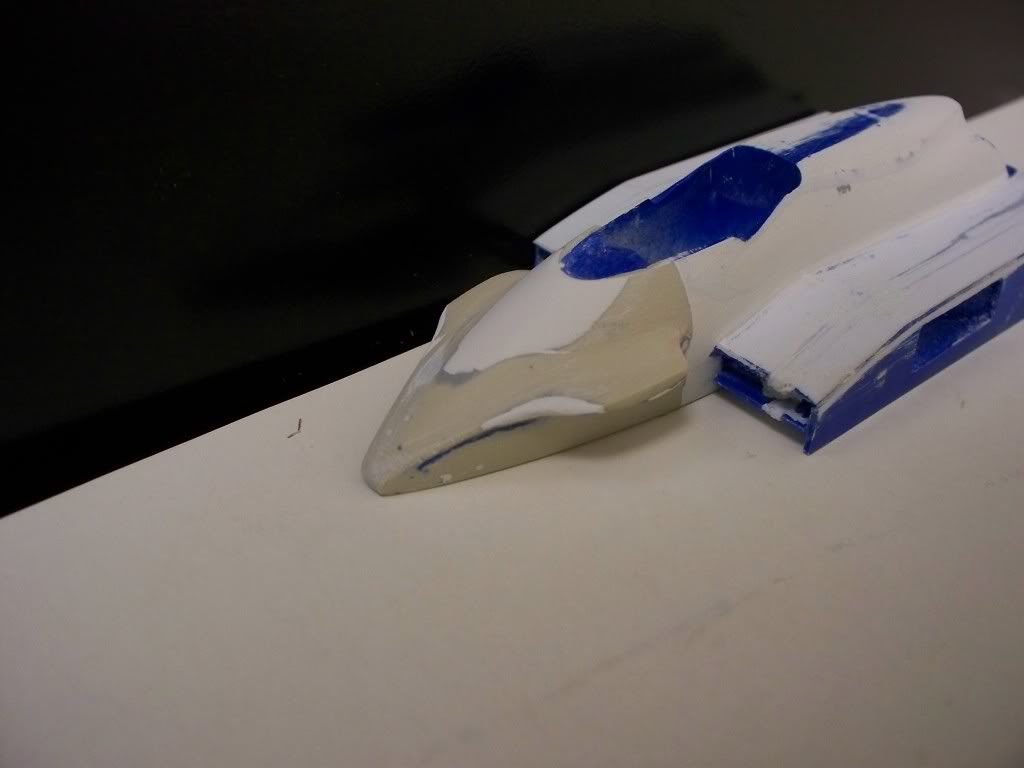
Then Im going to add some putty (milliput) on the top of the side pod, sides to fill in a gaps between the plastic. After it drys I will have to precisely add the body gap line which is the White line to Blue transition.
|
|
"500 LEGENDS"
Hot Shoe
 "500 LEGENDS"...ART IN MOTION...Racing's Most Spectacular Memorabilia www.500legends.com
Posts: 150
|
Post by "500 LEGENDS" on Dec 12, 2010 22:55:20 GMT -5
Calvin...GREAT JOB!! Not only do you have an incredible ability to ask for and use the opinions of others to make your product better, but you have such a great attitude and a passion that makes reading your thread so much fun and enjoyable. This has been a highly anticipated and requested car. When done and ready to deliver this one is going to be a great success!! Amazing what you have done in such a short period of time. Keep up the great work Calvin your passion for building is refreshing and an inspiration to all of us here on the forum!!
All the Best,
John Edwards
"500 LEGENDS"
|
|
|
|
Post by Calvin on Dec 12, 2010 22:57:38 GMT -5
I need to add some plastic to the bottom of the radiator exit. This is the tool I use for finding inside angles after you press the wires into the concave shape. Afterwards you just take a pen and trace the outline of the shape on some plastic. Pretty easy.   |
|
|
|
Post by Calvin on Dec 12, 2010 23:02:23 GMT -5
Here is a funny but embarrassing before and after. Last year about this time I started on a so called "82 Wildcat"  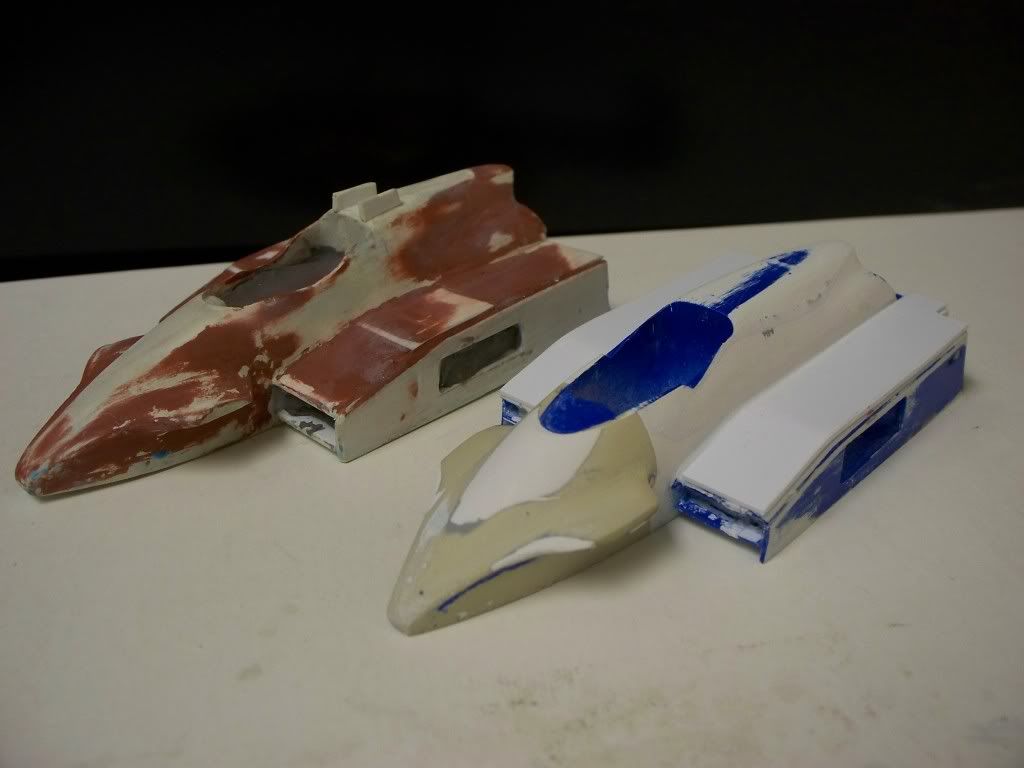 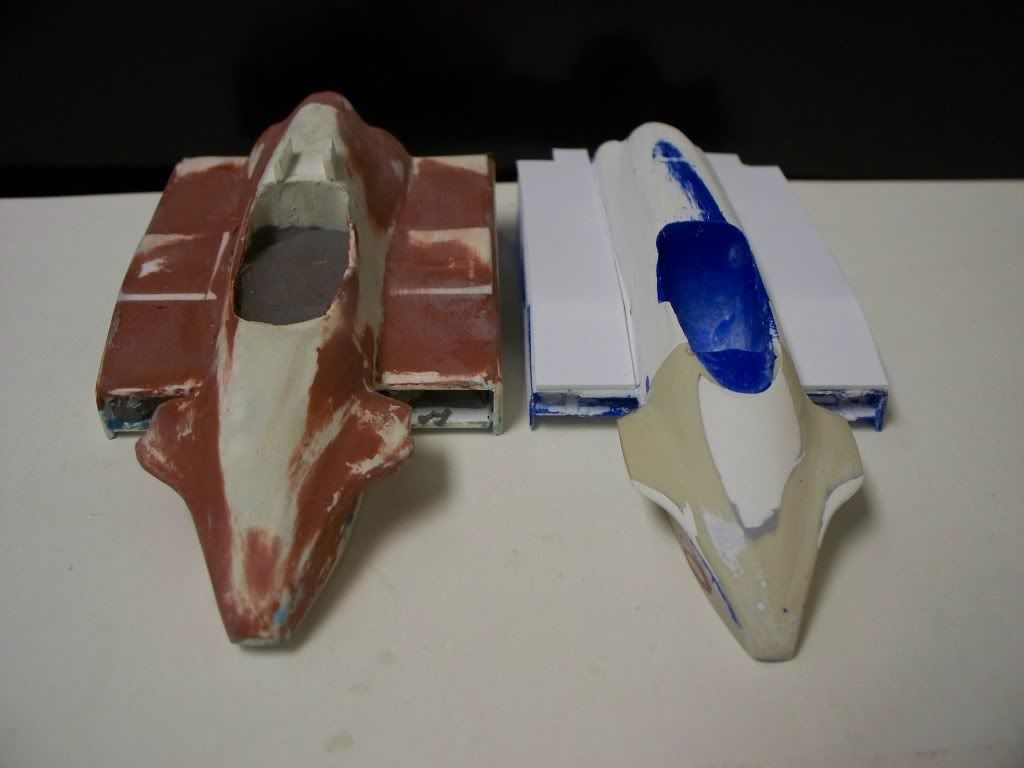 The sad part is I really though I was heading in the right direction!  |
|
|
|
Post by Calvin on Dec 12, 2010 23:03:44 GMT -5
Calvin...GREAT JOB!! Not only do you have an incredible ability to ask for and use the opinions of others to make your product better, but you have such a great attitude and a passion that makes reading your thread so much fun and enjoyable. This has been a highly anticipated and requested car. When done and ready to deliver this one is going to be a great success!! Amazing what you have done in such a short period of time. Keep up the great work Calvin your passion for building is refreshing and an inspiration to all of us here on the forum!! All the Best, John Edwards "500 LEGENDS" Thanks John! |
|
Deleted
Deleted Member
Posts: 0
|
Post by Deleted on Dec 12, 2010 23:13:17 GMT -5
Calvin...GREAT JOB!! Not only do you have an incredible ability to ask for and use the opinions of others to make your product better, but you have such a great attitude and a passion that makes reading your thread so much fun and enjoyable. This has been a highly anticipated and requested car. When done and ready to deliver this one is going to be a great success!! Amazing what you have done in such a short period of time. Keep up the great work Calvin your passion for building is refreshing and an inspiration to all of us here on the forum!! All the Best, John Edwards "500 LEGENDS"
Keep up the good work!Russ |
|
|
|
Post by stonecold44 on Dec 12, 2010 23:37:47 GMT -5
I also agree with Russ and John. I get a vicarious thrill looking at the work you put into your builds. This one looks even more involved than that Al Unser build from 1978 (?) or the 1981 Bobby Unser car. Just how long have you been building models?  |
|
|
|
Post by lance on Dec 13, 2010 0:18:30 GMT -5
I first met Bill Jorgenson in about 1993 when I purchased a 77 Coyote from him, my first resin kit, I soon decided I wanted to do a model of Ruby's 70 Mongoose. My first attempt was from a qualification photo. I had no experience with scratch building but still managed to produce a master I thought was pretty good, then I found out about Bob Clidnst's drawings and realized I needed to start over, I had produced a complete turd! Over the years I have learned many new skills, from research and planning to executing the build, but the most difficult skills can often be the mental ones, dealing with frustration and finding creative ways to overcome building challenges. You are doing a great job on this car and most importantly seem to be enjoying the process. Lance
|
|
|
|
Post by Calvin on Dec 13, 2010 0:28:14 GMT -5
I also agree with Russ and John. I get a vicarious thrill looking at the work you put into your builds. This one looks even more involved than that Al Unser build from 1978 (?) or the 1981 Bobby Unser car. Just how long have you been building models? Thanks! But I've been building since 2002 off and on..... Mostly Nascar w/ a few F1 mixed in. That was back when I could finnish a car in 2-3 days somehow? and it looked it too! From 2006-2008 I hardly got anything done because of college and Work. My first indycar build was an OOB AMT 1988 winner back in 2006? |
|
|
|
Post by Calvin on Dec 13, 2010 1:33:17 GMT -5
I just got done applying some Milliput in the top edge of the side pod. After 24hrs I can put a nice radius on it. Also take a look at my radiator exits, see what you guys think. 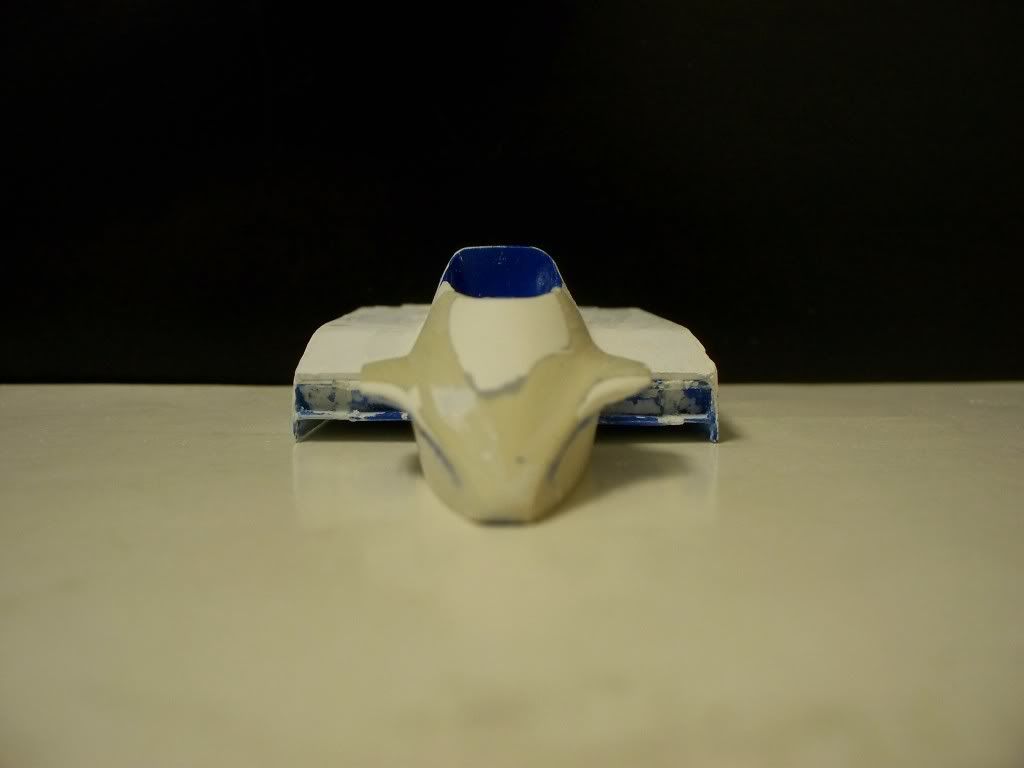 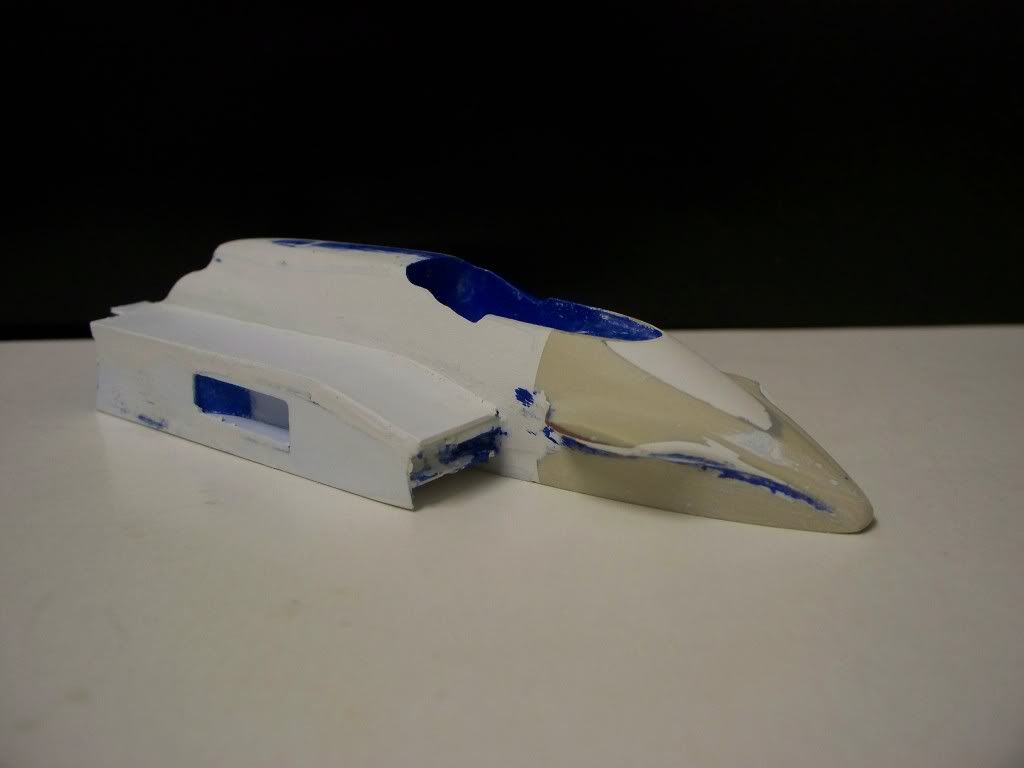 |
|
|
|
Post by Calvin on Dec 13, 2010 2:46:52 GMT -5
I need to cut that Exit and enlarge it. and angle down the front of pod. EDIT: I take that back Im having an illusion actually I think the main flat part of the side pod need just a little bit more height? 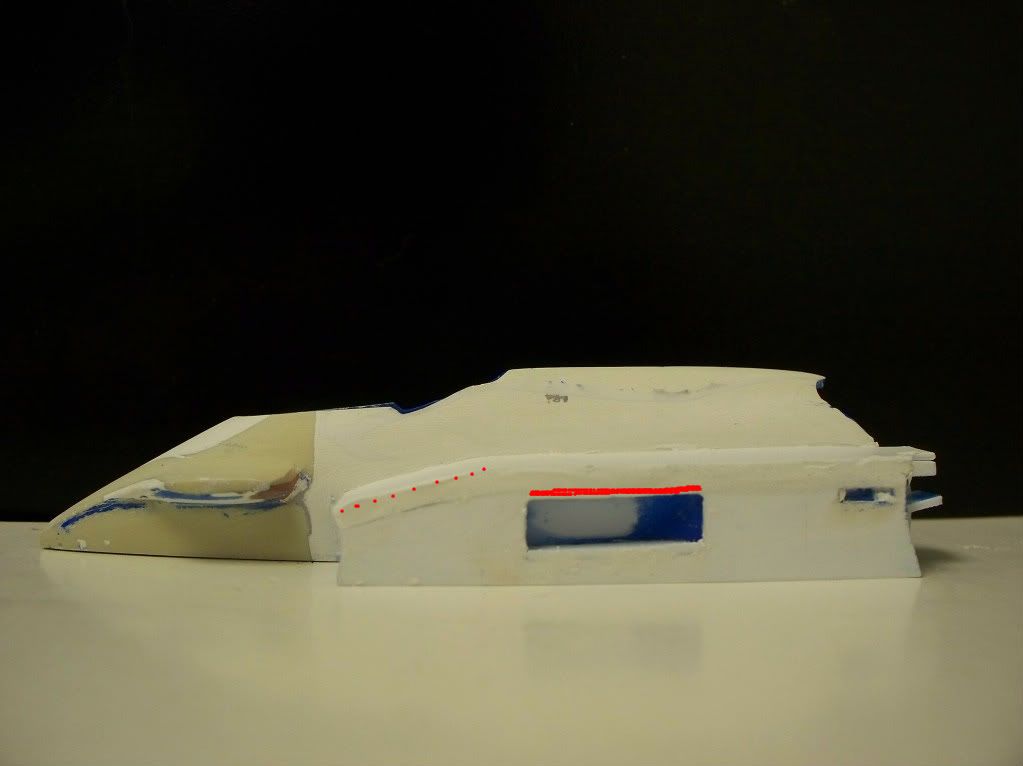 |
|
|
|
Post by indycals on Dec 13, 2010 3:21:53 GMT -5
I need to cut that Exit and enlarge it. and angle down the front of pod. EDIT: I take that back Im having an illusion actually I think the main flat part of the side pod need just a little bit more height? If you're talking about the overall sidepod height, no, I don't think so. |
|
|
|
Post by Calvin on Dec 13, 2010 3:28:24 GMT -5
yeah I think your right....Im starting to "loose it" Im tired LOL Im calling it a night Im going back and forth way too much LOL
I'll come back to it tomorrow and put that radius in the edge and go from there.....
|
|
drdave
Front Runner
Posts: 241
|
Post by drdave on Dec 13, 2010 12:47:04 GMT -5
I took these last year, maybe they will help. 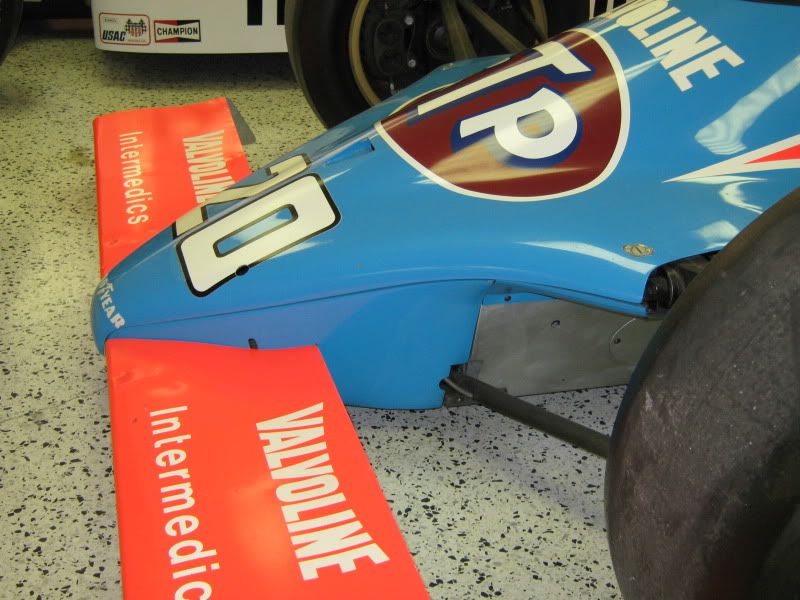 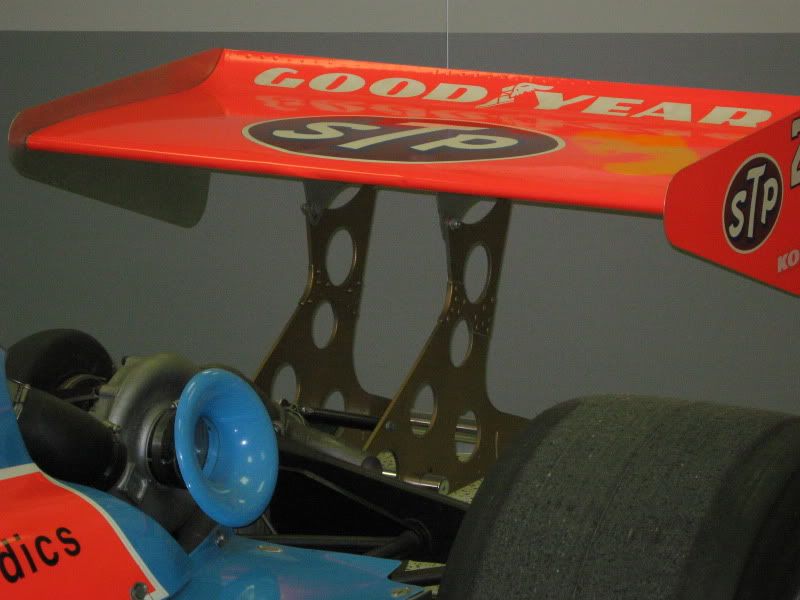 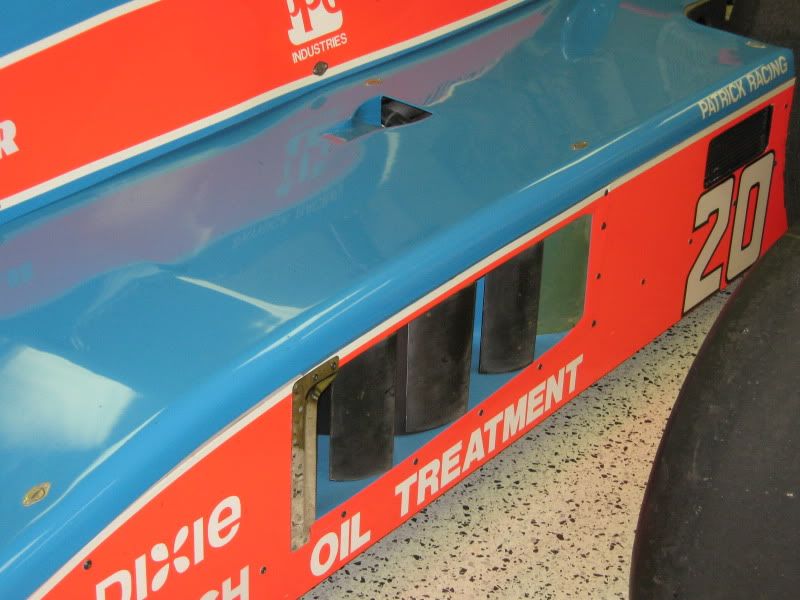 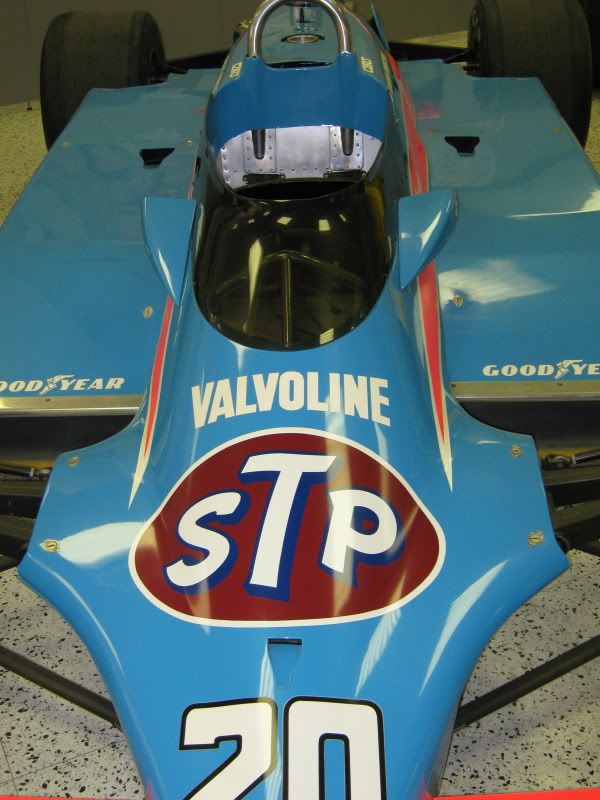 PS I want one too! Dr Dave |
|
|
|
Post by Calvin on Dec 13, 2010 13:34:47 GMT -5
Those are great Pics!!! Nice close ups!
Thanks Dave!
|
|
|
|
Post by stonecold44 on Dec 13, 2010 16:30:13 GMT -5
Calvin, are you making your own decals? Unless I'm wrong, I thought Fred Cady made a set for this car.
|
|
|
|
Post by indycals on Dec 13, 2010 16:33:11 GMT -5
I'm doing the decals - the artwork is all drawn up, just waiting for sizing. Will have markings for both Andretti and Johncock - accurate race day markings (The car in the museum is sort of a hybrid between qualifying, race day and show car markings).
|
|
Deleted
Deleted Member
Posts: 0
|
Post by Deleted on Dec 13, 2010 16:55:45 GMT -5
Calvin, are you making your own decals? Unless I'm wrong, I thought Fred Cady made a set for this car. Oh he did Gregg...Good luck finding one now and it has the wrong color red on it, sad to say. Best to you! Russ |
|
|
|
Post by indycals on Dec 13, 2010 17:37:36 GMT -5
Calvin, are you making your own decals? Unless I'm wrong, I thought Fred Cady made a set for this car. Oh he did Gregg...Good luck finding one now and it has the wrong color red on it, sad to say. Best to you! Russ The one time I met Fred I asked him if he could do dayglo colors. He said no. That said, I don't know if was a matter of 'couldn't' or 'wouldn't' as we have seen from other decals that dayglo silk screen ink does exist. My sheet will not even attempt to include the dayglo areas (it really isn't possible on the ALPS - I'd pay anything for dayglo ink if it was available) - those will have to be painted, it will include the white outlines for the dayglo area and I will post a masking template online that you can printout to aid in painting the dayglo areas so that the white outlines will fit properly. |
|
Deleted
Deleted Member
Posts: 0
|
Post by Deleted on Dec 13, 2010 18:24:21 GMT -5
Michael,
I accidentally discovered once while building a Tamiya McLaren 4B that sometimes, you can substitute a bright orange for day-glo red.
Just a thought...
Russ
|
|
|
|
Post by Calvin on Dec 14, 2010 0:13:37 GMT -5
|
|
|
|
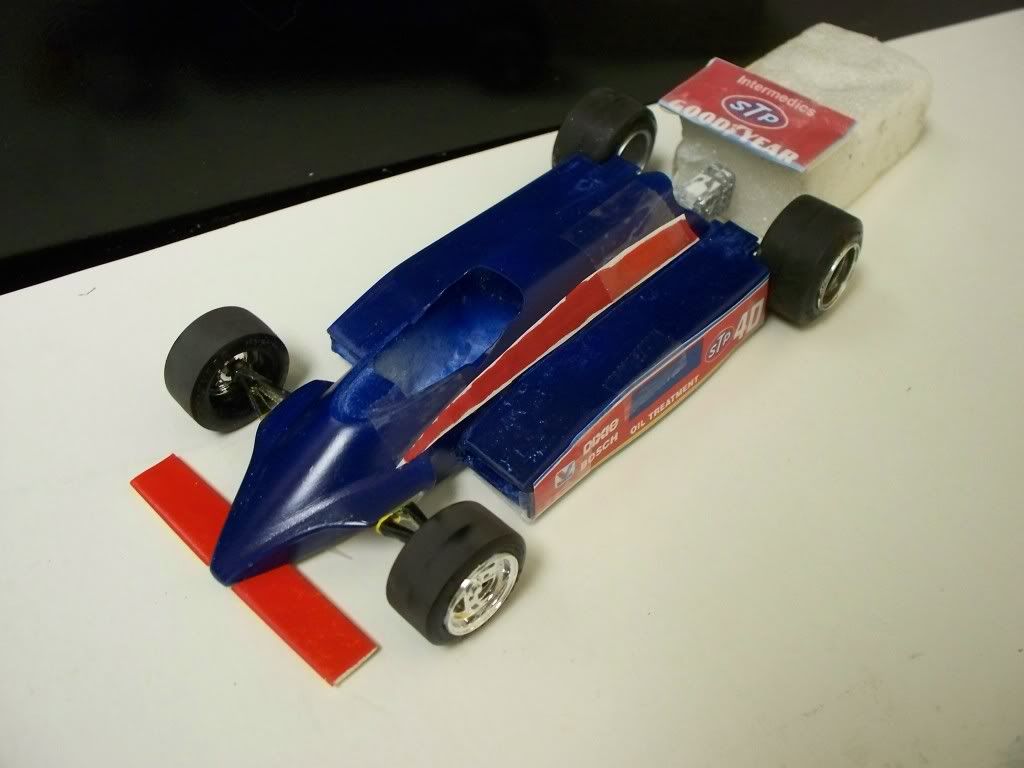
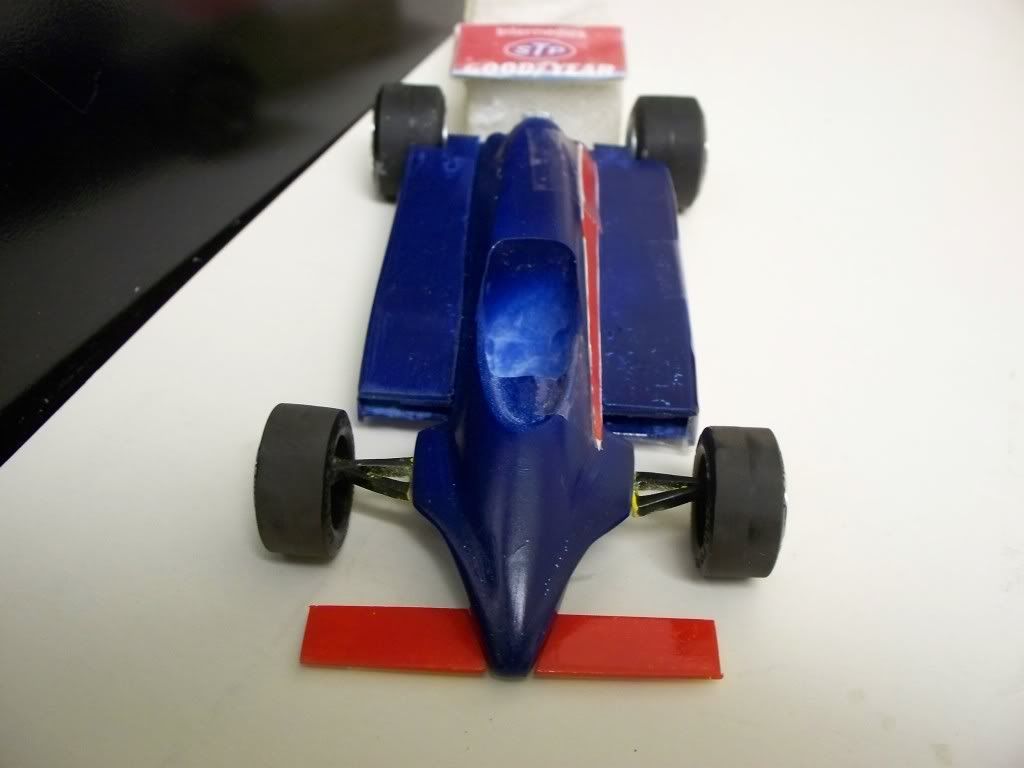
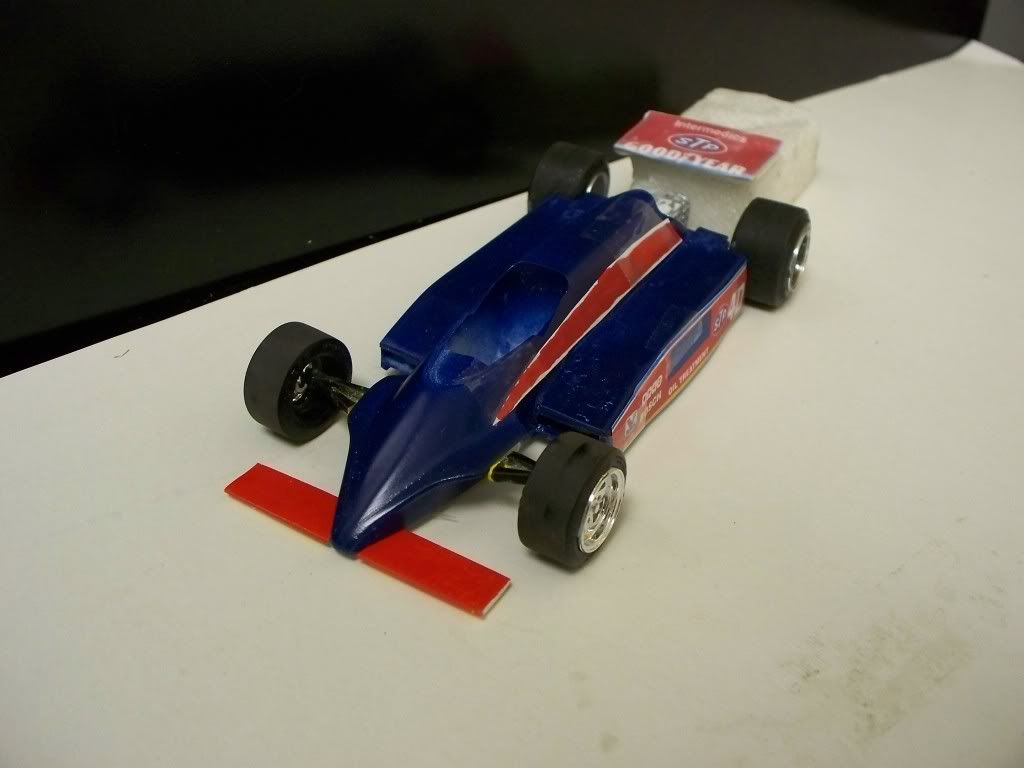
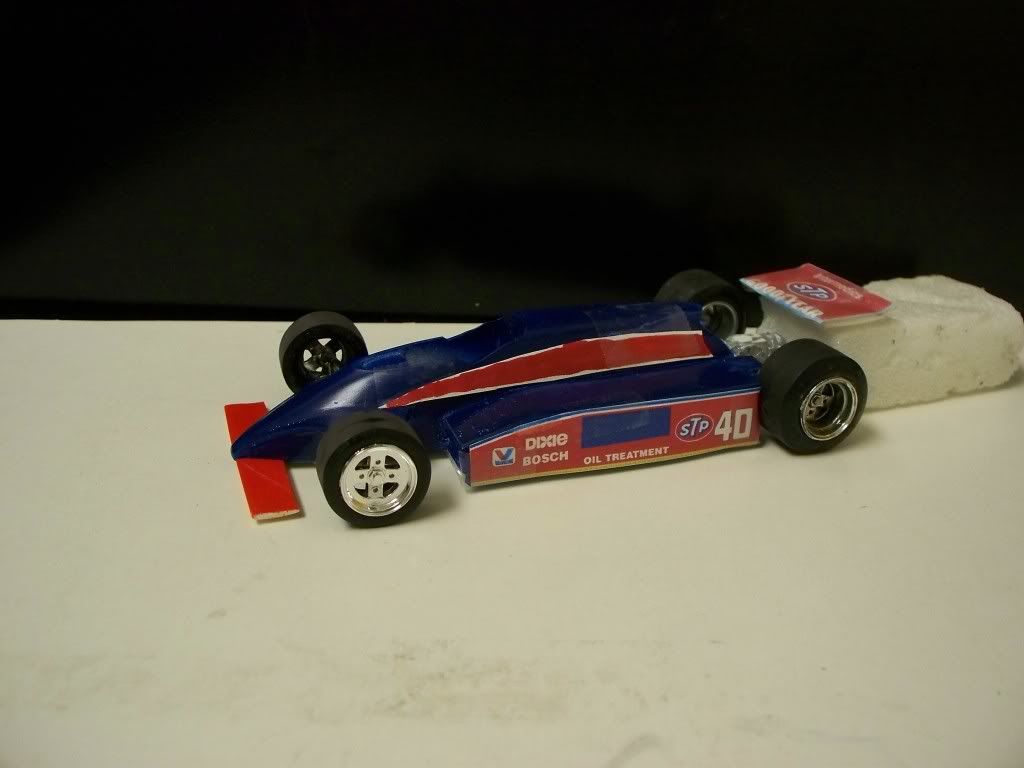
Post by Calvin on Dec 14, 2010 0:25:12 GMT -5
Ok, Ok lets get a little more serious here! Here is how it currently looks (without paper on it ) IMO its the closest its ever been! I still need to fix a lot things like the radiator inlets and exits, I need to fix the left side tunnel under the car, work on the rear cowling some more, add a little more to the bottom of the A-arm fin....and im sure a lot more little things. 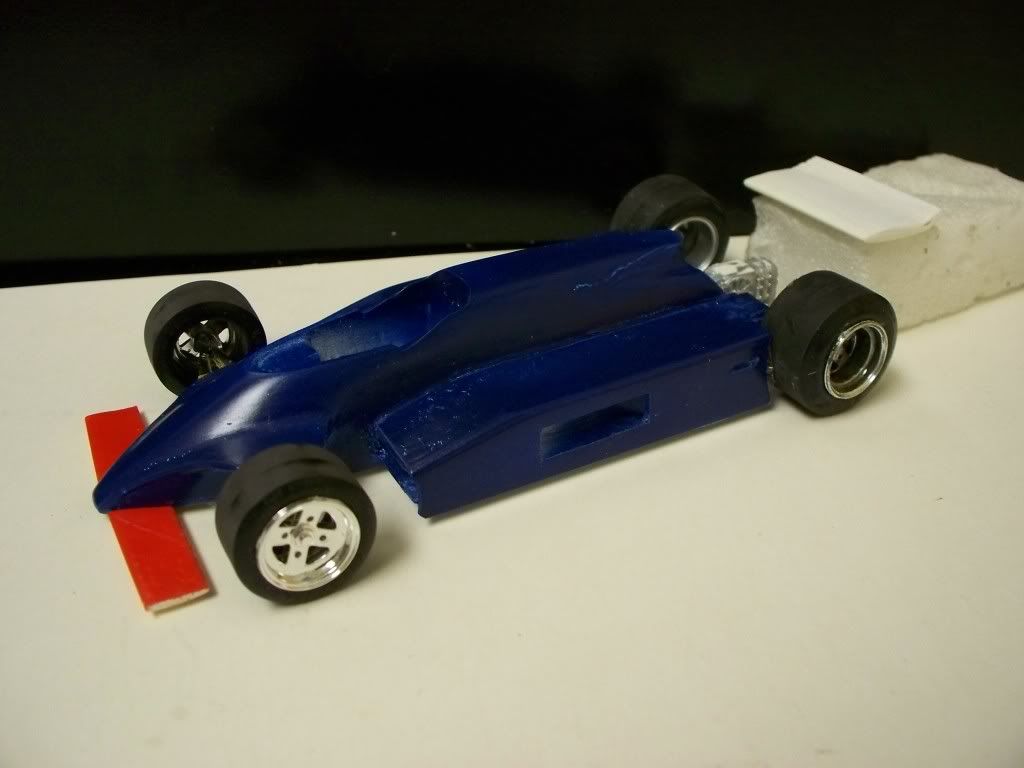 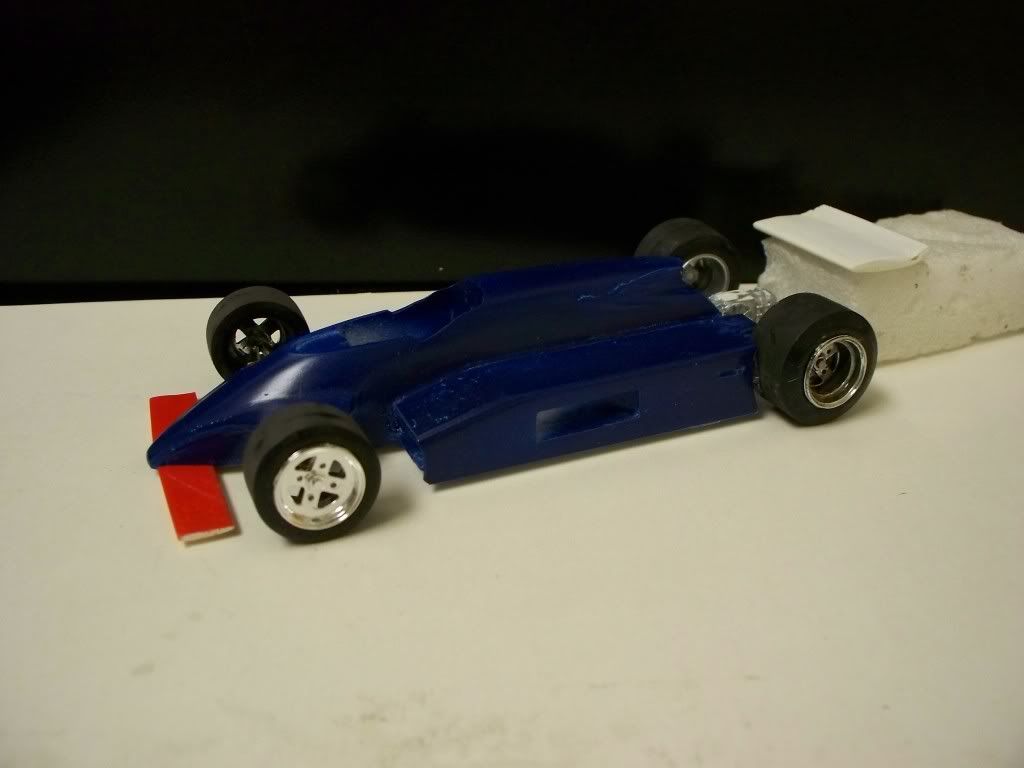 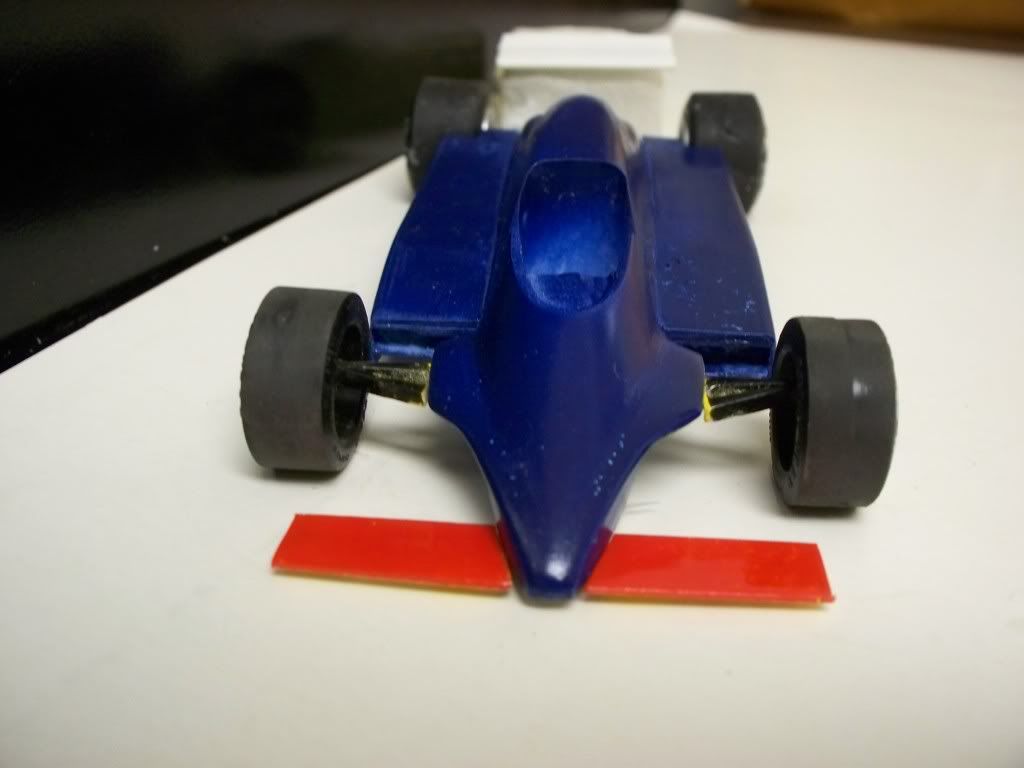 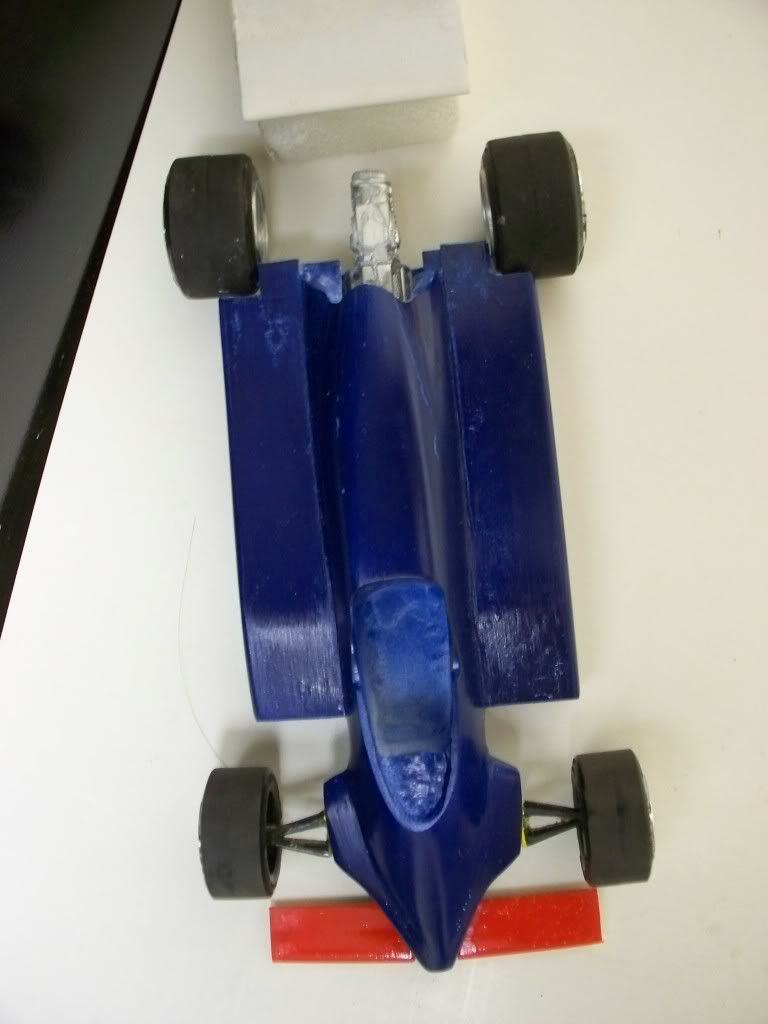 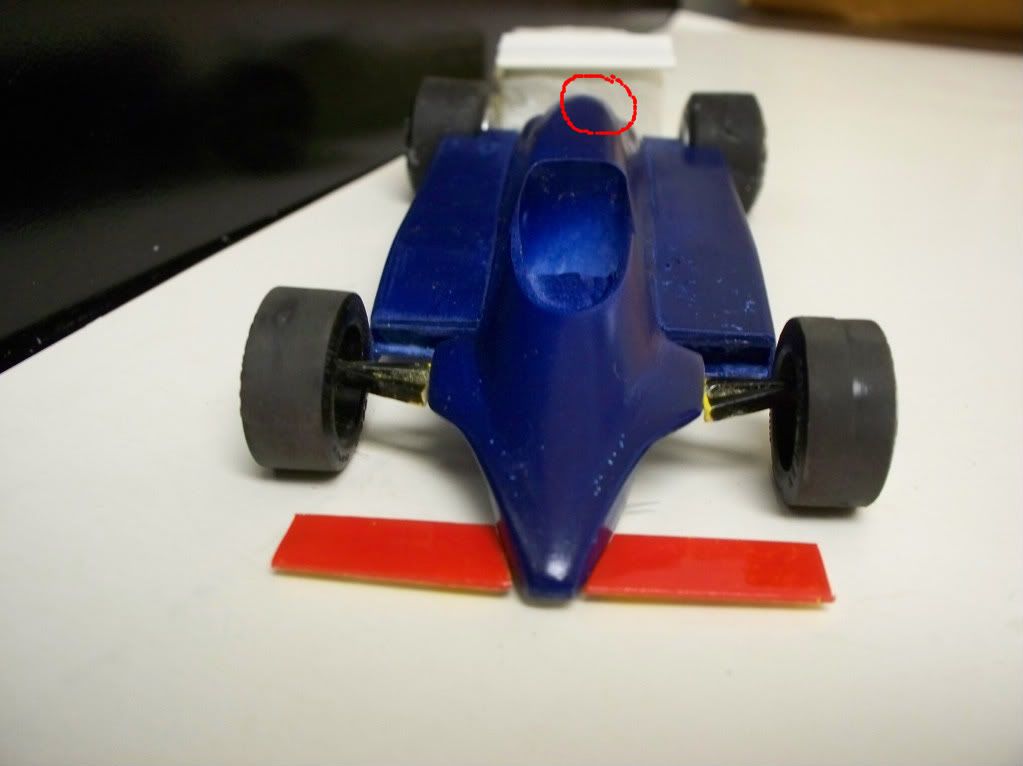 |
|


 I still have hrs/days/weeks to go. I cant stop intel I stop 2nd guessing myself.