|
|
Post by mrpeters on Sept 2, 2015 10:04:08 GMT -5
looking great! I've always wanted to know how to add those sidepod extensions. Is that all bondo, or is it styrene and then blended with filler?
|
|
|
|
Post by harveythedog2 on Sept 2, 2015 11:23:45 GMT -5
Styrene followed by filter. (White Squadron Putty)
|
|
|
|
Post by mrpeters on Sept 2, 2015 13:02:23 GMT -5
Stu - do you have a template for them? Or perhaps length and width? I'm going to try to put them on my Matos Marines car.
|
|
|
|
Post by harveythedog2 on Sept 2, 2015 13:36:43 GMT -5
Mike, I just make them from scratch each time I do them. I never thought I would have to do another Dallara I guess.
I flip the car over and hold a piece of scrap sheet stryene up against the nose and sidepod. I taka a pencil draw along the curved edge. Cut it out and the sheet plastic now matches the curve of the body.
The length is easy. It's from the curved part or leading edge of the sidepod to the cutout for the front suspension.
An easy way to gage it is to put your suspension in. The length of the body slat does not go past the front suspension.
|
|
|
|
Post by harveythedog2 on Sept 2, 2015 13:58:40 GMT -5
Oops! The width is easy too. Look at my pic. There is a body line that runs right to the slats. That's how wide it is!
|
|
|
|
Post by mrpeters on Sept 2, 2015 14:08:41 GMT -5
perfect! I'm working on my front wing right now, will glue on these pieces next to the tub! Looks like the styrene I'm using is about right thickness wise.  Not to hijack your thread for advice, but I imagine you are going to have to do a front wing, as well, so it's somewhat relevant. I glued styrene to the leading edge (but on top of) the original diecast wing mainplane to create the curves in the mainplane. What do you reccomend to fill this in and smooth out the surface? Will the Tamiya Basic Type Grey Putty (orange cap, if that matters) work here and then I can sand down as needed so its a smooth piece again? stevek51 has been in my butt today encouraging me to do way more than i ever planned  I like the result so far though! |
|
|
|
Post by Calvin on Sept 2, 2015 14:16:10 GMT -5
Everything looks to be off to a nice start, Stu!
|
|
|
|
Post by harveythedog2 on Sept 3, 2015 6:21:31 GMT -5
Mike, I emailed you some tutorials but Ralph is the master of these wings. In fact Ralph is the one building the front & rear wings for the JW winner. Ralph took the time to build jigs so when gluing the pieces together they fit perfectly with no gaps. If you are looking to fill gaps and imperfections I would use a Filler Primer. It fills gaps but is sandable so you can build up layers if you need to.
|
|
|
|
Post by mrpeters on Sept 3, 2015 7:26:36 GMT -5
Mike, I emailed you some tutorials but Ralph is the master of these wings. In fact Ralph is the one building the front & rear wings for the JW winner. Ralph took the time to build jigs so when gluing the pieces together they fit perfectly with no gaps. If you are looking to fill gaps and imperfections I would use a Filler Primer. It fills gaps but is sandable so you can build up layers if you need to. Thank you! I got them, and they are great. I sanded, and used some filler primer last night and it's looking LOTS better. |
|
|
|
Post by harveythedog2 on Sept 6, 2015 16:15:11 GMT -5
The JW car is painted red and I am letting it cure today before I paint the black. Michael's decals are awesome as well as all the wings and tidbits that Ralph has provided. Last night I finished up the JW figure while the paint is curing. 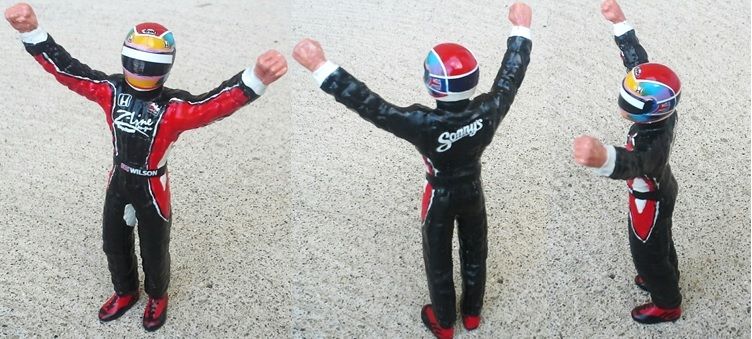 |
|
|
|
Post by chromehorn08 on Sept 6, 2015 16:48:02 GMT -5
Way cool Stu! Looks great! Can't wait to see the rest.
|
|
|
|
Post by indycals on Sept 6, 2015 17:25:06 GMT -5
Wow... that figure is awesome. Anyway we can get that pic added to the auction... might spur some interest and show that progress is being made.
|
|
|
|
Post by harveythedog2 on Sept 6, 2015 17:38:09 GMT -5
Steve said he thinks he can add a photo and is going to try.
|
|
|
|
Post by harveythedog2 on Sept 6, 2015 18:03:41 GMT -5
Steve has added the photo of the driver figure. He noted that I missed the Z-Line decals on his legs so those will be added.
|
|
|
|
Post by SWT500 on Sept 7, 2015 8:36:06 GMT -5
THANKS to everyone who contributed or bid. The car sold for $1,500 and is going to Dale Coyne. NICE JOB everyone!!!!!
|
|
|
|
Post by INDY22IAM on Sept 7, 2015 8:36:59 GMT -5
I was $75.00 away from winning this. In one way I was dissapointed that I could not and glad I did not go higher. My wife would have killed me spending that kind of money for a die cast (although it would have been well worth it). Great job everyone in on this project. I would love to see a story ran on this for the season opener for next year. I think it would be great PR for what kind of a tight nit race community Indy Car racing is and also would be a good shot in the arm for people to send in more donations to the family. Great job, great thought. Does anyone know who won the auction?
|
|
|
|
Post by chromehorn08 on Sept 7, 2015 9:49:14 GMT -5
That's pretty amazing!
|
|
Deleted
Deleted Member
Posts: 0
|
Post by Deleted on Sept 7, 2015 17:01:55 GMT -5
The Figure looks Great !!! Awesome Paint work Stu !!!
|
|
|
|
Post by alterrenner on Sept 8, 2015 4:55:02 GMT -5
This is the kind of let's-do-this, get-it-done spirit that makes this such a great forum!
Proud to be here. Proud to be a member!
Great idea, job well done!
--Frank
|
|
|
|
Post by harveythedog2 on Sept 8, 2015 8:30:04 GMT -5
So far so good. 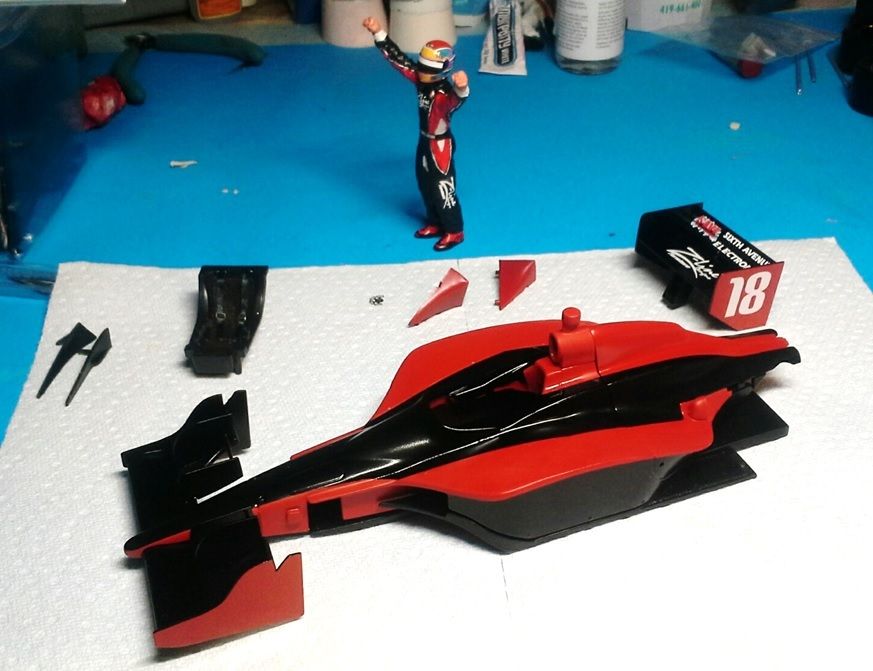 |
|
|
|
Post by clm1545 on Sept 8, 2015 9:27:46 GMT -5
Fantastic work, Stu. That price might be a bargain for this build.
|
|
|
|
Post by harveythedog2 on Sept 9, 2015 7:25:28 GMT -5
Coming along slowly but should make some better head way tonight. Notice how the nose cone stripes do not line up with the body stripes. There is also an extra black line on the nose cone stripe. At some point during the race JW had to replace the wing/nose assembly and the paint livery was slightly different. This is how the car finished so the mismatched stripes on our replica are on purpose.  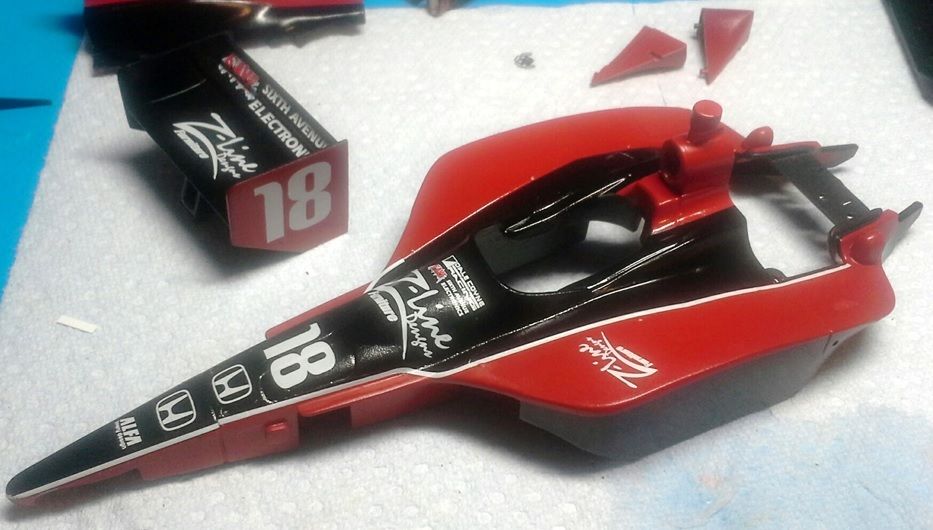 |
|
|
|
Post by Calvin on Sept 9, 2015 8:15:04 GMT -5
Fantastic stuff!
Really looking nice!
|
|
|
|
Post by GrandPrecision on Sept 9, 2015 8:27:20 GMT -5
Coming along slowly but should make some better head way tonight. Notice how the nose cone stripes do not line up with the body stripes. There is also an extra black line on the nose cone stripe. At some point during the race JW had to replace the wing/nose assembly and the paint livery was slightly different. This is how the car finished so the mismatched stripes on our replica are on purpose.  Looking amazing Stu, the "double Honda" logos on the nose are hilarious, definitely indicates that nose wasn't planned to run on that car! |
|
|
|
Post by indy on Sept 9, 2015 9:19:52 GMT -5
Love the detail work. Take some pictures with you when you show it to DC, I think he will be impressed!
Jordan
|
|
Deleted
Deleted Member
Posts: 0
|
Post by Deleted on Sept 9, 2015 13:42:31 GMT -5
Awesome Looking Car so Fa r ! Great Looking Wings Stu !
Robby
|
|
|
|
Post by mrpeters on Sept 9, 2015 14:44:53 GMT -5
Fantastic, as I knew it would be. Great attention to detail on the replacement nose cone!
|
|
Deleted
Deleted Member
Posts: 0
|
Post by Deleted on Sept 11, 2015 15:03:06 GMT -5
Stu,
For the Rear Wing ! Do you have to make a Special Wing Post to mount to the Wing and then to the Car ?
Thanks !!!
|
|
Deleted
Deleted Member
Posts: 0
|
Post by Deleted on Sept 11, 2015 17:45:37 GMT -5
Stu,
I could use a set of those RC Wing for my Ryan Hunter-Reay Project ! Hint Hint LOL:-)
Thanks !!!
|
|
|
|
Post by harveythedog2 on Sept 12, 2015 18:11:47 GMT -5
This is what it looks like Saturday Night. Doing the red stripe tires right now. A few minor things, some touch up and it will be ready to mount to the base. More tomorrow hopefully. 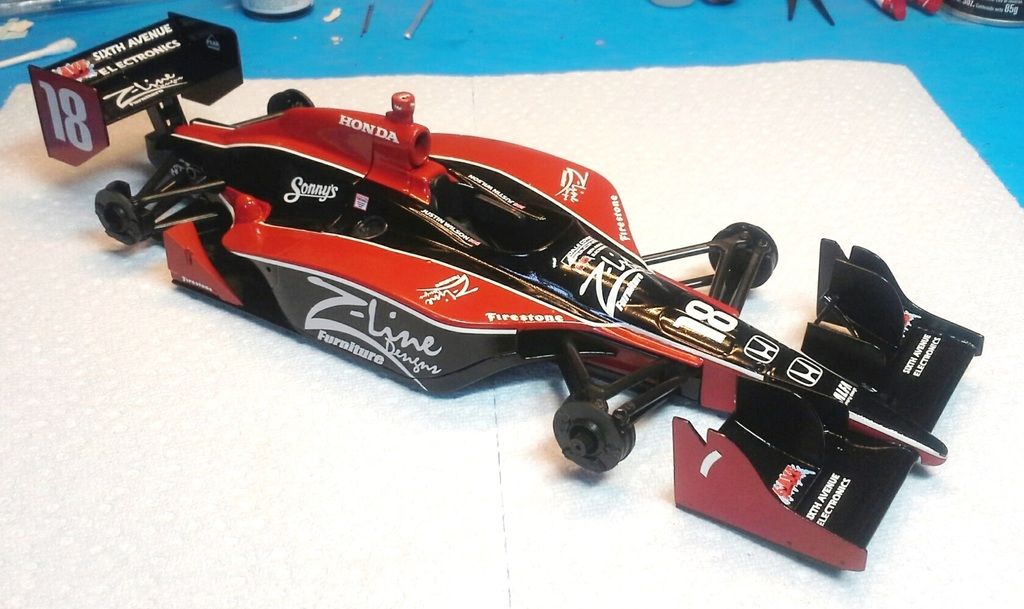 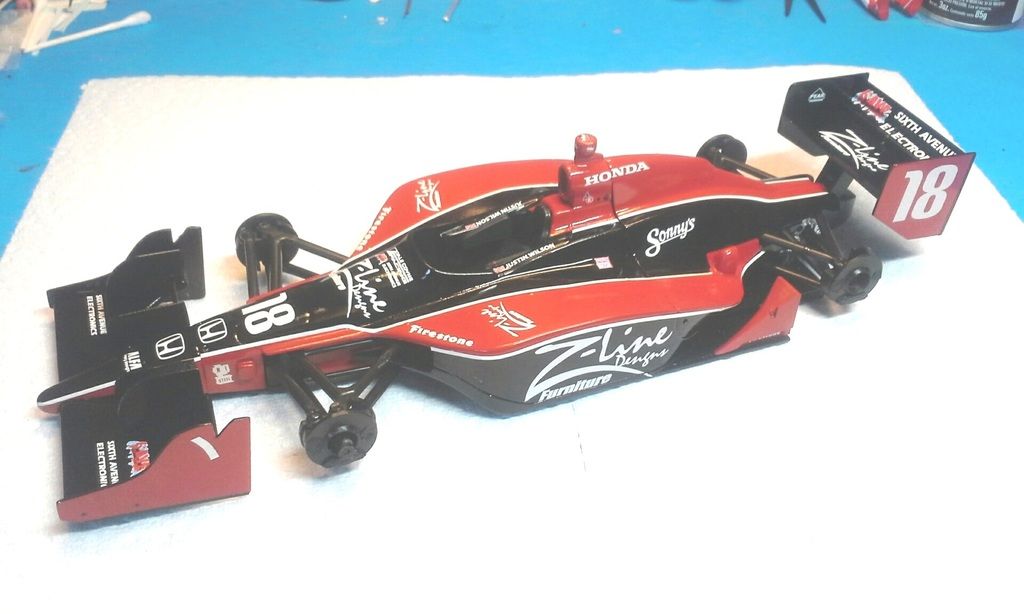 |
|