|
|
Post by Patrick on Dec 10, 2013 5:48:06 GMT -5
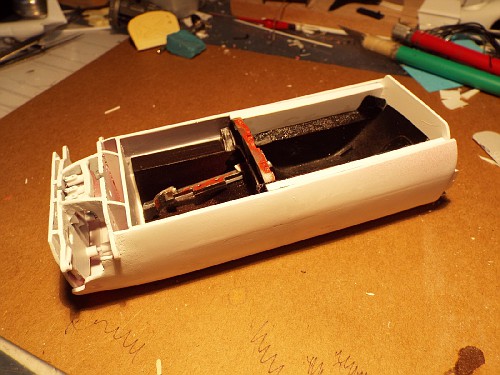
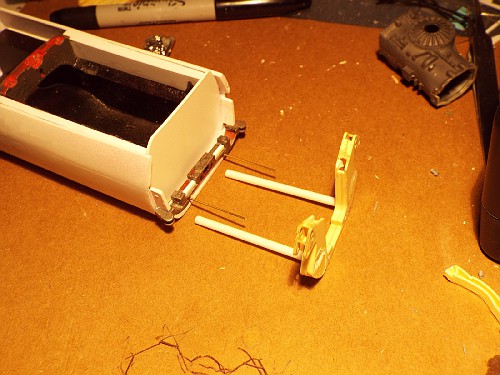
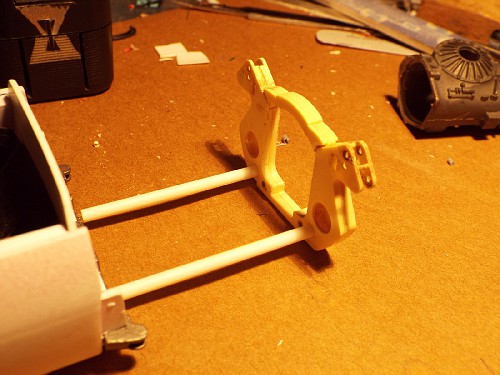
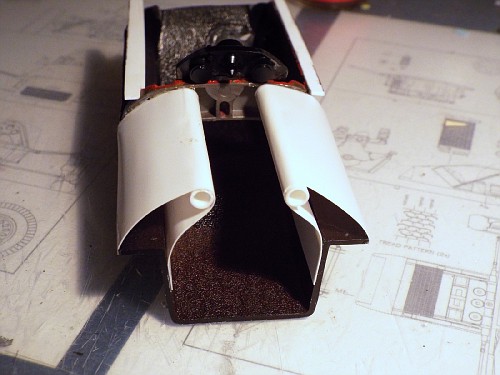
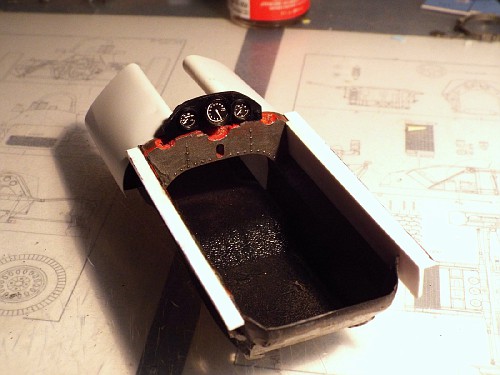
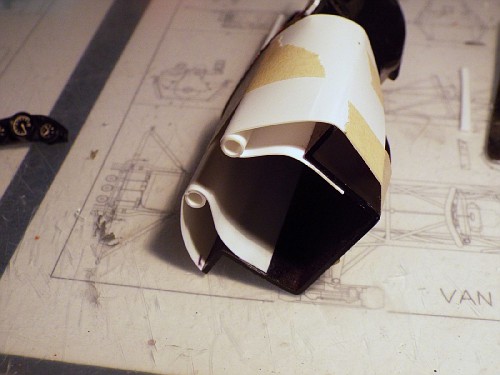
Ok, here it is...my great find from EvilBay... 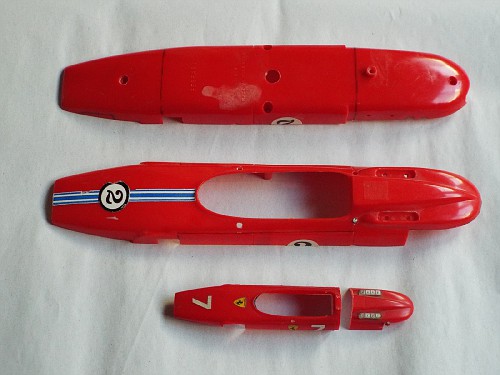 I can't find the photo of what it looked like when together, but when I do I'll show a before and after. So then, here it is in the two main halves... 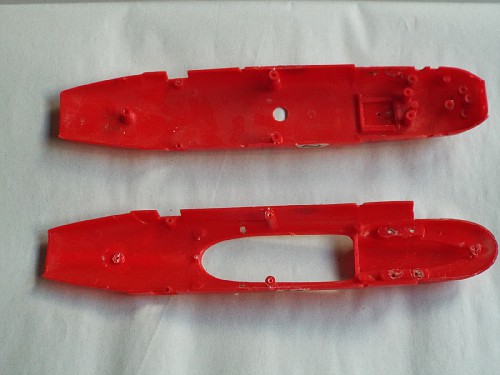 I then proceeded to cut off the monocoque part from the body part... 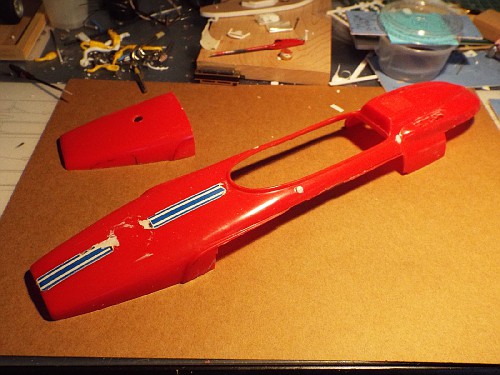 I then fabricated some bulkheads from Evergreen sheet... 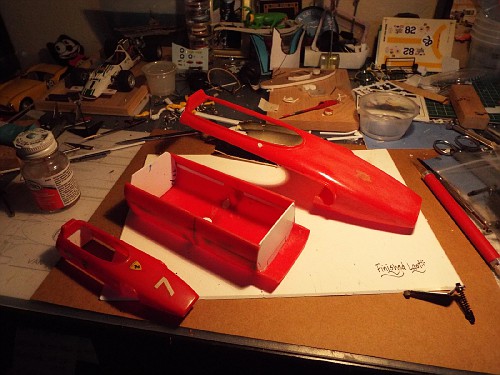 I then began to cut up a Tamiya Honda RA301 that Chris gave me (It was a model his Dad built long ago!)and used the rocker arm assembly to begin to establish the front suspension... 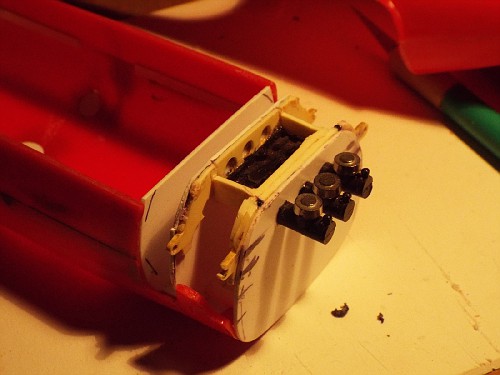 I miscalculated the proper distance and had to cut and glue a section of the lower nose onto the monocoque... 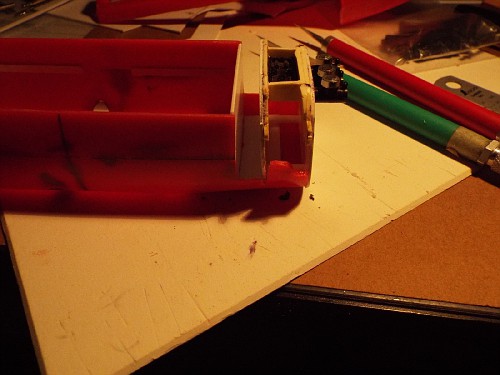 Then, I received a Tamiya Ferrari 312B F1 glue bomb from RaceParke and changed out the Honda suspension assembly with the Ferrari suspension assembly and fit the Ferrari's interior into the monocoque... 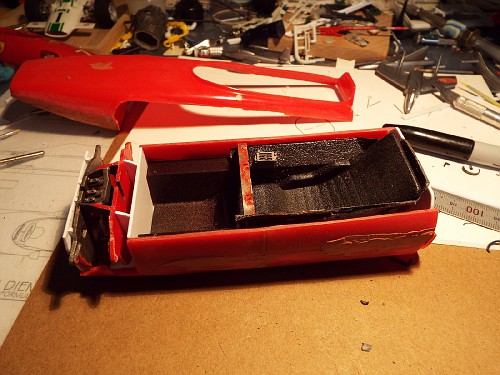 Tonight I began to patch up the mis-cut area in the front of the monocoque... 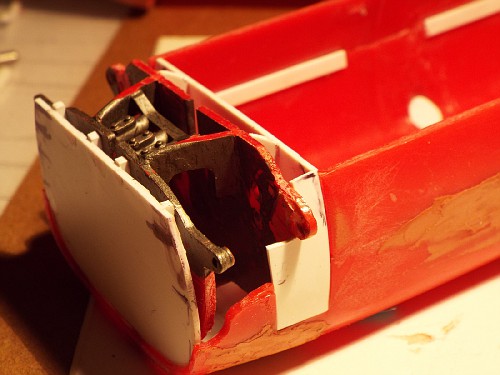 Well, we are making progress on this... 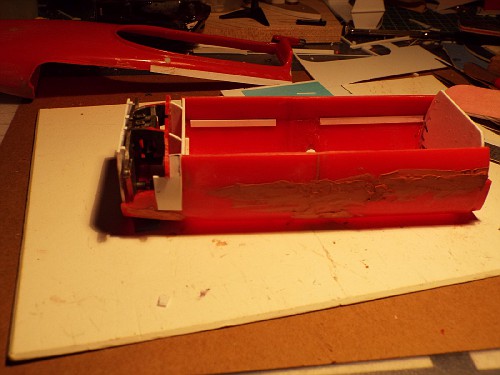 I am amused that the 1/12 body is a near copy of the Cox slot car body... 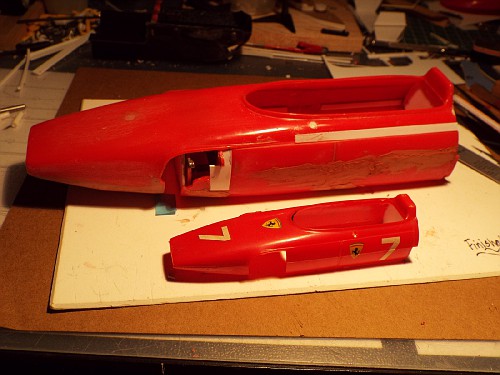 I'm combining parts from both kits in the interior with the seat insert from the Ferrari with the seat of the Honda... 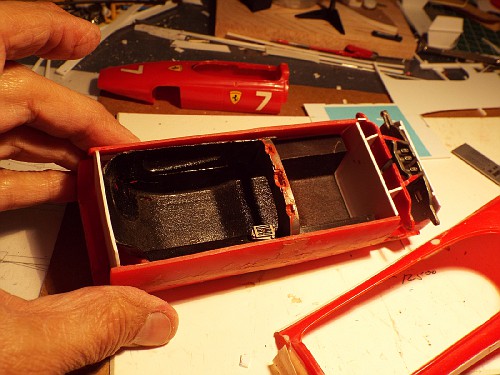 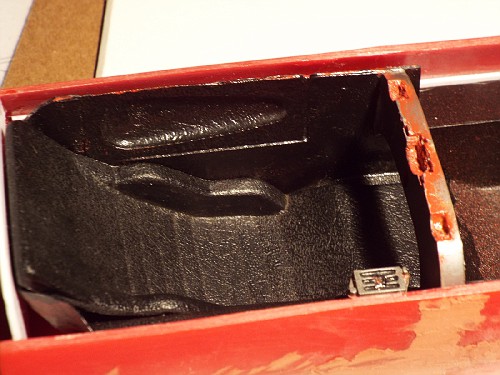 Since I have built 3 "aero chassis(ed)" Ferraris, read monocoque, GP cars in 1/24 this is fun to up scale (literally) the 158/246 and a 1512 is in the works (The #7 1/24 slot body will be the flat-12 car). I won't make this a super detailed model, but I won't make a 1/24 "big" model either. My thanks to Chris and Dan for their kindness in this project. |
|
|
|
Post by indy on Dec 10, 2013 9:30:59 GMT -5
Nice work, Patrick! 60's F1 Ferrari's are some of the nicest ones in my opinion - simple, sleek, fast, dangerous, and beautiful.
Jordan
|
|
|
|
Post by raceparke on Dec 10, 2013 15:48:49 GMT -5
Wow! Patrick's builds are like Jim Clark's races- immediately put in a couple really impressive laps from the start and then proceed with great rapidity until the finish.
|
|
|
|
Post by SWT500 on Dec 11, 2013 8:19:09 GMT -5
 Somebody must be on Christmas break!! Rock on Patrick!! Somebody must be on Christmas break!! Rock on Patrick!! 
|
|
Deleted
Deleted Member
Posts: 0
|
Post by Deleted on Dec 11, 2013 11:52:39 GMT -5
Absolutely stunning. I respect your ability to see the potential and to achieve it.
|
|
|
|
Post by Patrick on Dec 11, 2013 13:18:58 GMT -5
Thanks guys. This should come out pretty good. Trevor sent me some resin wheel inserts from the ABC 1/12 resin kit of the 158 (its muy expensivo)which will fit well with 312B's rims when cut down. I'm working on body work, puttying, and sanding.
Patrick
|
|
|
|
Post by Patrick on Dec 11, 2013 19:15:02 GMT -5
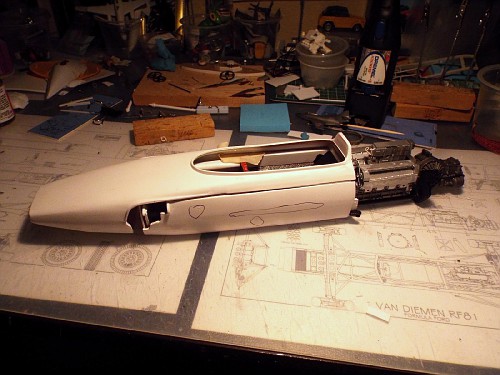
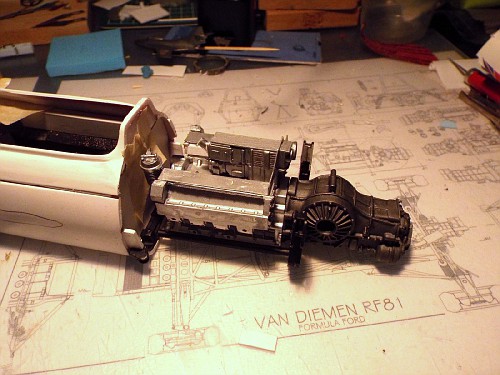
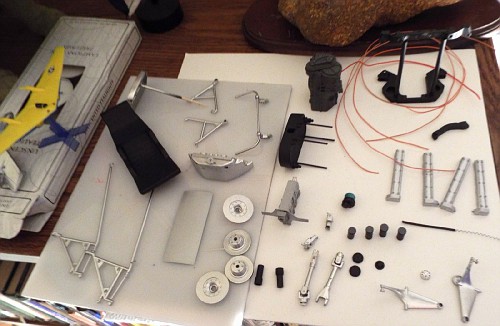
Here's the HK toy as I got it... 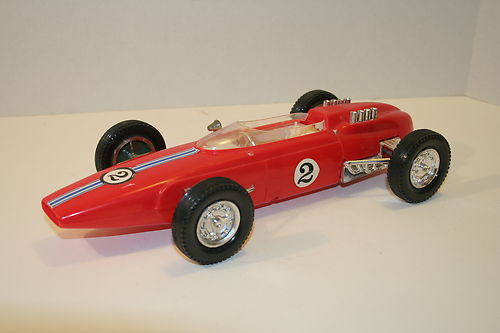 Patrick |
|
|
|
Post by Patrick on Dec 22, 2013 16:55:42 GMT -5
|
|
|
|
Post by Calvin on Dec 23, 2013 0:46:40 GMT -5
Looks like you made your 2,000th post a good one!  |
|
|
|
Post by Patrick on Dec 23, 2013 13:14:15 GMT -5
Thanks Calvin. I didn't know. I'm just havin' fun!
Patrick
|
|
|
|
Post by Chris on Dec 24, 2013 13:51:07 GMT -5
Patrick, watching your transformations is a motivating experience like no other when it comes to building. I received the flat 12 engine, Thanks, and am looking at starting several projects, foremost in mind is the Pinnifarina Sigma in 1/12th.. Thanks again for motivating me and the engine.. Chris
|
|
|
|
Post by Patrick on Dec 24, 2013 14:06:34 GMT -5
Chris,
No, I thank your Dad for building the Honda and you for donating it to the project. Knowing how important your Dad was to the hobby, I am honored to have the Honda in this project.
Patrick
|
|
|
|
Post by billgtp on Jan 3, 2014 20:43:02 GMT -5
This is great. Very nice work
|
|
|
|
Post by Patrick on Jan 4, 2014 12:55:40 GMT -5
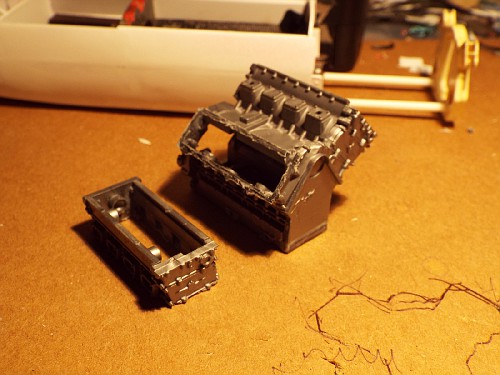
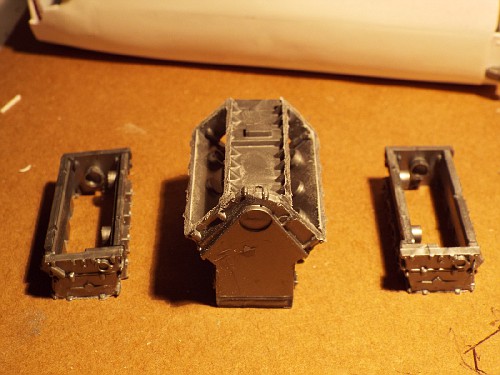
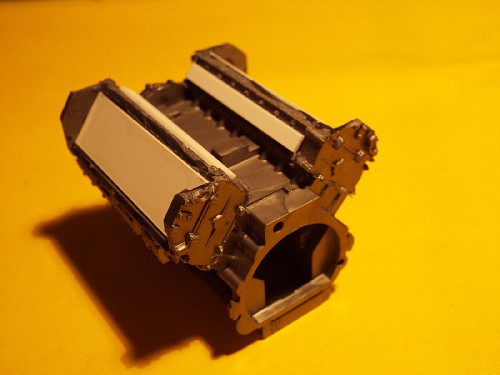
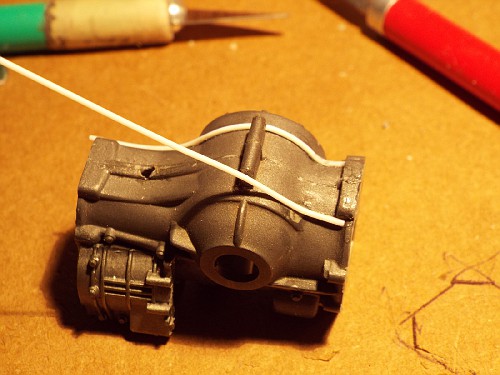
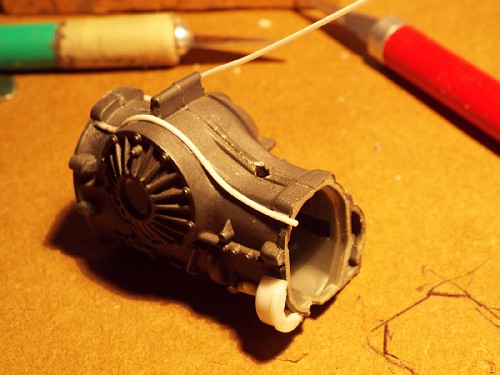
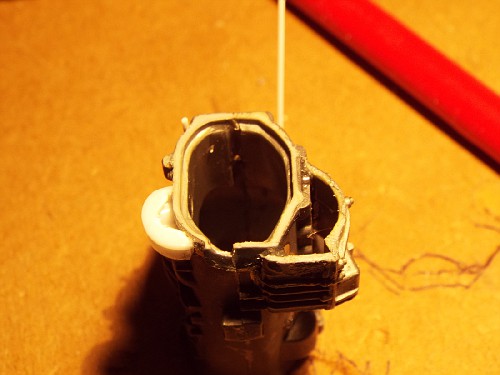
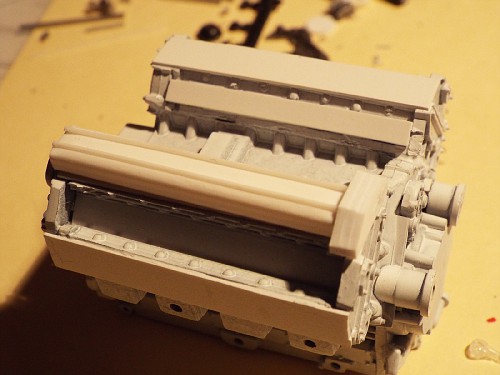
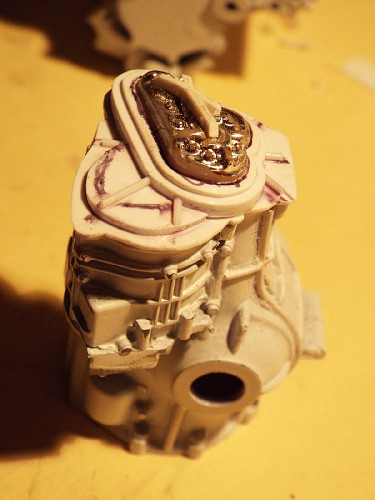
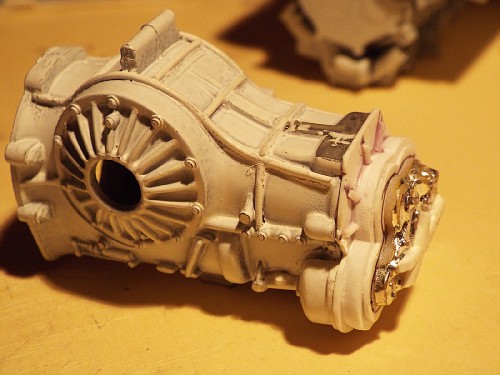
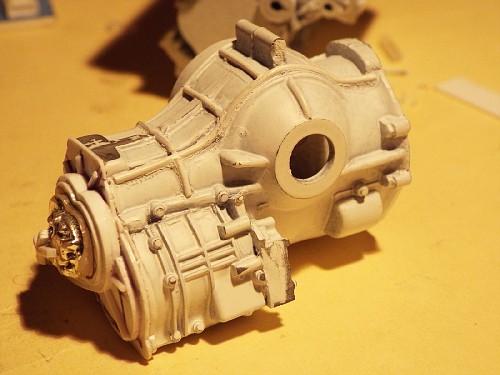
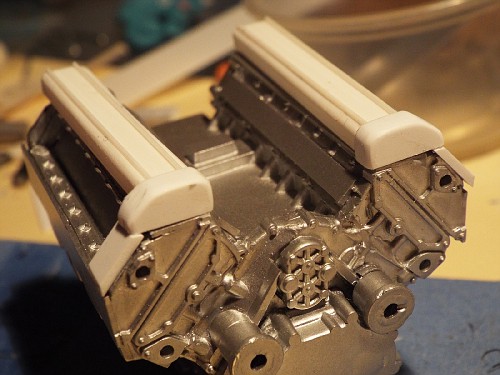
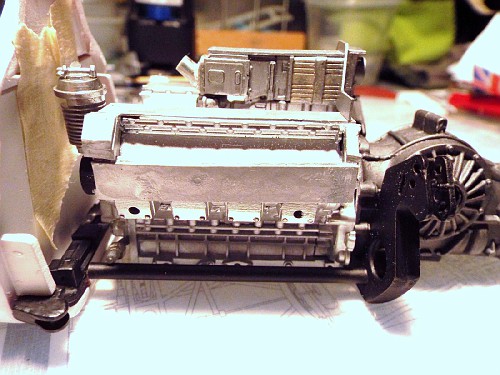
Ferrari-ization of the parts has been progressing slowly, but positively. Here's the transaxle unit close to being done. Time to add some bolts... 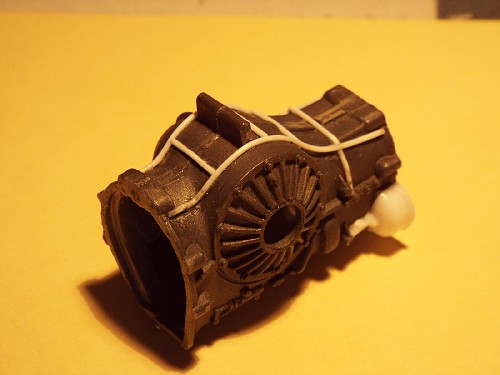 I've learned over time to save scraps that I cut-off and here is an example of saving the pieces from the head that I cut off for the cam covers of being useful later on. I needed to put a piece of plastic under the cam cover location and I used the mentioned pieces... 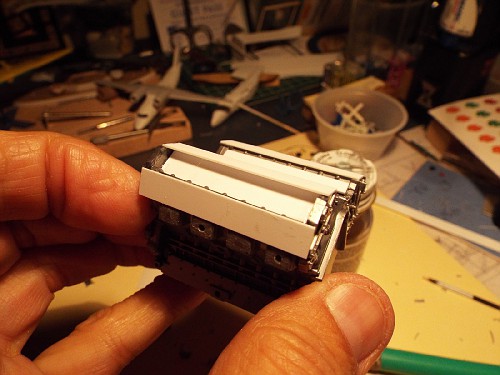 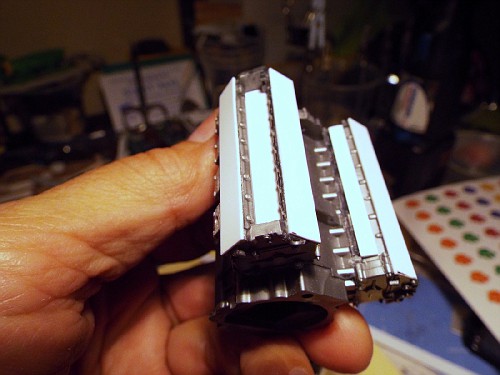 With a little sanding and shaving they fit reasonably well. The next items to tackle are the cam covers themselves. I bought some 1/2 round Evergreen strips, but I think a channel strip will work better once it is sanded rounder. So, here's where we are now... 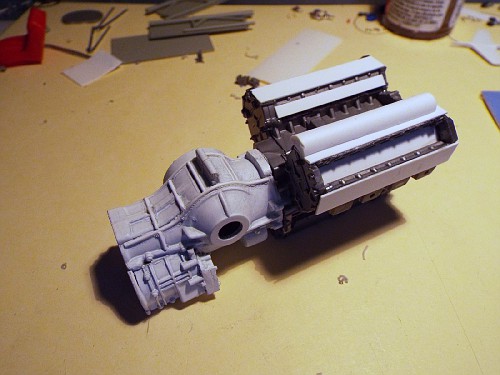 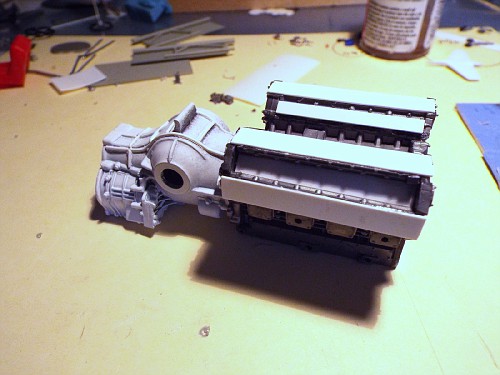 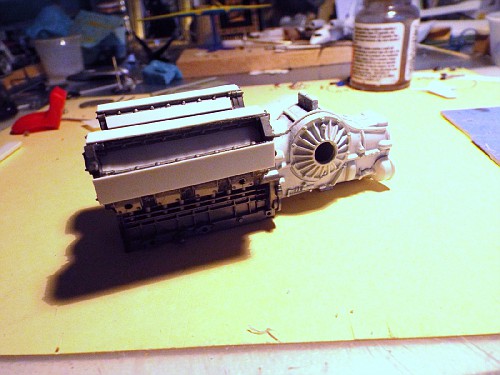 I mentioned the 1/24 Cox body was going to be a flat-12 car and here is a picture of the engine progress so far... 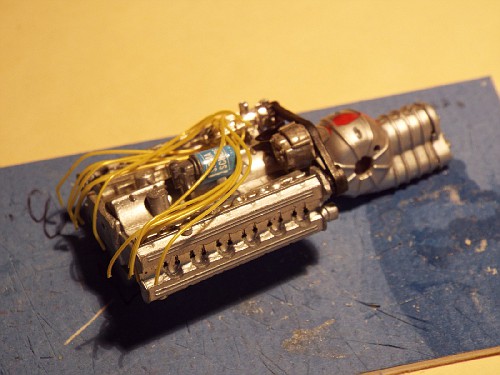 The clear lines are the fuel injection lines. I do love the typo-158 and feel it IS the classic F1 car. Yes, I'm prejudiced a tad. Patrick |
|
|
|
Post by beardogracing on Jan 4, 2014 14:21:19 GMT -5
Hi Patrick, My attempt at a 1512, it's a 1/32nd slot car I did a few years ago, 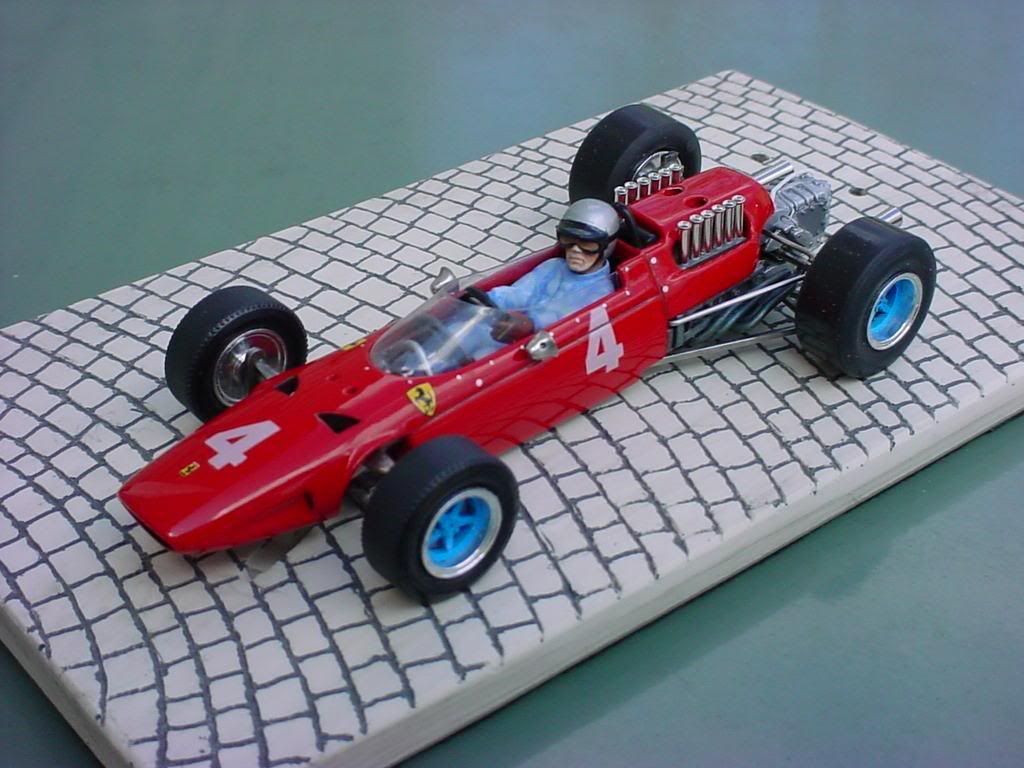 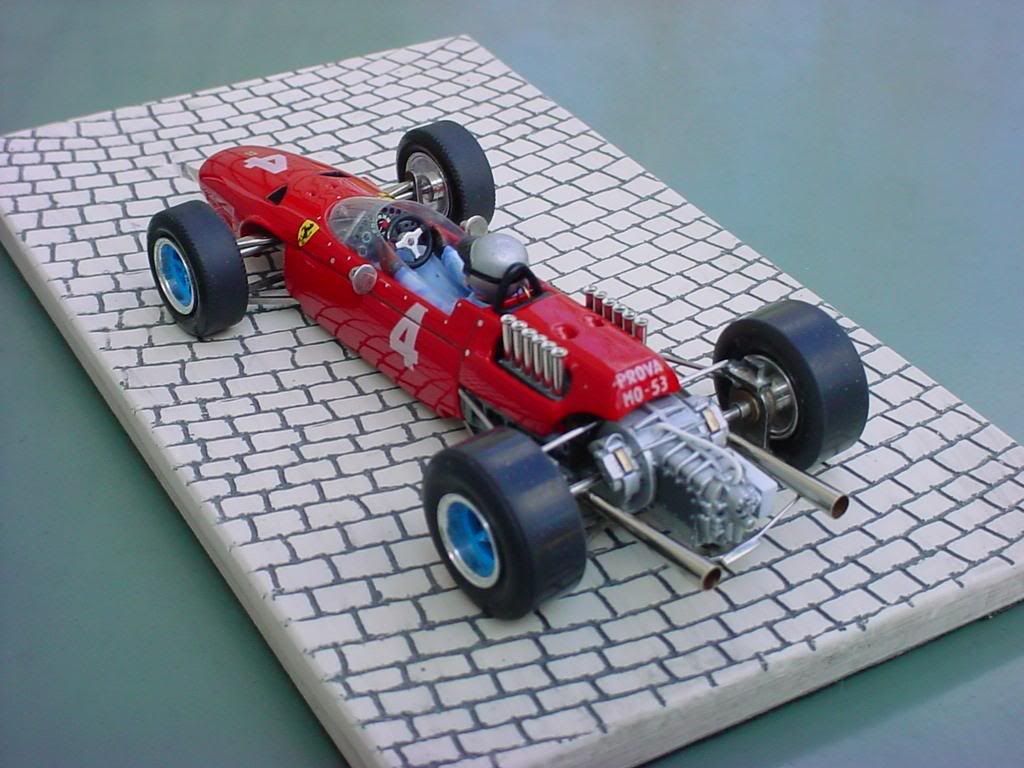 Looking forward to the progress on your 158's Chris |
|
|
|
Post by Patrick on Jan 4, 2014 14:46:25 GMT -5
Very nice...gawd I loved slot car racing! My favs were my 1/32 sharknose and my 1/24 Mini-Cooper! I soldered a brass spaceframe chassis for my 1/24 Brabham F1...it looked great...until "SMACK" into the wall at high speed! LOL what a twisted mess it was. Glad you like the 158.
Patrick
|
|
|
|
Post by Calvin on Jan 5, 2014 0:38:33 GMT -5
Awesome Stuff!
|
|
|
|
Post by kurzheck on Jan 7, 2014 17:41:45 GMT -5
Patrick,
Check out Ebay seller victoriamgb for your tires. He has 1/12 scale Lotus 25/33 and BRM 261 kits. If you message him he may be able to help you out. Otherwise I would look at some 1/18 muscle car diecasts for something close.
|
|
|
|
Post by Patrick on Jan 7, 2014 21:16:52 GMT -5
Excellent idea Trevor, thanks! Keep warm!
Patrick
|
|
|
|
Post by Patrick on Jan 11, 2014 15:00:55 GMT -5
|
|
|
|
Post by Calvin on Jan 11, 2014 18:34:47 GMT -5
This is another one of those enjoyable threads to watch.
|
|
|
|
Post by indy on Jan 13, 2014 9:32:06 GMT -5
Gorgeous scratch-building! It is a treat to watch this one come together!! I look forward to each new update.
Jordan
|
|
|
|
Post by Patrick on Jan 13, 2014 22:51:20 GMT -5
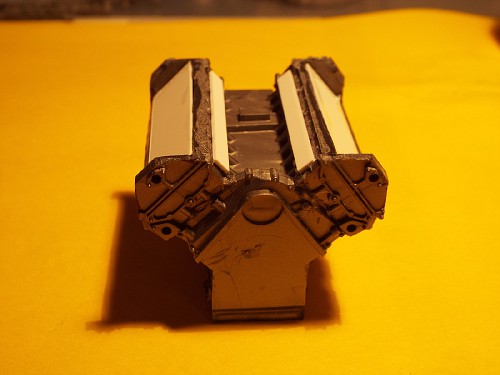
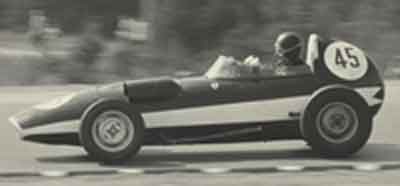
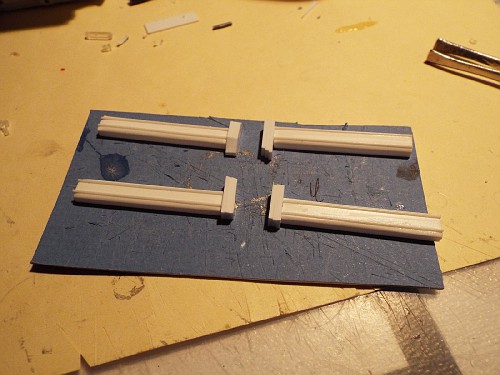
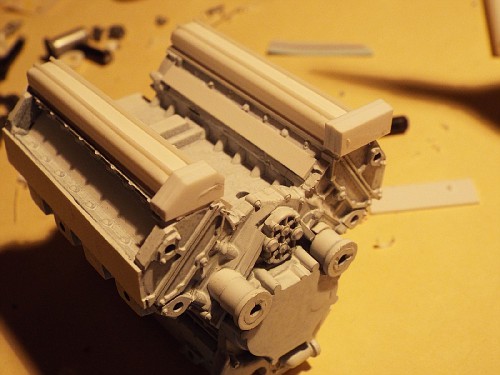
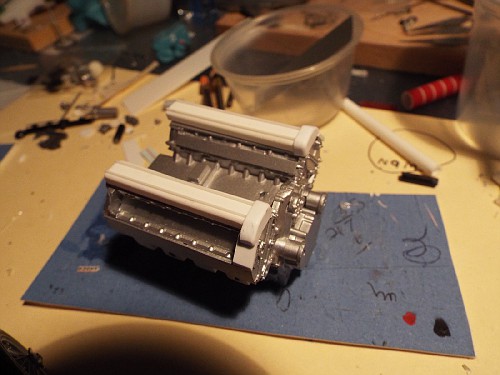
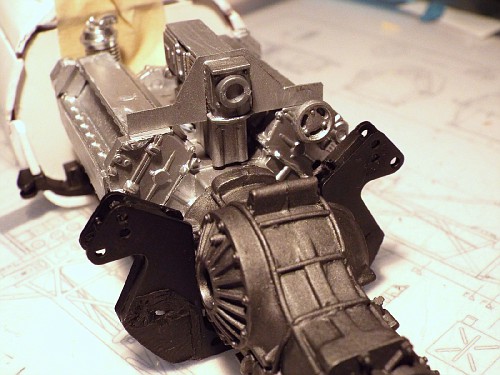
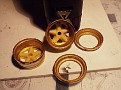
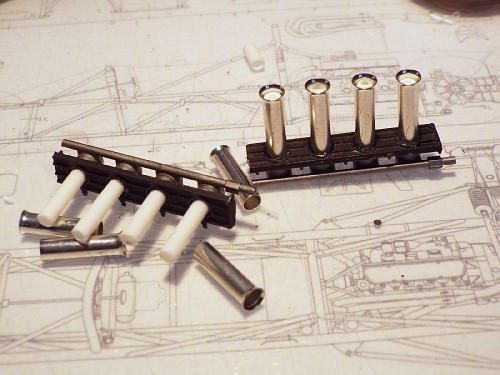
Thanks guys. I actually think this is coming out really well so far. The cam covers came out well with the addition of Grandt Line's 1/4 scale 1 1/2" hex nut and bolt #127...  The fuel pump is a delicate looking finned unit that I tried to replicate with hole punched plastic sheet. It looked lousy so I picked up my Uni-Ball pen, uncapped it and looked at the most beautiful, delicate fin mechanism that I ever could scrounge up! 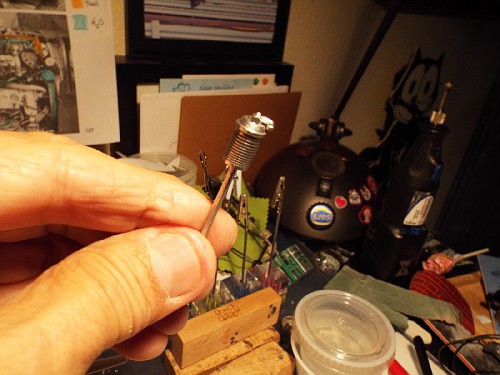 This will get buried in the engine bay, but it looks great.  this is the front of the engine with the fuel injection unit sitting in the center of the engine and the twin distributors' location on the front of the engine. This is such new stuff I have to know and make look real. Example, where are the fuel injection lines? I don't see them! Well, that's what we do...I forgot to mention that this is the 50th anniversary (May 1964-May 2014) if my interest in F1 racing and of my being a Ferraristi! So, I chose to do an early season Ferrari 158/64 of John Surtees driven at the 1964 Monaco Grand Prix...   Elegant, slim, fast. Ohhhh! I love it! Patrick |
|
|
|
Post by kuzlynn on Jan 14, 2014 6:25:20 GMT -5
Thanks guys. I actually think this is coming out really well so far. The cam covers came out well with the addition of Grandt Line's 1/4 scale 1 1/2" hex nut and bolt #127... The fuel pump is a delicate looking finned unit that I tried to replicate with hole punched plastic sheet. It looked lousy so I picked up my Uni-Ball pen, uncapped it and looked at the most beautiful, delicate fin mechanism that I ever could scrounge up! This will get buried in the engine bay, but it looks great. this is the front of the engine with the fuel injection unit sitting in the center of the engine and the twin distributors' location on the front of the engine. This is such new stuff I have to know and make look real. Example, where are the fuel injection lines? I don't see them! Well, that's what we do...I forgot to mention that this is the 50th anniversary (May 1964-May 2014) if my interest in F1 racing and of my being a Ferraristi! So, I chose to do an early season Ferrari 158/64 of John Surtees driven at the 1964 Monaco Grand Prix... Elegant, slim, fast. Ohhhh! I love it! Patrick see Patrick, I always said you could use train parts for race cars! |
|
|
|
Post by mjjracer on Jan 14, 2014 14:14:35 GMT -5
Geez Louise, Patrick! You amaze me. In the time it takes me to glue a kit engine together you can transform a toy that is barely even a car into a masterpiece. Mad skills, brother! I LOVE this particular Ferrari, even given the fact that my hero Jim Clark had that championship locked until the end (was it the last lap?) of the Mexican GP. I think I was so taken as a kid with the NART white & blue in the USGP & Mexico. One day I walked into Don's Hobbies and saw Gene Wallingford, a guy I raced slot cars against, showing the owner the prototypes of the Ferrari & Lotus 33 1/32 Monogram slot cars he designed. He tried to hide them but I horned my way in and about peed my pants. Hey, I was like, 10! I know I built at least one red and one NART Ferrari, along with the Lotus. Lacking your mad skills, I am highly tempted to get the Pinto 1/24 resin of this car. Especially since the occasional Cox model that shows up is at least $150. www.ebay.com/itm/121251125661?ssPageName=STRK:MEWAX:IT&_trksid=p3984.m1438.l2649Patrick, Mr. Ferrari, don't look at what he has for sale unless your credit cards have high limits. :-) MJ |
|
|
|
Post by Patrick on Jan 14, 2014 17:31:41 GMT -5
Really nice and clean his work is. All of them. I might spring for his 375 Ferrari GP car as it is so "brutal-looking".
Patrick
|
|
|
|
Post by harveythedog2 on Jan 15, 2014 12:37:04 GMT -5
Great work Patrick. Who would have thought that engine was once a Cosworth!
I absolutely love the use of the ball point pen too. Many times I have used parts from pens. Especially the silver or gold rings that fit in the middle halve of the pens.
Stu
|
|
|
|
Post by Patrick on Jan 15, 2014 20:24:52 GMT -5
Stu,
Many times I have used the springs and "brass venturi stacks" from the mechanical pencils that students throw away!
Patrick
|
|
|
|
Post by Patrick on Jan 16, 2014 23:13:26 GMT -5
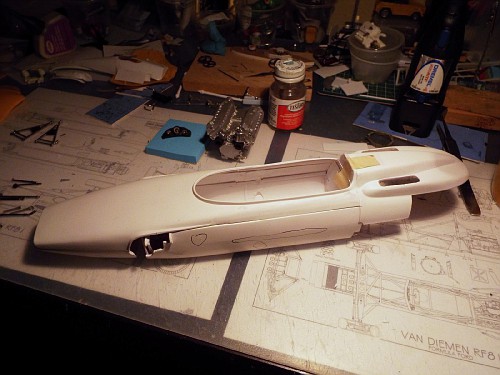
More body work and starting to paint the ancillaries like the shocks, trailing links, uprights, ect, ect, ect. Did the over the leg fuel tanks...not great, but will be ok after everything is added on. Photos tomorrow.
Patrick
|
|
|
|
Post by Patrick on Jan 17, 2014 13:47:49 GMT -5
|
|


 Somebody must be on Christmas break!! Rock on Patrick!!