|
|
Post by sandysixtysfan on Jul 22, 2013 12:15:22 GMT -5
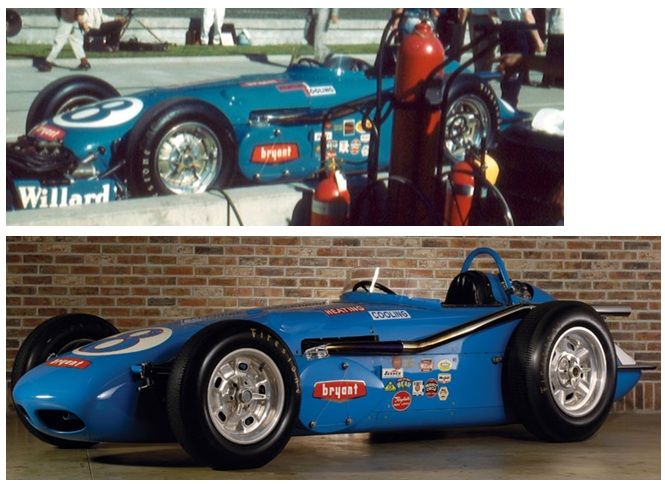
Just a quick color question on this car. There's color photos of it in restored condition and it appears much too dark compared to the race day black and whites. I've only seen one color period shot and it appears to be just a straight light blue. Would this be correct?
Sandy
|
|
|
|
Post by indycals on Jul 22, 2013 14:02:57 GMT -5
It was pretty light. I have one color image and as usual, it's impossible to tell with 100% certainty, but I'd use Tamiya French Blue if I was building one.
|
|
|
|
Post by sandysixtysfan on Jul 23, 2013 6:30:30 GMT -5
It was pretty light. I have one color image and as usual, it's impossible to tell with 100% certainty, but I'd use Tamiya French Blue if I was building one. Michael, thats how I feel about old photos also. Thanks for the color reference, that should look about right. Sandy |
|
|
|
Post by harveythedog2 on Jul 23, 2013 9:35:16 GMT -5
Sandy, It may be the quality of the color photos from back then but here is a picture of the real car (top) and the restored car (bottom). The real car appears to be more of a blue gray color but like I said. Could be the color photo quality of the day. Stu  |
|
|
|
Post by Calvin on Jul 23, 2013 10:56:48 GMT -5
I'd go with Tamiya French Blue as well. Blue is one of those colors that always photographs different - you pretty much have to average out what you see and call it good. Or if you are lucky enough to find a good known blue contingency decal on the car to gauge the shade of blue from....but I dont see any good known blue decals on this car unfortunately.
|
|
|
|
Post by sandysixtysfan on Jul 23, 2013 19:51:37 GMT -5
Sandy, It may be the quality of the color photos from back then but here is a picture of the real car (top) and the restored car (bottom). The real car appears to be more of a blue gray color but like I said. Could be the color photo quality of the day. Stu  Stu, thanks for sending these photos in. The mystery deepens! The color in your 'real car' photo is much, much different than the period shot from the Speedway archives. The difference is amazing. Could be the light, the film... like Calvin said, blue really is a color that is difficult to photograph in its true shade. Sandy |
|
|
|
Post by SWT500 on Jul 24, 2013 7:41:02 GMT -5
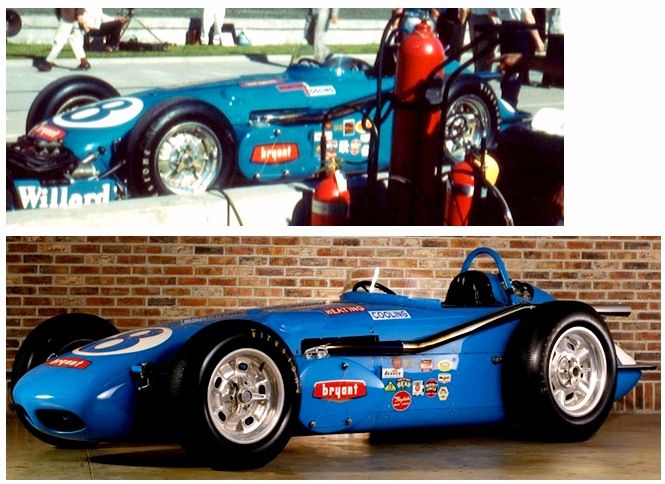
I have two comments in a constructive vein. First, cars were frequently painted in random colors that they or the painter had on the shelf. The marketing machines that sweat every detail, including paint codes, did not exist back then. It was, "Hey, got any light blue?". More often than not, and A.J. Watson confirmed this when I asked, the guys didn't keep track of paint codes. Secondly, where old color photos are concerned, don't look at the car, look at the other things in the picture. If the color balance is off, then the background will show it. Look at the pavement in the older photo. The concrete shows some green in it, as does the pit wall. The fire extinguishers are more orange than bright red. Get the color balance right on this print and that will tell you a better story about the actual car color. Any photo lab or Photoshop expert could look at the old photo and offers suggestions on color correction. Bottom line, my point is don't take an old photo at face value. Lastly, just because someone restored it doesn't mean they used the same color. Like modelers, frequently it is just an approximation. Don't take that at face value either.
|
|
|
|
Post by harveythedog2 on Jul 24, 2013 9:50:50 GMT -5
Looking at the background I agree with Steve. I do see some green in the photo on the concrete and the extinguishers are more an orange than red. I am not a photo expert but I adjusted the photo color anyway. The way I see it, that car is not french blue. I am sticking with a blue/gray or gray/blue however you want to say it. Stu  |
|
|
|
Post by harveythedog2 on Jul 24, 2013 9:55:53 GMT -5
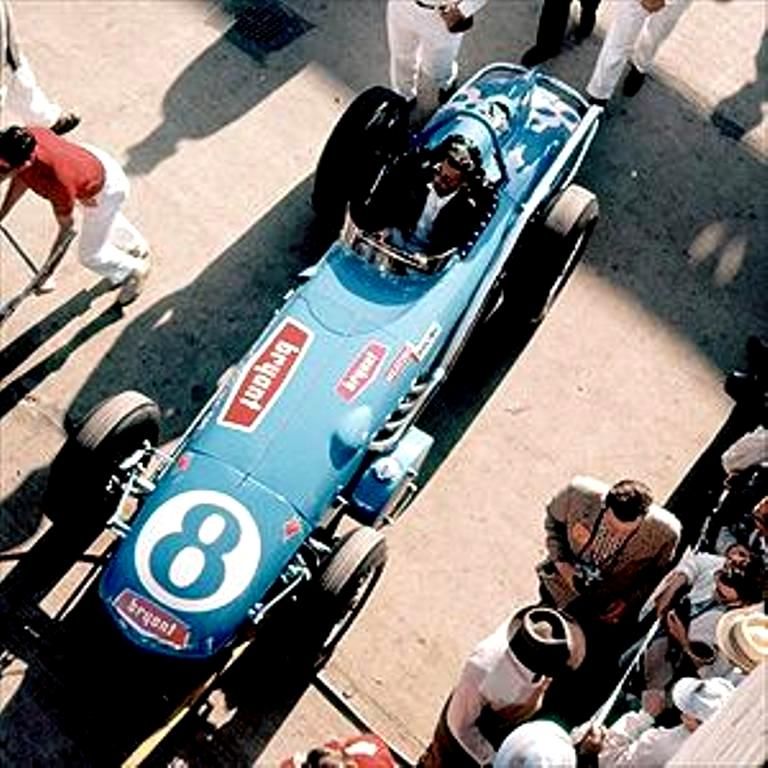
Here is another photo I found some time ago as I plan to do this car in 1/18th scale. Not sure where I got it so hope I am not stepping on any toes. Stu  |
|
|
|
Post by indycals on Jul 24, 2013 12:48:21 GMT -5
I'd still go with Tamiya French Blue - it sorta has that greyed down effect to it - perhaps not quite as much as the real car, but probably as close as you'll find in a rattle can.
|
|
|
|
Post by indy on Jul 24, 2013 14:01:30 GMT -5
Think white primer is best Michael or would using a grey primer shift the color of the blue to a more favorable shade?
Jordan
|
|
|
|
Post by sandysixtysfan on Jul 25, 2013 8:08:10 GMT -5
Hey guys, thanks for all the info and comments. Stu, thanks a ton for the great overhead shot. Michael, this is enough of a excuse to make a hobby shop run today. I'll pick up some Tam French Blue and try it over white and gray base coats and see how it looks. Stay tuned,
Sandy
|
|
|
|
Post by Calvin on Jul 25, 2013 8:17:57 GMT -5
Hey guys, thanks for all the info and comments. Stu, thanks a ton for the great overhead shot. Michael, this is enough of a excuse to make a hobby shop run today. I'll pick up some Tam French Blue and try it over white and gray base coats and see how it looks. Stay tuned, Sandy I'd buy and try light grey primer first before dark normal grey because I can tell you already normal grey will make your blue way too dark. But I'm pretty sure just using white primer is going to be the winning combo. |
|
|
|
Post by sandysixtysfan on Jul 26, 2013 8:05:59 GMT -5
Hi, I got the Tam French Blue yesterday (and a few other things I didn't really need, but couldn't live without). Michael, that paint looks like the ticket. It's on the spectum near the color of Stu's overhead photo, but just little a bit lighter. Factoring in scale effect it should look 'right'. I'll try it over differnt base coats this weekend just to see the different effects. Thanks again guys for all the input!
Sandy
|
|
|
|
Post by harveythedog2 on Jul 26, 2013 14:27:15 GMT -5
I still am not sold on the french blue. I just don't have another altenative for you to try so I hope it works out.
I guess in the scheme of things, you want the paint to match the blue in Michael's decals the best you can. If you do that then the rest will be gravy.
Would love to see you post the car when you are done Sandy.
Stu
|
|
|
|
Post by Calvin on Jul 26, 2013 14:29:59 GMT -5
Would love to see you post the car when you are done Sandy. Yeah! Me too! Its such a beautiful car! |
|
|
|
Post by sandysixtysfan on Jul 27, 2013 7:38:45 GMT -5
Would love to see you post the car when you are done Sandy. Yeah! Me too! Its such a beautiful car! Will do! I'll post some WIP pics also when I get rolling. Stu, I understand your reservations about the Tamiya color, but I think it will look good in the end with the decals on. OK, one more question. The kit is the SMTS 1/43 '59-62 Watson. It's does multiple versions and as such comes with the quick fueling port cast into the left lower rear body. The Bryant car doesn't appear the have this. Is this correct? I just wanted to check before I make one of my classic detail mistakes. Sandy |
|
|
|
Post by oldphotos on Jul 27, 2013 15:43:01 GMT -5
This Watson does not have a fueling port on the lower left of the tail.
Oldphotos
Walt
|
|
|
|
Post by sandysixtysfan on Jul 29, 2013 7:01:14 GMT -5
This Watson does not have a fueling port on the lower left of the tail. Oldphotos Walt Hi Walt, Thanks for confirming this. Project started over the weekend, will get a photo up later today. Sandy |
|
|
|
Post by sandysixtysfan on Aug 4, 2013 8:24:48 GMT -5
I've actually made some progress on this. Been trying to post some photos, read the 'how-to' but I'm still lost. Any tips in easy to understand laymen's wordage for a complete computer dummy?
Sandy
|
|
|
|
Post by clm1545 on Aug 4, 2013 9:22:10 GMT -5
I've actually made some progress on this. Been trying to post some photos, read the 'how-to' but I'm still lost. Any tips in easy to understand laymen's wordage for a complete computer dummy. Sandy What photo hosting site are you using, Sandy? I like imgur, if you shoot me a PM, I will be glad to give you my phone #, and I will walk you thru the process. Take Care Craig |
|
|
|
Post by Calvin on Aug 4, 2013 9:23:51 GMT -5
I've actually made some progress on this. Been trying to post some photos, read the 'how-to' but I'm still lost. Any tips in easy to understand laymen's wordage for a complete computer dummy? Sandy If you are still using Photobucket just copy and paste the IMG code to your post.  When you do paste it on here its should look like this big mess. [URL=http://s689.photobucket.com/user/chaparral2k/media/other/pb_zpsfc84e73d.jpg.html][img style="max-width:100%;"]http://i689.photobucket.com/albums/vv255/chaparral2k/other/pb_zpsfc84e73d.jpg[/IMG][/URL] |
|
|
|
Post by sandysixtysfan on Aug 4, 2013 9:30:39 GMT -5
OK, I might be able to break through the technology sound barrier and survive. I've got to leave in a few minutes and will be back in a few hours...
Thanks guys, Sandy
|
|
|
|
Post by sandysixtysfan on Aug 4, 2013 22:38:00 GMT -5
Well, I thought I'd be back sooner but the day turned into a great beach day with the family so here goes. I think I've got it now... thanks for everyone's help. Cal, we have photobucket but havn't used it from some time. Looks like they've really improved it. Craig, check your PM and thanks for the offer to help. I had posted some pics a long time and a few computers ago and things just didn't seem to be working til you folks jumped in. This SMTS kit uses the same body to build multiple versions (1 kit does '59-'62 cars & another kit does the '63-'64 cars) so I filled the unused holes with plastic rod and epoxy. The rectangle plug on the nose closes up the '64 Foyt car's intake. The drivers cowling is a seperate piece, different for the two kits.  Bondo and 3M Acryl Blue putty,  Round 1 of puttying and primeing with Tamiya primer,  |
|
|
|
Post by clm1545 on Aug 4, 2013 23:00:21 GMT -5
Looks like you have got it now.
Take Care
Craig
|
|
|
|
Post by Calvin on Aug 4, 2013 23:00:21 GMT -5
Awesome, it looks like a very nice kit!
|
|
|
|
Post by sandysixtysfan on Aug 4, 2013 23:16:33 GMT -5
Awesome, it looks like a very nice kit! It's a pretty decent kit, nice suspension and details. I'll get some more pics of the small parts up in a few days. Thx again Cal and Craig! Sandy |
|
|
|
Post by pntmachine on Aug 5, 2013 19:35:30 GMT -5
Looks very nice, can't wait to see this!!
Kevin
|
|
|
|
Post by sandysixtysfan on Aug 6, 2013 16:26:54 GMT -5
It just dawned on me that after everyone's generous help and kind words you guys expect me FINISH this thing! Holy C**p! I'm screwed now. OK, welll, here goes nothing... The small stuff primed and ready for paint,  Most 43's have the company name embossed on the chassis bottom and big old screw holes. I like neither, especially after on a kit years ago I gave the screw one last turn for good luck and it cracked the resin body! A couple dabs of silicone will hold everything together. Thats plastic rod and epoxy filling the holes and the company name,  Round 3 (4?) putty-sand-prime, I thinks its ready...  |
|
|
|
Post by clm1545 on Aug 6, 2013 16:44:47 GMT -5
Looks great, yes you have to finish it, and post photos. Calvin has a cattle prod, and he knows how to use it.
|
|